What's going on in your shop?

Finished this set of six folders. These were ordered to commemorate a wedding as gifts from the groom to his best man, etc.

Desert Ironwood Burl scales. 416 liners and bolsters. AEBL blades and springs.

Quickie cell phone pics on the work bench.
Very nice, John-boy.
 
Finished this set of six folders. These were ordered to commemorate a wedding as gifts from the groom to his best man, etc.

Desert Ironwood Burl scales. 416 liners and bolsters. AEBL blades and springs.

Quickie cell phone pics on the work bench.
Nice! Really nice!
 
Finished this set of six folders. These were ordered to commemorate a wedding as gifts from the groom to his best man, etc.

Desert Ironwood Burl scales. 416 liners and bolsters. AEBL blades and springs.

Quickie cell phone pics on the work bench.
Looks excellent John!
 
I still have to figure out my process a little better but I played around with a cork belt and compound today.
e81f6895-aea7-4bb5-aba6-94d9d4195437-png.74993
1260048D-8246-4697-BD7D-DDA5B3E6BDB1.jpeg
 

Attachments

  • E81F6895-AEA7-4BB5-ABA6-94D9D4195437.png
    E81F6895-AEA7-4BB5-ABA6-94D9D4195437.png
    1.2 MB · Views: 121
Finished this set of six folders. These were ordered to commemorate a wedding as gifts from the groom to his best man, etc.

Desert Ironwood Burl scales. 416 liners and bolsters. AEBL blades and springs.

Quickie cell phone pics on the work bench.

That's a great looking folder John!
Couple questions:
How was the inscription on the scales done?
How did you temper the AEB-L spring?
Thank you.
 
That's a great looking folder John!
Couple questions:
How was the inscription on the scales done?
How did you temper the AEB-L spring?
Thank you.

Thank you!

The engraving was done on my K40 laser engraver. It’s a relatively inexpensive laser machine. You can find them on ebay for about $400.

I temper my AEBL springs at 1000°f for two hours. (the spring and blade get exactly the same heat treat. The only difference between them is the temper.)
 
Finally making progress on the chef knife for my grand-daughter. When hand sanding I've had trouble getting the flats...flat. Finally have it flat at 400 grit. Planning to take it to 600.

I figured out what I was doing wrong. When I started the initial grind I always use the Bubble jig to at least get things started. Though mostly I use it all the time. However I set the angle wrong and only realized it after I was about half through my initial grind. So I had to change the angle of the grind and basically ended up with a convex grind. Which would be OK I suppose, except I ended up with a very thin edge.

I think I have it corrected and started on the scales before finishing the final sanding of the blade. The scales are Desert Ironwood. Getting there.
 
Is that Black Paper Micarta? That looks incredibly clean!
It's black corian. Polishes like glass. Paper and linen micarta always have a texture to them and it bothers my OCD sometimes. I've read on some forums that corian is brittle but I haven't found it to be so. I've dropped it without damage but maybe I've just gotten lucky. As long as it's not abused I think it will be fine. Seems plenty tough to me.

 
Last edited:
Ah, ok! It didn't look like G10 and it didn't look like BPM, either due to the lack of texture. Looks incredible!
 
mixed bag post today.

I am working on finishing the auto knife.
It was stupidly heavy. I used a 3/8" end mill and hollowed out the handles. Huge improvement.

hollow.jpg

I needed to countersink the pivot head I plan on using and didn't have a counterbore to fit.
The pivot hole is already there so it acts like a pilot hole. I never hand hold anything when drilling over 1/4" and most of the time I don't hand hold 1/4" drill. I have learned this the hard way. Anyway, I drilled with a 3/8" drill bit just enough to get a lip to hold an end mill. I then switched to an end mill and plunged the hole to depth. Putting it in the jig and clamping it down helps with chatter. This is a fairly dodgy way to do things but it's quick and works well enough.
plunge end mill.jpg
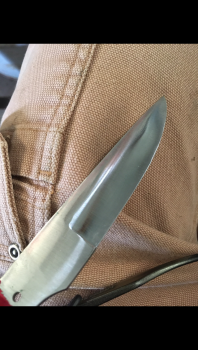
Using a height gauge I scribe the edge down .050". I am shocked I don't have solid blue fingers after using they Dykum.
These height gauges can be picked up for under a $100 and I seem to use it on every folder I do. Make sure it has a carbide point so you can use it to scribe your blade edge before grinding.
height gauge.jpg
Now I need to convex the handles. I drilled and tapped a 1" piece of stock and screwed on a handle.
hand jig.jpg

I can't do it and take a picture so basically I hold it like this to the flat platen and rotate it on the vertical axis.
platen.jpg

and finally today, see the gooseneck light? It's called a sewing machine light. There are several kinds on Amazon. This one has 30 little LED lights, a magnetic base and 12" flexible goose neck. I think it was like $15. These are flat awesome. I have them on two grinders and my drill press here. Highly recommended.
LED light.jpg
 
Back
Top