Morland's KITH WIP

Its encouraging to know how long it takes people who know what they're doing to hand sand. The other day, when it took me an hour to get to 80 on one side I'm thinking what am I doing wrong. Sanding the tight spots is a pain and time consuming, It's good to know that that is just how it gets done. Thanks for the detailed WIP.
 
Its encouraging to know how long it takes people who know what they're doing to hand sand. The other day, when it took me an hour to get to 80 on one side I'm thinking what am I doing wrong. Sanding the tight spots is a pain and time consuming, It's good to know that that is just how it gets done. Thanks for the detailed WIP.

What are you using for a sanding stick. It makes a difference. It does not have to be anything special. I use a piece of 1/4 inch G10 that is 1 inch wide and 5 inches long. It has a piece of hard leather epoxied on the opposite side. Also, are you using anything liquid in the sanding process. I am a big fan of WD40. Some like motor oil, some water, some simple green. Again, it makes a difference. Lastly, crank some 70-80’s rock and roll. Time will slow down and you get more done that way.
 

Attachments

  • A6321265-AA18-4E72-A675-73E77385DECE.jpeg
    A6321265-AA18-4E72-A675-73E77385DECE.jpeg
    918.9 KB · Views: 3
  • D94815AE-6C0B-43E5-B607-D7E2DA5B6D4F.jpeg
    D94815AE-6C0B-43E5-B607-D7E2DA5B6D4F.jpeg
    853.6 KB · Views: 3
I have 3/4 in square blocks about 5 inches long for my handsanding. I cut the paper in 4 (accross the sheet) and when it is tght wrapped round the block I have the four side and always have fresh paper ready. There is zero waste with this stype of sanding block and I can hve the paper at one end with about a 3/32 hanging past the end of the block to get into the plunge and of course I can slide the paper to the other end to double the amount of end paper I can use like this and still have the paper in between to do the rest of the blade. I do mine dry and find that there is almost no difference in the ammount of sanding I can do per piece of paper compared to using a wetting agent. I use the paper as if it is free so always have good fresh paper to use.
 
These are GOLD my friend. I get them only from USAknifemaker.com After I finish grind my blades to 220 I use these to clean up the plunges and any other tight area. Go to their site and search in sanding tools/supply. They are very inexpensive and the belts last. I apologize if it was wrong to use the picture.


red-120grit-sanding-tool_1.jpg
 
I am either compelled to master this task or obsessed. Perhaps possessed. This is my own artwork. No more patterns being borrowed. Better?? No. 7 and No. 8. I think.
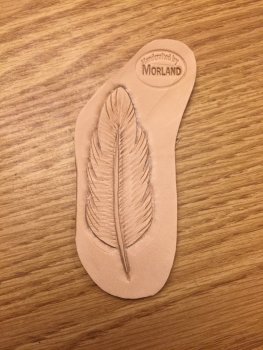
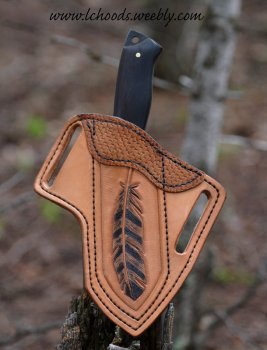
Dennis, Tandy has a bunch of Craft tool stencils for stuff like feathers and general shapes that are very good. The sheath below is my tooling on their stencil. Here's a few things that might help. Feathers are supposed to be delicate....think, lots of light tooling versus small amounts of heavy tooling. Also there is a tool called a "Hair blade" that scribed razor thin lines that give a feather depth. So the steps are as follows. Stencil, cut in hard lines with swivel knife. Detail the quil with a background tool, cut in a few hard "Cuts" going out to the outside edge of the feather. Hair knife to detail in the lines of the feather. Edge and background the outside edges. The pear shaped detailed you used on the inside lines of the feather look too "hard" to me. Adding shading by mixing dye with denatured alcohol gives a nice shading as well.
 

Attachments

  • image.jpeg
    image.jpeg
    133.3 KB · Views: 13
Last edited:
Vombrown - I will check the Tandy sight for a stencil or two. Thank you for that tip. I had found your sheath and was trying to determine how you put the feather together. Thank you for your input. That saved me about a dozen more attempts. I do have a few questions if you do not mind.

Stencil - got it.
Cut in hard lines with swivel knife - got it.
Detail the quill with a background tool - Do you mean a beveler? I'm lost a bit here. Nearly every video I watched says "beveler".
Cut in a few hard "Cuts" going out to the outside edge of the feather - got it.
Hair knife to detail in the lines of the feather - I do not own one, yet. Tandy Leather is about a 4 hour roundtrip for me. I will get one some day.
Edge and background the outside edges - What do you mean by "edge"? Beveler? I will background eventually after I get the feather down a little bit better.
The pear shaped detailer you used on the inside lines of the feather look too "hard" to me. - I used a beveler. Almost every Youtube video that I watched indicated to bevel the entire feather. Quill and outside edge before proceeding to the tooling on the inside of the feather. Is this wrong?

In advance - Thank you.
 
OK, let me start small. A beveler creates a smooth edge on one side of the work and leaves the hard line on the other. It's usually slid along the line into cased leather. A backgrounder is a tool that is angled in towards the work. The face of this tool can be smooth (just like a beveler) or gridded. I call them all backgrounders. The beveler is primarily used to clean up lines after the tooling is done. Not sure on the beveler you are using but it looks large for the work. This isn't surprising as there are only 100 types and styles of beveler and backgrounder....LOL. Don't even get me started on shaders... The little backgrounder tool is struck with a mallet as well. It leaves your cut lines standing proud and recesses the hard edge adjacent to it, just like a beveler would but it doesn't smooth it down, it gives it a little texture. When you look at the feather on my sheath, the only beveling was on the outside. Now that is pretty old picture, I was attempting to get the look of a weather aged Goshawk feather.
 
Back
Top