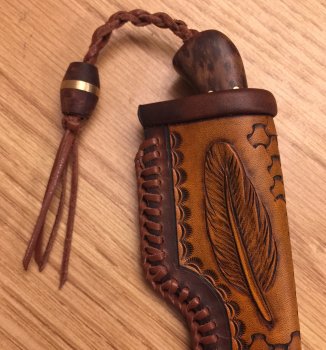
Morland's KITH WIP

What are you using for a sanding stick. It makes a difference. It does not have to be anything special. I use a piece of 1/4 inch G10 that is 1 inch wide and 5 inches long. It has a piece of hard leather epoxied on the opposite side. Also, are you using anything liquid in the sanding process. I am a big fan of WD40. Some like motor oil, some water, some simple green. Again, it makes a difference. Lastly, crank some 70-80’s rock and roll. Time will slow down and you get more done that way.
Dennis
I don't have photos, but I have a piece of bamboo 5" x 1" x1/2" with leather on one side one end is straight cut across with sharp edges and the other is rounded, this gives me the ability to do most areas, I also have I piece of micarta the same but the one end is chamfered down like a wedge so I can get into tight areas as the paper is pulled away from the edge at 45' works well
 
Well done Dennis! it all looks really great. It is the first time that I have seen the stitching done in the fashion that you have done it. Great work!
 
Well done Dennis! it all looks really great. It is the first time that I have seen the stitching done in the fashion that you have done it. Great work!

YouTube “double loop stitch”. It is not that hard once you watch how it is done. But, buying the lacing will make you gasp for air...
 
I am living large. Edge dyed with Fiebing’s - Dark Brown. It will have a tan antiqued center with hopefully a cool feature on the feather. We will see, tomorrow.

I am going to line the sheath and have it roll over the top. I have never built a sheath like that before.

This sheath will have my first carved feather. It will have the first double loop lacing. And, it will have the first rolled over liner.

I’m sure there is a better name for it than “rolled over liner”. Any help? Proper term??

--------------------------------------------------------------------------------------------------------------------------------------------------------------------

Dennis, you were wondering about your terminology and you were pretty close with what you called it. I believe it is what is called a rolled edge!! Check out these two links to the Leatherworker.net. In this first one they are discussing what the name of such an edge is called! http://leatherworker.net/forum/topic/70726-what-is-this-leather-edge-binding-techniqhue-called/

The second link is to a tutorial on how this is done on a wallet. Much thinner leather but same principle!! Sorry just realized I never posted the second link! http://leatherworker.net/forum/topic/9940-kk-tutorial/

What I want to know is how to you dye the edge one color and the field another. Maybe I am just sloppy but ever time I have tired it. I got over the line or the dye ran over the line. What is your secret!
 
Last edited:
What I want to know is how to you dye the edge one color and the field another. Maybe I am just sloppy but ever time I have tired it. I got over the line or the dye ran over the line. What is your secret!

CCraft-Here is the first part of the secret. A $1.69 secret. A brown sharpie. Use a new one. As it dries out-get a new one. In the sheath picture you will see that I cut a groove between the dark brown edge and the tan center. Use a sharpie to color that groove. Then I use a q-tip to dye the edge. The brown sharpie keeps you from having to dye the groove. Just dye up to the groove. Less chance of a mistake.

The second part of the secret is I do not use dye in the center portion. I either use highlighter or antique gel. When it gets applied, I color the entire sheath. Center and edge. It hides the imperfections.

I also dye the rolled edge separately. Again dye it dark brown. Then use the gel/highlighter the same way as the sheath shield.

That’s my secret. Pretty simple.
 

Attachments

  • 482E6E8B-041A-435A-A4F1-A6156E8023BC.jpeg
    482E6E8B-041A-435A-A4F1-A6156E8023BC.jpeg
    657.3 KB · Views: 0
Back
Top