Morland's KITH WIP

Grind the front and top. Make sure you only go about half way down the face. Do not grind the entire face or you will need to start over. Also grind the outside of the bolster. R and L face up. Or you will need to start over. Yep, did that once also.
 

Attachments

  • AD6ECE1E-3CC2-45E9-AF44-96CC1BBE428A.jpeg
    AD6ECE1E-3CC2-45E9-AF44-96CC1BBE428A.jpeg
    538.6 KB · Views: 6
Now I head to the grinder. Small wheel attachment to rough shap the bottom of holster on the finger guard curve.
 

Attachments

  • FA236671-BC6E-43B8-8765-6249BB6793AF.jpeg
    FA236671-BC6E-43B8-8765-6249BB6793AF.jpeg
    718.3 KB · Views: 3
Should look like this after rough shaping the top, front and bottom of the bolsters. I now head back to the grinder to smooth out the top of the bolsters.
 

Attachments

  • 552C2AAD-2A35-423D-94BD-D4B6B44BD573.jpeg
    552C2AAD-2A35-423D-94BD-D4B6B44BD573.jpeg
    633.9 KB · Views: 5
As a tip. Stay away from the bottom edge. Since the bolsters are pretty much fitted to the knife blank you do not want to alter the overall shape of the bolsters or they will not fit very well. That is why I only rough shaped about half way down the face in the previous steps. A nice rounded shape that is uniform to each side is the goal. STAY AWAY FROM THE BOTTOM EDGE!
 
I forgot to mention. Be careful with the dovetailed end. Hit it with the grinder and you will have more work to do. Brass is soft and pretty easy to manipulate. Just it them close and finish them after attachment to the knife blank.
 
We are getting pretty close to attachment. Only a couple of steps left to accomplish. I like to get the bolsters as flat as possible. I have a piece of granite that I use to flatten. A piece of sand paper and rub...
 

Attachments

  • 3B23B5E1-A503-4445-8387-F8CB6AD485CE.jpeg
    3B23B5E1-A503-4445-8387-F8CB6AD485CE.jpeg
    970.4 KB · Views: 4
I like to dimple the inside face of the bolsters to hold the epoxy just a bit better. Here is where makers differ on opinions. Some use epoxy and some don’t use epoxy. I have seen some use solder. I use epoxy just to keep moisture out from between the bolster and the knife blank.
 

Attachments

  • ADF66E52-1DE8-425D-A9D8-35492252FCB2.jpeg
    ADF66E52-1DE8-425D-A9D8-35492252FCB2.jpeg
    748.7 KB · Views: 3
  • C7E62A0B-31CB-407B-809B-6B94244A544C.jpeg
    C7E62A0B-31CB-407B-809B-6B94244A544C.jpeg
    595 KB · Views: 3
I sat down and finished sanded the front of the bolsters. This is very important to do before attachment. Afterwards it is darn near impossible to sand this area. Make sure you have it finished before moving on in this process.
 

Attachments

  • CAF3D4BC-0302-46A4-979E-1357A91639F9.jpeg
    CAF3D4BC-0302-46A4-979E-1357A91639F9.jpeg
    729.3 KB · Views: 8
Just a quick fitting check. Really good fit.
 

Attachments

  • BEBD8765-523F-47E3-AA41-C0885D2023E4.jpeg
    BEBD8765-523F-47E3-AA41-C0885D2023E4.jpeg
    630.8 KB · Views: 4
  • 4CE83F32-C7C7-449A-9EAB-E35EB2D1847B.jpeg
    4CE83F32-C7C7-449A-9EAB-E35EB2D1847B.jpeg
    531.8 KB · Views: 4
I am a little anal about the pins. About 1/8 longer in the hole. Clean. Filed neatly. Sanded. Rounded on each end. Probably a bit overkill. I cannot help myself.
 

Attachments

  • 21C64662-F9A6-401E-B549-78F1D17B4422.jpeg
    21C64662-F9A6-401E-B549-78F1D17B4422.jpeg
    580.9 KB · Views: 3
Final fit check. All looks good. Need to mix up the epoxy.
 

Attachments

  • FFA60D3B-E638-4C20-BDAB-E8F5ED71318E.jpeg
    FFA60D3B-E638-4C20-BDAB-E8F5ED71318E.jpeg
    713.7 KB · Views: 4
  • 99BAF449-EB24-4785-98CA-544E5D51DD80.jpeg
    99BAF449-EB24-4785-98CA-544E5D51DD80.jpeg
    688.9 KB · Views: 5
  • C5A834BD-71BB-46C9-B687-0E77347D30FD.jpeg
    C5A834BD-71BB-46C9-B687-0E77347D30FD.jpeg
    598.9 KB · Views: 5
  • F96902A8-FD52-4993-932D-A77252C18F73.jpeg
    F96902A8-FD52-4993-932D-A77252C18F73.jpeg
    596.7 KB · Views: 5
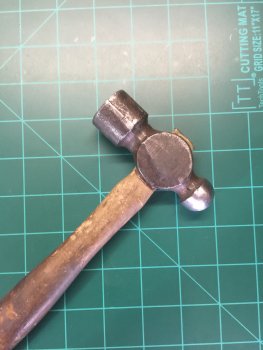
Does everyone know what this tool is called? It is a ball pien Hammer. A very special one. It sat on my grandfather’s work bench. When he died it sat on my father’s work bench. When he died it sits on my work bench. I smile every time I get to use it. Kinda nuts for a $2.00 Hammer that you can buy at any estate sale or auction. If I ever lost it I would cry. Don’t come into my shop and mess with this Hammer. My kids are afraid to touch it. Someday, one of them will be the possessor of this fine tool. Hopefully.

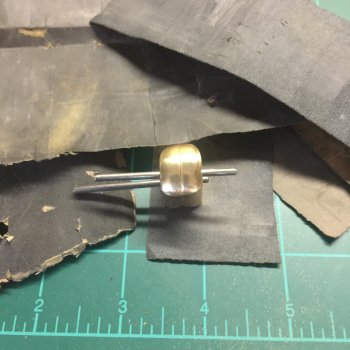
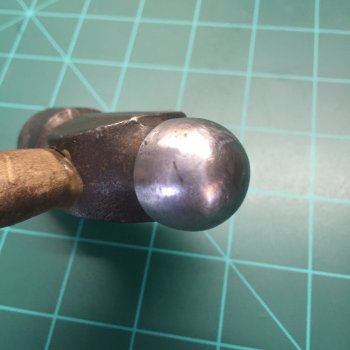
The second picture shows the the ball is polished. Do this to your Hammer so you don’t muddy up the pins during piening.
 

Attachments

  • D3D6ED8E-78DA-4941-9301-D02790F714A2.jpeg
    D3D6ED8E-78DA-4941-9301-D02790F714A2.jpeg
    960.3 KB · Views: 4
  • 73FAC2E9-0723-49C9-84B6-C8DBE94FB673.jpeg
    73FAC2E9-0723-49C9-84B6-C8DBE94FB673.jpeg
    605.2 KB · Views: 4
Back
Top