Heikki
KNIFE MAKER
I have ten of them in the compost heap at the moment to get all the tissue off.
Do you stabilize or dye yours? I should have enough to experiment a bit with and was thinking of trying a few different approaches.
I have ten of them in the compost heap at the moment to get all the tissue off.


I've made a couple with giraffe bone. It polishes very nicely.
I bought those as scales and I don't have any experience dyeing or stabilizing them myself. Would like to learn more about the process though.Nice pieces Randy. I'd love to be able to get that look from mine. I know Von Gruff said he would stabilize his but didn't dye them, preferring the natural look. I had also read you could soak bone in boiled linseed oil and mineral spirits. If anyone has additional input, I'm all ears.
Do you stabilize or dye yours? I should have enough to experiment a bit with and was thinking of trying a few different approaches.


Bone can be stabilized and will benefit from it. Bone moves, shrinks, warps just like ivory. Just not as bad.
Keep it dry. Don't dunk in water to cool. Don't get it hot when grinding. It should not get hotter than you can touch your lips to it. A lot like giving it a big kiss.
When stabilizing, leave it oversized as it will warp a bit from the process and you will need to flatten it again.
It will also take leather dye very well but only surface deep generally. It will be blotchy in appearance as a one color dye job so consider making it multi-colored that looks like ancient mammoth. I use a q tip with leather dye and just dab a bit here and there letting it run out and/or overlap for a variegated appearance.
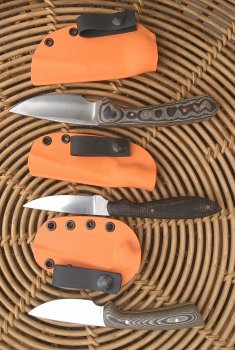
Here are a couple I did some time ago. The surface had tiny spider cracks and I left those in to allow the dye to run a bit. I sealed the surface with polyurethane wood finish.
The idea is to do a bit of both. I have not worked with it before, so I am learning as I go along.Do you stabilize or dye yours? I should have enough to experiment a bit with and was thinking of trying a few different approaches.
")


Everyone knew that the boss liked his handle material however they were a little concerned when they walked in on him making out with his Camel bone.Keep it dry. Don't dunk in water to cool. Don't get it hot when grinding. It should not get hotter than you can touch your lips to it. A lot like giving it a big kiss.
Everyone knew that the boss liked his handle material however they were a little concerned when they walked in on him making out with his Camel bone.
Great looking space. The bars on the Windows look kinda oppressive though!Working on setting up a "shop". Still have a bit to go but hopefully in the next few weeks I can finish up and start ruining steel as I learn to grind. View attachment 75316


Ugh, titanium is no fun! I used some for handle scales one time, just once! Sparks from grinding it kept popping off at me and the dust set the work bench on fire a few times. I would not want to forge that stuff or clean up the scale!

Looks like you have enough ricasso that you could still fix it. The hardest thing to do is when you are having trouble is to walk away from it for awhile. I’m guilty of it too. Some days at the grinder I know right away I need to go do something else.Messed up another one tonight. Started chasing around a minuscule issue on a plunge and ended up over grinding pushing it way off center. This is like the fifth knife I’ve messed up in a row Haven’t all been the plunge issue but still irritating. Stuck in a rut.
View attachment 75325

I'm in agreement with Randy. That looks fixable to me. Take another look at it tomorrowLooks like you have enough ricasso that you could still fix it. The hardest thing to do is when you are having trouble is to walk away from it for awhile. I’m guilty of it too. Some days at the grinder I know right away I need to go do something else.