What's going on in your shop?

very cool. I bet you are stupid excited.
The shop is looking great.

I have been getting ready to make my first framelock. I have been ordering equipment and I built a new shop. It is just single garage bay but it should do the trick. Much better than the 2 tables I had before. I am also restoring an old surface grinder and setting up a new mill. For me this project has been a long time in the making and im almost ready. The design is not final but its close.
 
a mad scientist's work is never done.

I've been working up a fixture to cut inlays. This is the rough mock up and the fixture will need plenty of tweaks. A lot of slippy guys use something like this for shield inlays. This one is scaled up for larger inlays and to hopefully cut the plugs for the inlay pocket.

The top plate is the pattern. The cutter is lowered and the plain shank that is the same diameter of the cutter runs against the pattern outline. The two orange pieces are just spacers to get the pattern plate off the test piece g10 I am milling. The whole assembly is fairly hefty but slides around easy enough. It needs to be heavy so the cutter doesn't kick it all over the place and minimize chatter. The process is to lower the cutter into the material and then hand push the whole assembly around the pattern milling your pattern into the stock. Any stock left in the middle of the inlay pocket is milled out using a larger mill keeping the cutting edge away from the pattern. It's awesomely dangerous. Here I am using a worn our dremel cutter to test this out. It works decent enough. Now I will cast a positive from the pattern using Cerosafe and figure out how to hold the positive pattern and then cut the plug.

69224692256922669227
 

Attachments

  • IMG_5087.jpg
    IMG_5087.jpg
    50.3 KB · Views: 0
This whole exercise is just something I have wanted to try for a very long time and so I am trying it. I saw this technique used by Ron Lake 20 some years ago and never got around to it. Now I am. Better late than never.

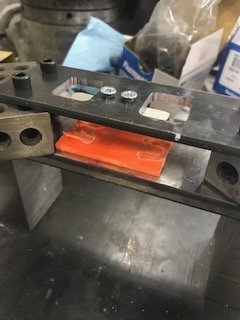
This is a shot of the positive pattern and resulting end product. The g10 went in with a little hammer persuasion. There is a visible gap but I think that is me and not the process.
69239

Here is what I ended up with. I will use the partial cut out as a grind to line. There is going to have to be some manual fitting. I can't see any way around that right now.
69240

The positive pattern and g10 slug or insert material. The g10 is super glued to the support plate.
69241

This is how it goes on the mill. you lower the spindle down and move the entire thing around the positive pattern. The cutter shank smooth part is used to rub against the pattern.
69243

Top view.
69244

Side view.
69245
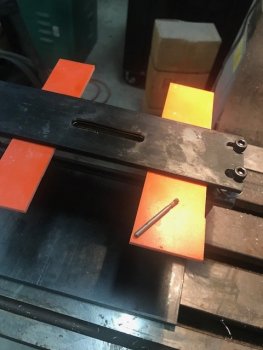
The Cerosafe positive. This was stupidly easy to cast. I set the negative pattern on top of a plate of steel and using a torch melted part of the cerosafe into the cavity. It popped right out with a hammer and punch.
69246


Will this process work? Maybe. I still have to dial in a few things and do a couple more practice runs. I'm pretty confident about making the negative cavity. I'm less positive about the positive (hah!) pattern process. We'll see.
Before anyone suggests CNC. I have a full size CNC mill and could do this process with it until electricity runs out. That isn't the point. This is just one of those things on a list I made long ago and I want it to work or it's off the list.
 

Attachments

  • IMG_5107.jpg
    IMG_5107.jpg
    17.7 KB · Views: 0
Back
Top