You are using an out of date browser. It may not display this or other websites correctly.
You should upgrade or use an alternative browser.
You should upgrade or use an alternative browser.
New Commission Knife in the Works
- Thread starter CDHumiston
- Start date
Edwardshandmadeknives
Well-Known Member
Bob Dozier has a video on YouTube where he solders a bolt onto a hidden tang knife. It looks like he cut a slot in the bolt that fit over the tang. Either way should work fine.
CDHumiston
Well-Known Member
Been doing a lot of work on this project when time permits. I got the guard soldered on, the handle drilled out, the threaded rod soldered in, and a piece of nickel silver drilled and tapped for the pommel.
I need to get everything roughed out and fit up perfectly before I glue the handle on and tighten down the pommel.


I need to get everything roughed out and fit up perfectly before I glue the handle on and tighten down the pommel.
CDHumiston
Well-Known Member
Progress yesterday and today. I epoxied the handle on and shaped it. I'm going to take the top of the guard down some more and I have to add another piece to the pommel.


CDHumiston
Well-Known Member
This one is closing in on being a knife.
I'd like some opinions from the good folks on here.
Should I leave the pommel as is or grind off that second piece I added on as well as the white spacers and just round the single piece up?
I'm not sure I like it...


I'd like some opinions from the good folks on here.
Should I leave the pommel as is or grind off that second piece I added on as well as the white spacers and just round the single piece up?
I'm not sure I like it...
CDHumiston
Well-Known Member
To my eye, removing the extra parts will leave you with a cleaner & more symmetrical look.
I agree. It's the first pommel and guard I've attempted!
Bühlmann
Well-Known Member
I have three hidden tang blades on my bench & I’m terrified to move forward on them!I agree. It's the first pommel and guard I've attempted!
Edwardshandmadeknives
Well-Known Member
Grind it off.
CDHumiston
Well-Known Member
Okay...the offending piece is gone. Now for some hand shaping and sanding...


CDHumiston
Well-Known Member
Looks much better.
Thanks! I agree completely!
chrisstaniar
Well-Known Member
I'm interested to see the soldering on the fronts of the guard. A challenge I had was getting the solder to blend well enough between the guard and the blade. It's a tough spot to sand.
It definitely looks better without the bump on the pommel.
It definitely looks better without the bump on the pommel.
Edwardshandmadeknives
Well-Known Member
Cleanup is a real pain on soldered guards. Did you try a resist on the blade before you soldered it? I use regular graphite pencil and just draw around the guard and maybe a 1/4 inch or so onto the blade and that helps a lot. Mild steel chisels afterwards to clean it off so I don’t scratch the blade.I'm interested to see the soldering on the fronts of the guard. A challenge I had was getting the solder to blend well enough between the guard and the blade. It's a tough spot to sand.
It definitely looks better without the bump on the pommel.
chrisstaniar
Well-Known Member
Cleanup is a real pain on soldered guards. Did you try a resist on the blade before you soldered it? I use regular graphite pencil and just draw around the guard and maybe a 1/4 inch or so onto the blade and that helps a lot. Mild steel chisels afterwards to clean it off so I don’t scratch the blade.
I believe the issue I was having was that the edges of the solder kept peeling away so after I sanded there would be a small void. I'm gonna change the process and use shoulders rather than soldering to avoid the guard gaps and sanding. Just like Bühlmann above, I have several hidden tangs on the bench waiting for me. Wanna get as much info to avoid messing up.
CDHumiston
Well-Known Member
I'm interested to see the soldering on the fronts of the guard. A challenge I had was getting the solder to blend well enough between the guard and the blade. It's a tough spot to sand.
It definitely looks better without the bump on the pommel.
I'll post some pictures after I get it completely cleaned up.
Edwardshandmadeknives
Well-Known Member
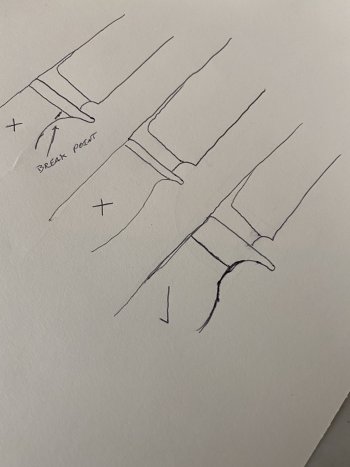
One thing I see a LOT of people do when they fit handles up is illustrated in this drawing. If people have a radius leading into the guard, many times the handle material has a radius “feathering out” onto the guard material. That’s the top two drawings. I have noticed that the handle material tends to chip off where I have “break point” labeled on my drawing. The handle material tapers to nothing, so even if it is epoxied together, it damages, wears, and breaks easily. I make mine now like the lower illustration. The handle material stays perpendicular to the metal guard, and is much less likely to break. I think it looks nicer too.
Attachments
CDHumiston
Well-Known Member
One thing I see a LOT of people do when they fit handles up is illustrated in this drawing. If people have a radius leading into the guard, many times the handle material has a radius “feathering out” onto the guard material. That’s the top two drawings. I have noticed that the handle material tends to chip off where I have “break point” labeled on my drawing. The handle material tapers to nothing, so even if it is epoxied together, it damages, wears, and breaks easily. I make mine now like the lower illustration. The handle material stays perpendicular to the metal guard, and is much less likely to break. I think it looks nicer too.
Very nice example for my future guard projects. This is my first.
Edwardshandmadeknives
Well-Known Member
I know you mentioned it was your first. Not saying it’s bad or anything, just thought I would share my experiences with them.Very nice example for my future guard projects. This is my first.