What's going on in your shop?

Done finally.


The sear pin is small. It only needs to retract .050" or so. It has a small ramp on the bottom to help push the main spring up and over the sear. The top of the sear is filed flat to help hold the main spring.
View attachment 74580View attachment 74582


The switch spring needed a little curly lift to get out of the way of the scale.
View attachment 74581

I had to add a 3/32" pin to the back bar to pin it to the liners so it didn't flex up.
View attachment 74583

What it looks like inside.
View attachment 74584

Always use a push stick when using the band saw. If you don't, keep super glue handy.
View attachment 74585

Now it's time to move to coil fired autos for awhile.
You did good Tracy. At the minimum it gives us wannabees an inkling as to what we are up against, should we endeavour to emulate you...:cool:
 
Let's make an auto!

Here are my parts:
IMG_2112.jpg

Well there will be more parts than this but these are the money parts.

I don't know where I got these parts. I have had some in a drawer untouched for maybe 15 years. I *think* these may be from my buddy Scott Reed of Reed's Custom Cowboy Knives. We have visited many times over several years about knives and knife making. He is a good guy and makes a great auto. Stop by and tell him hello and buy an auto: https://www.facebook.com/CowboySwitchblade/ I told him I was going to move over to making auto's and he sent me some spare parts to play with.

Since I don't sell auto parts, I thought I better get some made.
Here is a drawing of what I am having my crack machinist make for us. This one has a "grip" for a 5/32" blade thickness. I'll also have a version like this for a 1/8" thick blade. We should have them in a few weeks. I'll need to locate a spring maker and get some coil and compression springs made also. It's on the to-do list.
IMG_2119.jpg
These are 7 degree buttons. Most are 5 degree or 7. I went with 7. More on that later.


I've never made an auto before so I will need some help. I grabbed one of my Protech(TM) autos. I love them. I must have at least a half dozen. I used to be a dealer for them and had to stop when Paypal got snippity about it.They are great knives and I recommend them to anyone that asks about getting a production auto.

Anyway here is a Protech opened up as a pattern. I don't recall which model it is. There is nothing secret about this design. It's been done by hundreds of knife manufactures. I don't particularly care for this exact style that has the big notch around the pivot but it's common and there is more than enough meat left to be strong enough. The big notch is for a center of handle button. If the button was at the 1 o'clock position to the pivot, the blade wouldn't need the big notch. It would have two arc cut outs at 1 and 7 o'clock in the blade.
IMG_2109.jpg

The ethics of copying an existing production or custom knife comment: I am making a couple just for me to learn this style and then I'll make my own pattern to work with. I just wanted the first one to be a little less trial and error and a little more making. The protech has milled, integeral space bars, mine will have a separate space bar. Basically I just wanted the hole placement for the button, the pivot and the blade notches where the button lines up. The handle and blade can be any shape really.

I am making a drill pattern for the blade and the frame. Using a locating punch, I can mark where the holes go. Protech uses 2-56 screws so drilling through the frame into my pattern piece with a #48 transfers the holes easily.
IMG_2117.jpg

Locating punches are sometimes handy. They come in sets with different diameters. Put the punch through the hole you are locating and give it a tap. The material you are transferring the holes from needs to be thick enough of they don't work.

Below you can see the hole location transferred to my template material.
IMG_2118.jpg


Protech uses a blind hole for the 1/8" stop pin. I needed a way to transfer that hole to my pattern. I took a 1/8" dowel pin, chucked it into a drill and ground a point on it.
IMG_2113.jpgIMG_2115.jpg

Stacking my pattern material and the protech frame with the little pointed 1/8" dowel helps me locate the stop pin hole with a little tap on the frame. Note I am using a pivot and #48 drill indexed to the protech frame to keep things lined up.
IMG_2116.jpg

The holes are all drilled into my templates. I will profile them and give them a heat treat. I used 1/8" AEBL for the template material since it was the cheapest 1/8" thick material I could find in the end cuts pile.
 
My granddaughter got married last week. So the chef knife that I was going to give to my daughter will now be going to my grand-daughter and her new husband. A bit late. But when I asked her mother she said go ahead and get it finished up.

So this chef knife is on the fast track. I'm planning on a nice presentation box for it and a matching fork. Due to time constraints the fork will be from USAKnifemaker. But I will be matching the handles. Down to hand sanding now.
 
They say a bad day fishing is better than a good day at work.

This is a philosophical post.
I need healing. Or a beer.

It has been years and years since I have thrown a stubborn knife project across the room in anger.
I am ashamed to say I did it this morning. I instantly felt foolish and hoped no one else saw it. I did notice no one came around me after that.
I had to crawl and look under the bench to find my parts. I still haven't found my hand file.

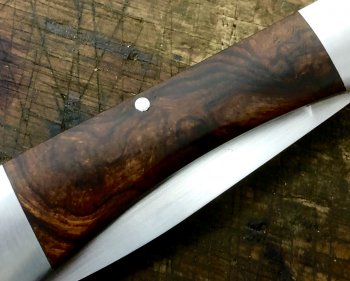
I am milling out the underside of a scale to fit the guts in.
I couldn't get it under a 1/8" scale and that was my goal.
Below is where I have it milled out and it didn't fit.

View attachment 74559

Here is where I was using a hand file to just widen the opening to make it fit and broke it clean in half.

View attachment 74560

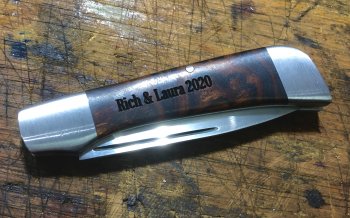
I scaled up (bad pun) the size to 3/16" thickness and I can now make it all work but the fit for the switch opening is absolutely hideous.
I will make sure this all works and then use this (hideous) scale to make a new scale that doesn't look like a 10 year old did it.
I can see several issues now with my switch design and spring design I was so proud of yesterday before I started to cover it up with a scale. I hope I can work around them.

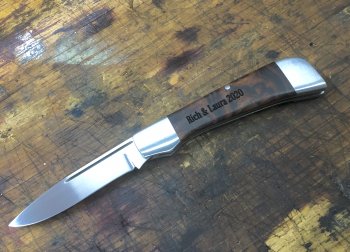
It works but it isn't great. I didn't profile this scale as I changed my order of work flow to concentrate on fitting the switch and milling out the pockets needed.
All day: Mill some, check it, doesn't fit, mill some more, check it, doesn't fit, repeat for 4 hours.

I finally got it all together and working.
As it is now, I could clean this up and call it done but I would hate it more than I do already.

View attachment 74561

I am going to have a beer and maybe go fishing.
I gotta learn how to do this!!
 
Making some progress on the auto knife.

This button has a little lip on it so I needed to counter bore the hole for it.
It was really a quick and dirty way.
I enlarged the hole with a 3/8" drill and then used a 3/8" end mill to take it further and give me a flat bottom for the lip.
This holds the button in the handle although many auto's don't use a flange to hold the button it. The blade does that.

IMG_2187.jpg

I used the mill and turntable to mill out the arc in the blade. This could have been done with a hand file also.
The blade pivots free enough to full open and closed now.
IMG_2188.jpg

No space bar, just the pivot screw is holding this together. Also I haven't milled for the coil yet but the button works in the open position and I have to file a bit for it to hold in the closed position. Just after this I took it apart and the button spring sprung and now is somewhere in the shop.
I swept a bit and found several other parts I had lost but no spring. I have a couple more but dang.

I have learned that if I don't label frames like this "front out" with in/out and front/back I will nearly always drill or countersink the wrong side. The same thing for scales.

It opens and locks open but it does rock a bit. I need to mill the button pocket a bit deeper to allow the button to more fully engage the blade. Hopefully there is enough room for this, if not it is a deal breaker and I have to start over.
IMG_2191.jpg

I can already see several things I need to change to my pattern. Mostly the button hole location needs to be .030" closer to the pivot. This means my "arc notch" in the blade will also need to move. The protech uses a milled in the frame washer much like some of the slippy guys do. I am using regular washers just to skip this step. I really didn't expect this first one to work and would have to start over but I am growing mildly optimistic in might.
 
New folder pattern. Liner Lock, very slim. I had one of my "good" days today, so got them to the point of ready to set the locks....but thought I'd better do that in the morning when I'm rested. These both have 80CRV2 blades, and will have a tumbled finish and clear gun kote. Hope to have these available within a week or two. Waiting on come carbide tooling, so I can flute the scales.

 
SCORE!!!!!

I just scored an old Delta model 28-203 14" Band saw from an ol' retiring woodworker. It is in primo shape!!! I am very excited to be able to use something other than my mitre saw and angle grinder to profile 'stuff'!! NOW I am doin' a JIG!!!! :D:D
 
Seeing as how the fires are reportedly making our air quality the worst on the planet, and the recommendation is to wear a respirator, I thought I may as well do something that requires my respirator. Here's what 40+ feet of 15N20 bandsaw looks like when cut into 1 1/4 x 6 pieces. Looks like I have enough for about 46 billets.
20200915_114503.jpg
 
I managed to stay focused and get a bit done on the auto knife build.

The button has a 7 degree ramp on the inside and you use a 7 degree end mill to match that on the blade. I visited with Phil Booth last week. He is the godfather of auto's. Super nice guy and very helpful. We talked about this. He is good enough to hand file this little ramp in the blade. I am not so I used an end mill.

IMG_2209.jpg

The button needs to go down far enough that the blade will clear and open. There is a little compression spring under the button. It will fly out at the worst time and you have a heck of a time finding it. I am on my second spring since the first one took a walk.
IMG_2212.jpg

Here the button is pushed up against the blade on the 7 degree surfaces. This is all that is needed. It sticks out maybe .050" to .070" to hold it open and closed.
IMG_2210.jpg

I spent most of the day making a new blade. I didn't like how the last one wiggled a bit and it was just ugly. I paid better attention to where the blade should be milled to match the button and had some success. It now is tight and wiggle free in both open and closed position. Getting the open position milled is fairly easy. Getting the closed position milled where it needs to be is hard since you can't see where it is hitting. I tried sharpie and dykem to get rub marks to see where it was binding and neither worked well. I need to find something that will show rub spots better. If you have any ideas, I am all ears.
IMG_2216.jpg
I also made a new back space bar to run the length of the folder. A little off the bar and a little off the bottom of the blade and it all fits.
I have not ground the profile yet so it looks pretty rough here. I'll clean all that up on a small wheel and get it all flush and pretty.
IMG_2217.jpg

At this point it gets easier -- I hope. The guts are done. Now I need to surface grind and then bevel grind the blade and get that into heat treat. I used CPM20CV which is basically the same as M390 so it should hold an edge forever. The back space bar is close to but not the exact thickness it needs to be. Once I get the blade done, I can then surface grind the space bar to size.

I will mill out the inside of the frames as much as I can to get the weight down. I'm not sure what I will do yet on the outside for appearance. I have some ideas but need to get it further along first.
It's Miller time...
 
I managed to stay focused and get a bit done on the auto knife build.

The button has a 7 degree ramp on the inside and you use a 7 degree end mill to match that on the blade. I visited with Phil Booth last week. He is the godfather of auto's. Super nice guy and very helpful. We talked about this. He is good enough to hand file this little ramp in the blade. I am not so I used an end mill.

View attachment 74955

The button needs to go down far enough that the blade will clear and open. There is a little compression spring under the button. It will fly out at the worst time and you have a heck of a time finding it. I am on my second spring since the first one took a walk.
View attachment 74956

Here the button is pushed up against the blade on the 7 degree surfaces. This is all that is needed. It sticks out maybe .050" to .070" to hold it open and closed.
View attachment 74957

I spent most of the day making a new blade. I didn't like how the last one wiggled a bit and it was just ugly. I paid better attention to where the blade should be milled to match the button and had some success. It now is tight and wiggle free in both open and closed position. Getting the open position milled is fairly easy. Getting the closed position milled where it needs to be is hard since you can't see where it is hitting. I tried sharpie and dykem to get rub marks to see where it was binding and neither worked well. I need to find something that will show rub spots better. If you have any ideas, I am all ears.
View attachment 74958
I also made a new back space bar to run the length of the folder. A little off the bar and a little off the bottom of the blade and it all fits.
I have not ground the profile yet so it looks pretty rough here. I'll clean all that up on a small wheel and get it all flush and pretty.
View attachment 74959

At this point it gets easier -- I hope. The guts are done. Now I need to surface grind and then bevel grind the blade and get that into heat treat. I used CPM20CV which is basically the same as M390 so it should hold an edge forever. The back space bar is close to but not the exact thickness it needs to be. Once I get the blade done, I can then surface grind the space bar to size.

I will mill out the inside of the frames as much as I can to get the weight down. I'm not sure what I will do yet on the outside for appearance. I have some ideas but need to get it further along first.
It's Miller time...
Try some of that gear set up paste used for showing the contact patch on a ring and pinion.
 
Finished this set of six folders. These were ordered to commemorate a wedding as gifts from the groom to his best man, etc.

Desert Ironwood Burl scales. 416 liners and bolsters. AEBL blades and springs.

Quickie cell phone pics on the work bench.
 

Attachments

  • 386444EB-457A-42A5-8AEC-0073E0566D48.jpeg
    386444EB-457A-42A5-8AEC-0073E0566D48.jpeg
    1.6 MB · Views: 18
  • 9C758DBB-2FF6-4FD3-8B76-CC9C7F2AA527.jpeg
    9C758DBB-2FF6-4FD3-8B76-CC9C7F2AA527.jpeg
    828 KB · Views: 18
  • 1C933713-E25E-4C4E-99E5-102B7B793B8E.jpeg
    1C933713-E25E-4C4E-99E5-102B7B793B8E.jpeg
    1.4 MB · Views: 16
Back
Top