Sheathmaking: tips and tricks and getting started

Heres a tip if you have a "limp" or too soft leather problem. One of the finishing steps I take just before sealing the leather is to dampen (not drench) and then put the sheath in a food dehydrator to dry it. The leather comes out fairly hard which is something I like personally.

I use a product I concocted that I call SheathCoat (tm) to harden the sheath. It is a hot dip application and is a combination of waxes and oils. The end product is a sheath that keeps out water and forms a hard sheath around the contours of the knife. Look at my site if you have interest in this process
.......... Pete pjkozy.com
 
Stiffening leather sheaths

I find that by dyeing the inside of the sheath as well as the outside, and then sealing inside and out, that the sheath has adequate stiffness. A sheath that is too hard, such as a pouch style, will lose a great amount of retention friction. I always use Feibings Professional Oil Dyes and steer clear of the so called Eco and water based dyes.
 
Last edited:
I like the idea of using a food dehydrator to heat the leather and in doing so will harden the sheath . DONT DO THIS ,I took a sheath put it in the oven at 300 for 6 min and shrunk it up from 7 inches long to 5 inches long LMAO . Here are some things I do that have improved my stitching and durabilaty. I use 35 lb waxed polyester thread. I pull it tight when the leather is damp and I can pull so tight it looks as if I used a grooving tool . I also only use a saddle stitch its the best stitch known for hand stitching used by more makers than any other stitch.
 
I use a bras burnishing rod in my drill press run it slow make sure the end of the rod sticks through the bottom of the table. Also use a finish nail and my drill press to make my holes. You can find good tools for sale on Ebay.
I do have a question about tooling what type of a surface works best for good tooling.
 
I MAKE CUSTOM BOW STRINGS SO I USE THAT FOR MY STITCHINGS ON MY SHEATHS HAS 142# TENCIL STRENGTH AND COMES PREWAXED ANYONE ELSE TRY THIS WORKS WELL COMES IN 1/4 OR 1 LB SPOOLS
 
vacuum packer

I use a foodsaver vacuum packer for wet forming & casing. It makes a very even case quickley, & prevents mold growth. When wet forming on only one side I put the leather on a wood bord then vac-it. This keeps the edges flat & strght and the wood suck's the water out giving you a almost dry piece of formed leather. You can also give lether a wood texture (or other) this way.
 
I use a bras burnishing rod in my drill press run it slow make sure the end of the rod sticks through the bottom of the table. Also use a finish nail and my drill press to make my holes. You can find good tools for sale on Ebay.
I do have a question about tooling what type of a surface works best for good tooling.

I prefer 2 inch MINIMUM thick marble slab. 3"....even better. 4" even better than that. Polished or at least VERY smooth. 12"X18" is a good size.

Paul
 
Paul, I am a big fan of your work. I hope you don't have to move that 4" marble slab too many times so that you can keep on working.
 
I have one of the 4 prong chisels to get my holes, and I also have a 1/8" flat head screw driver to help around curves.

One thing that has helped me a TON is to use my wood band saw to cut the leather pieces (already cemented) to the right shape. I have cut 3 pieces cemented together as if it were 1/4" wood.
 
I prefer 2 inch MINIMUM thick marble slab. 3"....even better. 4" even better than that. Polished or at least VERY smooth. 12"X18" is a good size.

Paul

After reading in Wayne Goddard's book regarding his granite primitive style anvil, I contacted a local cemetery (as he did) and discovered there were 2 polished granite tombstones that they had misspelled, and which were free for the taking. Apparently they make a great surface for leatherwork.
(I'll wait until I move and find another one once I'm settled)
 
Hey Mike, I have tried all the punches Tandy sells and even made my own, lately I've been using the drill press, but i haven't ever gotten straight lines on the back. I am going to go find my ice pick. thanks Roy
 
If you do just a paper pattern for the sheath, one way to get straight back lines, is to space your holes in the folded pattern. Unfold your pattern and lay it on the cut out sheath and mark your holes. When you have the holes marked , glue your welt only to one side of the sheath, drill your hole pattern all the way around the sheath. you should be able to use pins etc to lineup the holes and finish gluing the sheath together. Lined up holes that are drilled from the outside to the inside. Before I got a stitcher, I used a drywall nail to drill the holes. It as it spun would burnish the hole as it went through. Rerun you stitching spacer wheel over the holes to help depress the leather down into the holes and sew.
 
O.K., some tips of my own:
I use a small hardwood dowel chucked into my small bench drill press to burnish. I think I will try the brass rod and see how that works, or maybe a piece of SS. The nice thing about the dowel is that I can cut grooves in it to match the profile of whatever I am burnishing.
For finish burnishing on the edge of sheaths I use Yankee wax in black or brown. Comes in a unusual triangular stick and imported from Germany. Better than gum imho.
For dyeing leather do not use the applicators. Use a piece of cheap sponge. Use rubbing alcohol to soak the leather then apply Fiebrings....it will penetrate better. For big pieces use a spray bottle from the garden supply shop.
For good black finish use Fiebrings USMC black dye.
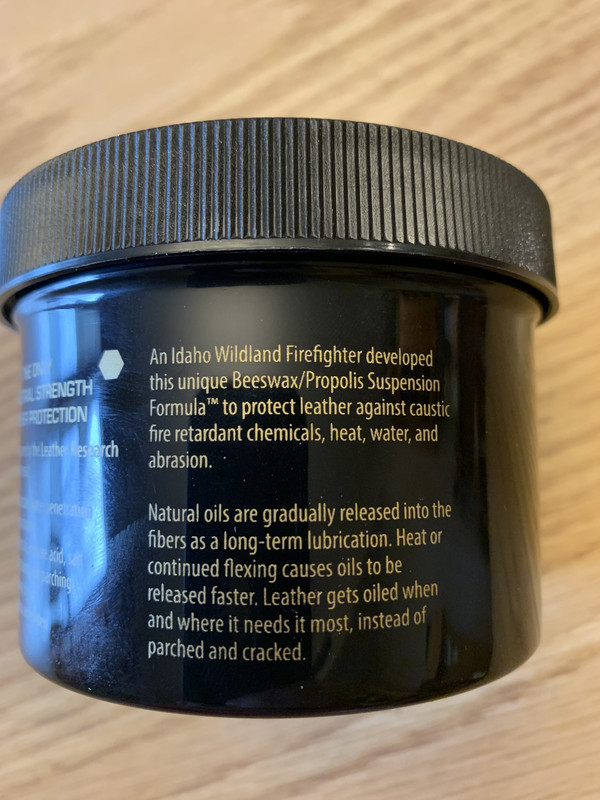
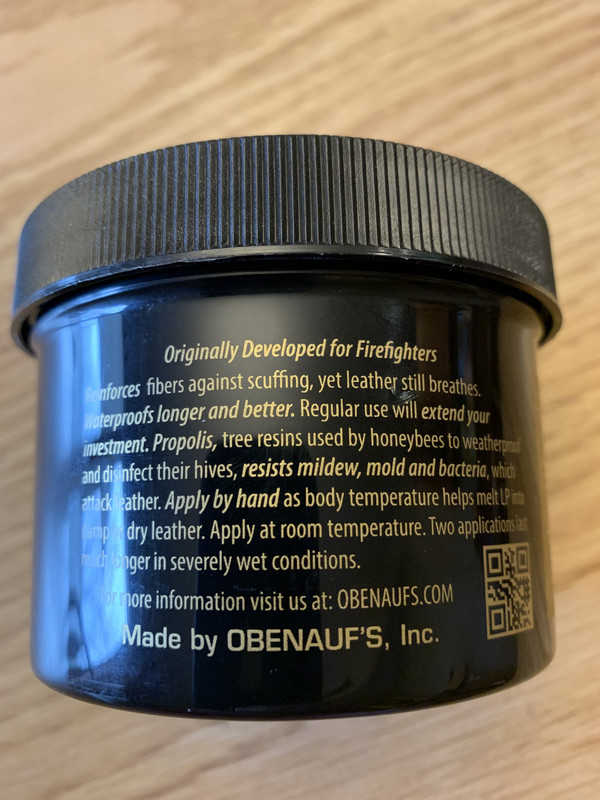
For good shiny finish I use Chicago or Butchers wax and work it into the stitching, then buff out. For leather preservation, dressing and maintenance I use nothing but Obenaufs out of Idaho. Used by wildland firefighters to preserve their boots and gear. Awesome stuff. Nothing better. Don't use neatsfoot oil.
For an awesome assortment of every sort of leather hardware imaginable go to Chicago Luggage on the net.
Use the heavy paper used in lining briefcases for patterns. Much stiffer and more durable than manila folders and can be kept for patterns. Keep all your patterns! This heavy paper is available at Springfield Leather in Springfield, MO. They are on-line and great folks to deal with.
Don't buy an antique sewing machine. Don't buy the Boss from Tandy. Hand stitching is great, but when several sheaths have to get out the door nothing beats a machine! If you do hand stitch buy or build a stitching pony.
Don't buy Barge cement from leather supply houses......buy rubber contact cement at the hardware store. Same stuff and much cheaper. Buy small or med. can as it will dry out.
Use bulldog paper clamps as mini-vises to hold leather while it dries. Apply painters tape to jaws to prevent staining leather.
Use the large size xacto knives, not the small pen sized and your hands will thank you. Don't be afraid to sharpen the blades on a diamond stone.
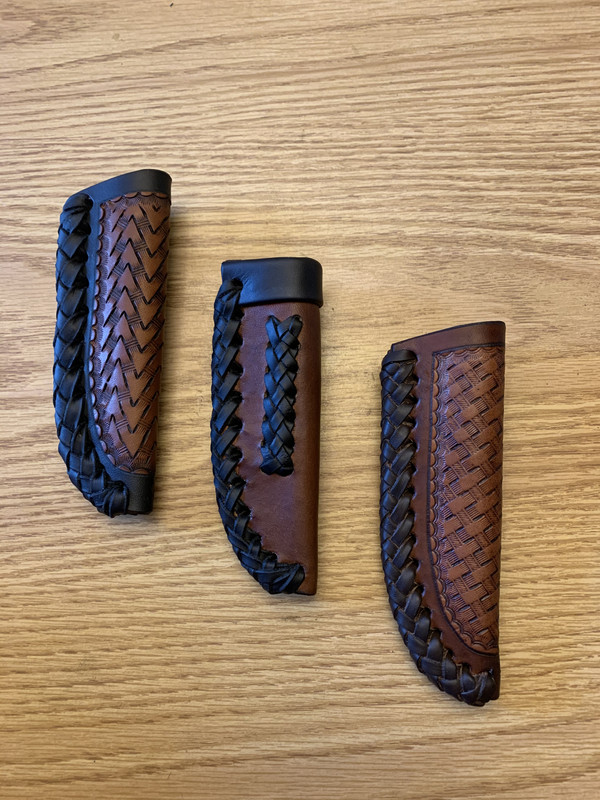
For heavy leather use a good leather round head knife. Worth their weight in gold. Keep it sharp and make a sheath for the knife.
A small bench sized drill press is your very good friend.
Better to buy a few good tools and add to them every month than buy cheap crap. Don't ask why I know this. Osborne tools ....made in the U.S.....good stuff. Not cheap.
It is old school, but I wet sheaths and place knives inside after wrapping in saran wrap for an absolute shrink fit. Custom fit.
I use my contact wheel on knifemakers grinder to contour and smooth edges of sheaths. Use it to round over edges.
 
For the straighter punching of holes with an awl, put the awl blade in your drill press and punch them that way. You don't actually turn the press on, but it holds it 90° to the leather and you can punch the holes quicker that way too.
 
It had been a long time since anyone posted in this thread. It is full of golden nuggets. Here is another. The internet, google and YouTube, for sure, can be your best friend. A couple of easy searches and you can find your answers, usually. Here is one of my favorite YouTube sites. Weaver Leathercraft. Chuck Dorset is entertaining and informative. Check it out if you have some time. This is a simple knife sheath segment. There are many others.

 
Now I will add a tip if my own. If you want to try a rolled over the top of the sheath liner, here are a couple helpful pictures showing the process.

1. Stitch the pieces face to face.

0-E06-C05-D-CB11-43-DD-89-FC-5-D2493-C78-FD8.jpg


2. Pre shape the roll a bit before using any cement.

9-A048224-71-F6-4-E73-AB3-F-DE31-C4-ECF10-D.jpg


3. Cement the roll and tap it into place with your mallet. Make sure you have a nice straight roll and plenty of length for the liner.

07-CF9601-CCDA-43-CB-8-BA1-D9-AA79-CD4-A2-C.jpg


4. Cement the sheath to the liner. Make sure you have stitched the belt loop onto the sheath or you will need to take it a part like I did. Argh!!!

D83-E2869-5-D6-F-409-F-B9-B7-71-D50-AA7-F058.jpg


5. Attach the belt loop and try again. Tap it smooth with your mallet.

4-F0-A5-F94-8223-46-F3-83-CF-FF38-A24-E520-C.jpg


6. Trim off the excess liner.

D4-FA1-CA0-0-EFE-4-A1-D-B4-E7-1102551-CD653.jpg


7. Set your welt and stitch/ braid/ finish the sheath. It is the one in the middle.

6450149-A-3804-4-E10-B82-C-6-DFAC8-D123-C0.jpg


I hope this helps someone. I would sure like to see some more tips and tricks. Feel free to share.
 
Here is a product that I use on all my sheaths. It is called Obenauf’s Leather Conditioner. When I finish a sheath, I apply this product as the last step. You can get it in the shoe/boot department at Cabelas.

FBB5A768-E960-475D-AA86-9A1E996AEA32.jpg


261F60D3-F5E9-484B-BE08-D57F9889090A.jpg


56DB253F-ABA8-4736-A66C-9EA0A811A760.jpg
 
Unless you are using a sewing machine or you have three arms a stitching pony will really help with the hand stitching. It will hold your work and leave both hands free.

Even if you are buying waxed thread or waxed artificial sinue have a cake of bee's wax to apply more before stitching.

Doug
 
Last edited:
I mark out my stitch line with Tandy's grover, follow with one of the spacer (star wheel) sets for the holes, and then I use my dremel drill press to drill the holes...makes things a lot quicker and easier.
IMG_4002.JPGDSC01274.jpeg
btw - i was using a rubber mat under the drill press, but the kitchen table as a work space is not wife approved
 
Last edited:
Back
Top