Rusty 1084 WIP-ish?

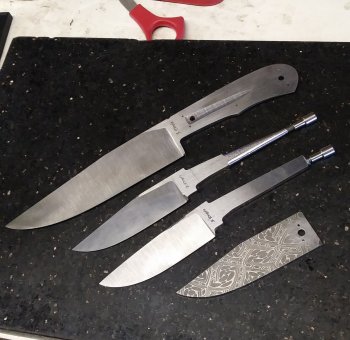
I have to catch a couple other blades up to this one before heat treating but I have a couple more pics and some commentary on some fine details about the ricasso area.

The ricasso area is the most important area, from a design standpoint, on a knife. Its an important area to focus on at different times, for different reasons during a build. This one has some cosmetic issues to my eye right now but I'll address them later and they serve a purpose now.
Capture+_2018-10-12-16-22-43~2.png
 
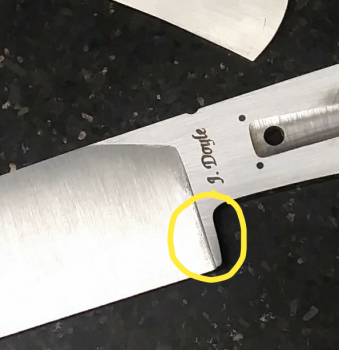
The area circled in yellow below is not very pleasing to my eye and I don't want it on my finished blade.

Capture+_2018-10-12-16-24-40~2.png

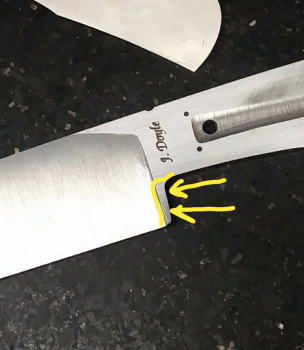
One purpose it serves as it sits now is to give some strength and a thicker transition area between the thickness of the ricasso and the thin cutting edge at the dropped heel of the blade.

On bigger thick blades like this, its important to have this extra transition. Otherwise, the expansion/contraction rates of the thin blade edge and thick ricasso right next to it are too drastically different and you risk the blade tearing itself apart right there in that junction during heat treating.

I used to neglect this and I went through a spell of cracked blades, all cracked right there in that same area.
 
To get that area cleaned up and looking good, I will grind it to shape after heat treating and tempering.

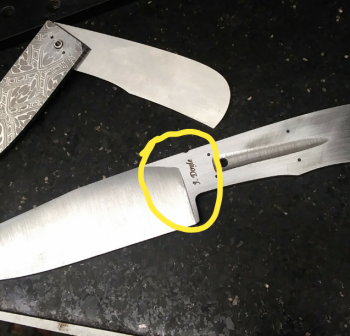
To get rid of the flat transition area between ricasso and plunge, rather than try to move my whole plunge line back, its much easier and more precise to grind the heel forward to get rid of the transition area. See photo below:

Capture+_2018-10-12-16-26-44~2.png

I position my plunge line right where I want it to be but I allow extra material to grind away in the heel transition area.
 
I have no doubt that I can make MUCH better knives than I’m making now with the same equipment that I have now. The tips and tricks that I have learned and continue to learn from threads like this help me tremendously. I appreciate it very much.
 
I have this blade thermal cycled and quenched. There is definitely some straightening that will need to be done.

I had some severe warping issues, even during thermal cycling. This is the risk you run when just picking up a chunk of steel and going for it when you have no idea what state the internal structure is in from the supplier.

This blade has drastic tapers in both directions but it was ground very evenly. The tapers didn't cause all the warp but no doubt contributed to the warp being more severe than normal.

I gave it a heavy thermal cycling regimen and straightened each time in between. This will no doubt require some tweaking once tempering is done. How much remains to be seen when I can further assess this.
 
I had some severe warping issues, even during thermal cycling. This is the risk you run when just picking up a chunk of steel and going for it when you have no idea what state the internal structure is in from the supplier.

What would be the best way to avoid or minimize the chance of this?
Edited; you may have answered this in your last paragraph?
 
What would be the best way to avoid or minimize the chance of this?
Edited; you may have answered this in your last paragraph?

The best way for me, and what I usually do, is forge the blade to shape first. All of the forging heats( provided I do my part properly) can act almost as thermal cycles and keep things even and reduce stresses.

This piece of steel was likely from my first steel order ever and was in who knows what condition when I grabbed it and started heavy stock reduction.

Since I didn't forge it, I may have been better served to do a normalizing treatment followed by a few thermal cycles on the bar THEN proceeded to my stock removal. I bet I would have had less warp in either case.

But things happen and some warp would still have been extremely probable. If one wants to stick around as a knifemaker, learning to deal with warps is a necessity.

It has been my experience that being a good knifemaker is simply a constant endeavor to make things straight and flat.
 
It came out straighter than I thought it would. A little tweaking Will still be in order.

I clay quenched even though 1084 doesn't make for the best hamon formation. I didn't want to harden the whole thing.

There is some pretty good activity but its so shallow, almost all of it will grind away.
 
What is the difference in normalizing and thermal cyling?

True normalizing is done at temperatures much higher than critical (normal austenitizing) temp.....like 1600 or hotter. Its purpose is to make the internal structures evenly distributed and the same size.

Thermal cycling is usually at austenitizing temps or below and is used after normalizing to refine the grain and possibly relieve some internal stresses.

I would welcome any expounding or clarifixation/correction on that by Kevin Cashen.
 
Back
Top