LINERLOCK - WIP

IanF

Well-Known Member
I am keen to get comfortable making framelock folders so thought that sharing some WIP would both help me to document my process but also allow comment tips and critique so please let me know your thoughts as this goes on. It won’t be quick as I will need to get a few blades ready for HT as I will be send them out and cost is same for 1 as it is for 5 blades. So it will be a couple of months I think before I get to finishing stage but I figure that speed is not the name of the game here and time in the shed is limited both by the weather (heat) and life!

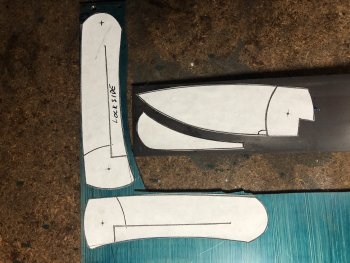
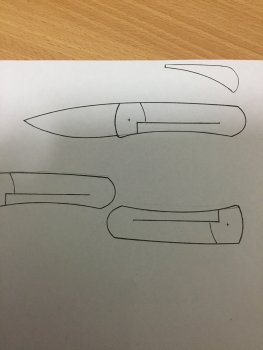
So I started out with paper and French curves to work out my design, using a pin for pivot point and making various changes until I think I have a design that will both work and is in a style I like.
B18A24FD-C1DF-4699-8383-C28F4F77D9EB.jpeg
 
Next up using my templates I stuck them to the titanium for the frame and I’m using some RWL34 for the blade.

B888FD05-1AB3-472D-92BE-E0565C6DD847.jpeg

I cut the backspacer from the same blade steel to give me a spacer with same thickness as the blade for initial design and then will use this as a template for a final backspacer most likely G10.

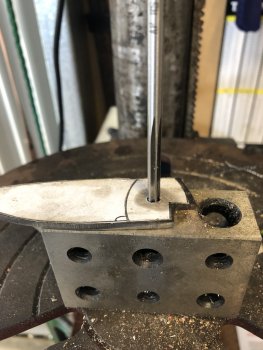
Blade is drilled with #14 and the reamed to 3/16777409E3-79C7-4F57-9AEF-1A1456A77B96.jpeg
 
I’ve been having trouble sizing and posting pics so please bear with me.

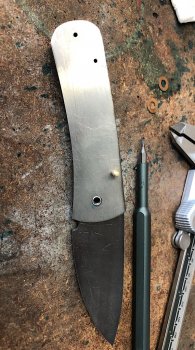
Anyway, All cut out and starting to get the idea of how this may look. The idea is for this to be a front flip opening knife so you can see that there is some protrusion of the blade tang at the front of the scales. Screws are 2-56 tapped in the Ti - no broken taps this time as I have my technique sorted and moved away from hand tapping and using a cordless drill which seems counterintuitive but works great.
PNG image.png

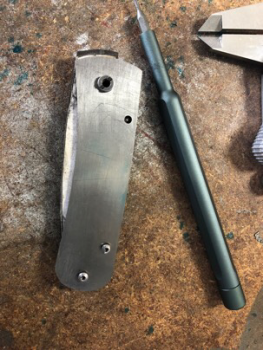
Next up is working on the notch for blad to close when stop pin is installed and to open to desired height.

74EB2A25-EF5A-4CC2-B04C-64C0AF49195B.jpeg

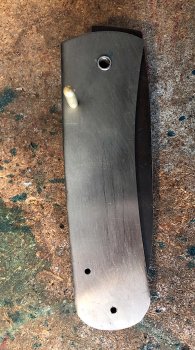
And open position

92BC334B-8F32-4D70-B311-6A25EAB54A79.jpeg
 
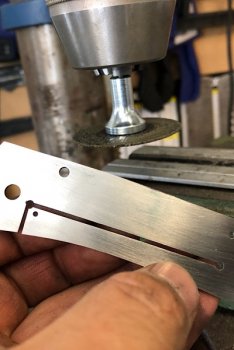
Now it’s time to cut the lock bar. Set my drill press to highest speed it can go and using a metal cutting disc I was able to cut a decent slot with the liner held in drill press vice. These are much better than the dremel version I used previously - I could cut a couple of locks with one disc I think.

I have also drilled hole for the 2mm ceramic detent ball to sit in by the time I took the photo.

54019494-C7EE-4969-9B8B-EFB511EB7417.jpeg

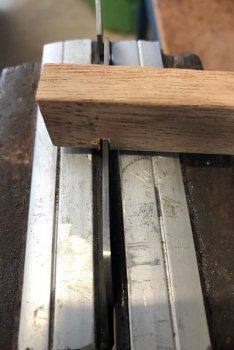
Bending the lock bar using a piece of wood with slot cut into it. I used this method to try and get a more gradual bend along the lock bar rather than applying heat to the back end and bending in one spot. I am really not sure which is the best way to do this so if anyone has some advice I would love to hear it.

0EA1BAD6-39F9-4C1E-B51C-851BDF68B00F.jpeg

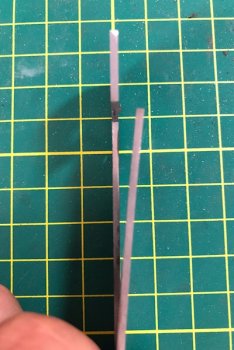
And the result

126E5CAC-D86B-44DA-A790-92E48099DA60.jpeg
 
I’ve just change the title of this thread - I had it as a framelock but it is a liner lock - sorry if I caused any confusion.
 
Looking good, IanF! I'll be following along with you. You asked about bending the lock bar. I do it the exact same way that you do.
 
Looks good so far Ian. you might want to make bending the lock as one of your last steps though, I know when I build them I end up putting it together and taking it apart countless times. it makes those steps easier if the lockbar isn't under tension, at least I found that true for me.
 
Thank you for the comments Brandant and Steve.

Steve I bend the lock now to grind the face of the locking surface on the tang, I.e to set the lock up. I probably should get my scales all mounted etc before this step but I guess I feel that if I can get to the stage of the blade opening and closing to correct position and the lock engaging as I want it then I am well on my way. In other words these are critical steps that I am most likely to mess up!
 
OK so few thing shave gotten in the way of this WIP but I did manage to get some more progress made.

I have drilled the hole in lock for detent ball (2mm ceramic ball) and then I set the ball and with dychem on the blade tang I worked the blade open and shut a couple of times so I had a wear track and then estimated 2 thousands of an inch past that for my detent hole. I found I was just a little past where I should have been meaning I was not getting any engagement before the blade hit the stop pin. I remedied this by drilling a slightly larger hole and a small chamfer but felt this was not the best method. Given I am making three of these folders at the one time I searched around for a better way and came across another technique for defining where to place the hole for the detent to engage in when the blade is closed.

Instead of marking the track that the detent ball makes and then estimating the correct distance past it as I did in the first version, I tried using the next smallest drill than the stop pin size in the stop pin position meaning the blade can close slightly more than normal. Then you can drill through the liner detent hole straight into the blade with the blade held hard against the temporary smaller stop pin. In the case of the knife I am working on at the moment it has a 1/8 stop pin so next smallest drill is a #31. Here you can see the slight amount it allows the blade to close - I marked blade position with the #31 stop pin and then reinserted the 1/8 and you can see the difference.

This worked very well and will be my method of choice going forward I think.

 
I have now ground my blade flat, hand sanded to 600grit and stamped my mark ready for HT.

39505b373256ef68ca3a48ad06a67cd8.jpg


And the three blades ready to be sent away. It will be a few weeks before I get it back which is OK since I will be busy with work and few other things.

12830b60fa959f104dfc3bf0c7c6fa1d.jpg
 
My blades are back from heat treatment and I found some time yesterday to work on my folder. I have three to complete but am working on just one now through to the end and hope the mistakes I make on this one will result in the others being better!

Liners were marked out and cut on the bandsaw. Green G10 is my chosen colour for this one and I quite like it.

b567aac847257cfe9b7add69dd0a8527.jpg


I bought these clamps recently and I think they are going to be very handy for drilling operations.

1e008b5ce0554a4744368aef1afce4ca.jpg


I drilled the handle screw holes first and mounted the scales to liners with screws before drilling the pivot holes. The holes were countersunk for screw heads and once attached the back side where screws protrude are ground flat.

db01106e5f38cd7abb7ddada1cac95bf.jpg


I used the grinder to bring the scale thickness down using a 120 grit belt first and then 240 to get close to final dimensions. Slack belt with 240grit worked well.

deb3391fe23e4d6079f0f7c8b1383285.jpg


So this is where I ended up.

6be3f02dbb11020fce924a847e41485b.jpg


So next steps to finish handles are:
Shorten stop pin (slightly long at moment)
Reduce thickness of back spacer to final thickness
Going finger groove in face liner to access lock bar
Detent ball needs seating slightly lower
Finish scales all around liners
Re-countersink screw and pivot holes
Refinish screw length on inside of liners
Grind pivot to length
Flame lock bar face to try and get a smoother contact face
Sand blast liner

Then I can move onto grinding the blade.....
 
Well I finished this last weekend but been slack to update. Overall I’m very happy with this since I learnt so much and I have a knife to carry and use that feels great in the hand. There is a massive amount of time in this knife. Room for improvement? Always. But I enjoyed it and will continue to make folders which at the moment are more appealing to me than fixed blades from a making perspective. I have a number of fixed blades on the go and will continue to do them but folders are just plain fun.

I have two more half made and then will have a crack at the next design.

So re-run of specs on this one, RWL blade I tried an etch and tumbled finish but went back and put a belt finish on bevels to increase the contrast - not sure if that was best or not so I’ll see for the next two. Liners are 0.063 inch titanium sand blast finish (I like the look a lot), ceramic detent, 3/16 pivot, 2-56 screws for the scales. Toxic green G10 scales, black G10 spacer. The pocket clip is Ti and one I had bought from USA knifemaker with a little bit of modification by me. If I had some thinner Ti I would have made my own.
58843b8f07a32c7da03ebe13a2bc34b1.jpg


82cd8823c7461aeddadb970bd8be3c4e.jpg


2b95124fed9e7c0d587610b2cf7e6dc9.jpg


06c19affbeb0556ba14927ed4e434abf.jpg
 
Back
Top