You are using an out of date browser. It may not display this or other websites correctly.
You should upgrade or use an alternative browser.
You should upgrade or use an alternative browser.
Forge Burner
- Thread starter Gliden07
- Start date
Gliden07
Well-Known Member
Nice work!
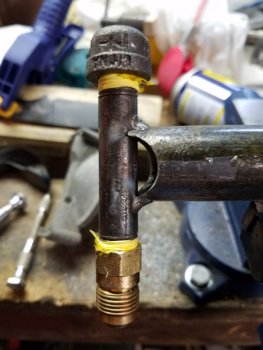
We shall see!! I'm hoping it works I'm building a mini forge similar to the Atlas, this burner is larger than the Atlas at 3/4" so I'm hoping it will work as good or better even with my lack of burner knowledge?
Wayne Coe
Forum Owner - Moderator
Good luck. It looks like you have tried to modify the Frosty T burner from www.IFoargeIron.com, but I doubt very seriously that you will have adequate air supply.
Let me know if I can help you.
Let me know if I can help you.
Last edited:
Gliden07
Well-Known Member
Good luck. It looks like you have tried to modify the Frosty T burner from www.IFoargeIron.com, but I doubt very seriously that you will have adequate air supply.
Let me know if I can help you.
I copyied it from a YouTube channel called Bear River Knives. This is what he claims to use in his forge. I had almost all the material in my junk pile except the brass fitting on the gas supply. So I figured I'd give it a shot? I suppose I could open up the semi circular slots with my Dremel for some more air if need be.
Also Wayne I will be in touch I want to get some of that IR coating you sell on your site. Did you ever determine which one works better out of the 2 you sell the Plistex or Metrocote??
Thanks
Last edited:
Gliden07
Well-Known Member
I don't go there as i am stock removal only...Wayne's link had a typo so I search it and linked it.
I do stock removal also but I want to do some bigger knives and will try forging them eventually. Matter of fact I hit a buddy of mine up for an empty refrigerant tank the other day. He said he would drop it off. Problem is like most no time to play!!
Kevin Zito
KNIFE MAKER
Very Nice!
Naturally aspirated (NA) burners are very subject to malfunction, or poor function due to extremely small variations in their assembly and geometry. The alignment, position and size of the gas orifice is arguably the most critical aspect of the burner design. The best burner designs, IMHO, have either this geometry well tested and "locked down" or have the ability to modify to allow tuning (i.e. slides to allow moving the burner orifice up and down the mixing chamber, replaceable orifice parts to allow easy orifice size changes, movable shrouds for air inlet...). Your burner design does not appear to have any ability to be easily tuned and is an untried design for the size of forge. I'm not familiar with the Bear River forge burner video and don't know how much detail he goes into regarding construction in the video, or if you just followed what you thought was the design based on viewing it in a video of him working.
I'm afraid that unless you get lucky on a first time trial that you are in for some disappointment. Please note that NA burners can be both too small and too large for a forge and will behave quite differently burning in free air than in the forge proper.
By all means test your burner, but please be careful. You will need a properly designed gas train with a good 0-30 psi propane regulator (preferably with a gauge), and not just one from an old propane barbeque, and a 1/4 turn gas rated ball valve to allow you to shut off the gas quickly in case of trouble. Please don't try to use just the propane tank valve as a device for safety shutoff and metering.
Gliden07
Well-Known Member
Good luck. It looks like you have tried to modify the Frosty T burner from www.IFoargeIron.com, but I doubt very seriously that you will have adequate air supply.
Let me know if I can help you.
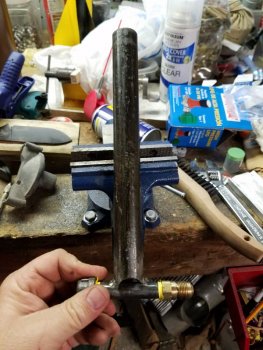
Well I tried the burner. As some figured, It was not getting enough air so I drilled 2 more holes on either side of the scallops and filed the holes out to blend into the scallops. After that it was blowing the flame out as soon as I turned the regulator pressure up, for testing I made a heavy duty Aluminium foil cone. It worked very good. I believe that when I get the burner end into the forge it should work (fingers crossed!!)? Testing will continue!!
EdCaffreyMS
"The Montana Bladesmith"
Just a note, a burner will not operate the same in "open air" as it will when inserted into a forge body....... I've had a number of people contact me about this very thing, seeking advice, and had it happen to me in my early days of forging. It's just the nature of the beast so to speak.
Gliden07
Well-Known Member

Here is a pic of the modified intake. I am going to install in my little mini forge, see what happens, I may make a small sleeve/choke to adjust the air intake if needed. Obviously I want it to work but I'm having fun playing while building too, and I learn a lot doing this too!
Last edited:
Smallshop
KNIFE MAKER
I don't know if Ed is going to update his photos on his forge WIP on his website. I saw it before Photobucket? broke the links...it's amazing and he knows his stuff. You might be able to extrapolate some knowledge there also. That WIP is old and I think he has been using that forge successfully for a few years now.
EdCaffreyMS
"The Montana Bladesmith"
Thanks for reminding me of that Ted..... that stupid Photobucket debacle destroyed just about all my post that included pics. I'll see what I can do.
Note on the burner design (which I should have thought about mentioning sooner).... the ROUGH ratio of burner tube size to "bell" or air openings for a venturi type/style burner is 3 to 1. That means if you're using a 1" burner tube, you need either a 3" bell reducer, or the equivalent area of draw if the burner is designed as pictured above.
Fuel pressure also plays a part too.... because the fuel input pressure is what creates the vacuum that causes the burner to "suck in" atmosphere. The smaller "venturi" to burner tube ratio, the higher the fuel pressure required to create sufficient vacuum...... the down side is that the higher the fuel pressure the less inherent control you will have over the burner.
If you try to stick with the 3 to 1 ratio, you tend to get the "best of both worlds"..... efficient burner/fuel consumption, and controlability.
Last edited: