You are using an out of date browser. It may not display this or other websites correctly.
You should upgrade or use an alternative browser.
You should upgrade or use an alternative browser.
What's going on in your shop?
- Thread starter Justin Presson
- Start date

bladegrinder
Well-Known Member
Awesome, what kind of steel are you using there Boss ?
Awesome, what kind of steel are you using there Boss ?
.209" thick 80crv. It's what I had on the shelf I could grab quick.
How do you heat treat such a long piece of steel??????????????
It's an inch too long for our biggest oven so it will be with a forge.
Casey Brown
Well-Known Member
Just finished this sheath for a customer to go with this knife he purchased. He wanted a custom antler addition and a wooden liner. I had never tried either. I actually like the wooden liner, and may add that in the future. W2 blade with hamon, and black locust scales, and scrimshawed antler.

scribing the edge lines I had to move things around.

I had to get out a big vertical quench tank from the shelf for dipping in water while grinding.

I'm using a 36 grit Blaze belt to hog with. The flash rust is insane. You can see it turn after a dunk and some grinding heat. I sprayed it down good with Ballistol oil when I finished today.

Mostly hogged and that is enough for today. I have some other stuff to work on this afternoon.
I'll switch to a small grit, take out any high spots on the bevel and straighten out the grind line. Then I'll probably convex the grind line and make it softer. I just don't want to chase getting it perfectly straight on this one.
I've pretty much left the tip full thickness and I left an inch to work on for the plunge cuts. I hate matching a dagger grind plunge and I'm going to put it off as long as I can.

You can not help yourself holding it up and swishing it around.
I am SPARTICUS! <cough>
I had to get out a big vertical quench tank from the shelf for dipping in water while grinding.
I'm using a 36 grit Blaze belt to hog with. The flash rust is insane. You can see it turn after a dunk and some grinding heat. I sprayed it down good with Ballistol oil when I finished today.
Mostly hogged and that is enough for today. I have some other stuff to work on this afternoon.
I'll switch to a small grit, take out any high spots on the bevel and straighten out the grind line. Then I'll probably convex the grind line and make it softer. I just don't want to chase getting it perfectly straight on this one.
I've pretty much left the tip full thickness and I left an inch to work on for the plunge cuts. I hate matching a dagger grind plunge and I'm going to put it off as long as I can.
You can not help yourself holding it up and swishing it around.
I am SPARTICUS! <cough>


Daniel Macina
Well-Known Member
That'll look sweet! Probably be extremely difficult to get all the gaps filled though?
No. It will squeeze together just fine and didn’t really need the powder. I just wanted a little shiney here and there.That'll look sweet! Probably be extremely difficult to get all the gaps filled though?
It took about ten minutes of spooning powder on top and tapping the can to let it settle in.
spent a couple hours on this today with a Norax 100x.
Getting a straight grind line across 20" is no joke it seems.
I'm just not interested in using stones or flat sanding it so I need my grinder mojo to step up. I still have the point to clean up and I left a full inch to do the plunges and get them to match. At this point it's getting thin enough to bend just from hand holding and grinding. I'll need to finish the grind after I harden it.
Before I harden it, I'll figure out a size pommel nut I want to use and then thread the back end of the tang and build the handle around that.
Randy Lucius
Well-Known Member
I can't imagine. I have enough trouble with a five inch blade.Getting a straight grind line across 20" is no joke it seems.
")
Randy Lucius
Well-Known Member
Six blades heat treated. Started working my way through them. First one is a knife for my grandson's hunting buddy. Very nice 14 yo young man.
Glow in the dark scales. None of his friends will have one like it.


Glow in the dark scales. None of his friends will have one like it.
Robert66
Well-Known Member
You can be very proud of such a tool, lovely jobJust finished this sheath for a customer to go with this knife he purchased. He wanted a custom antler addition and a wooden liner. I had never tried either. I actually like the wooden liner, and may add that in the future. W2 blade with hamon, and black locust scales, and scrimshawed antler.
View attachment 66720
Looks good Casey, Tracy, Lucius...
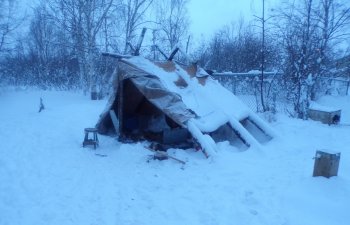
I've been fighting weather and wanted to get somewhere in my heat treat... I built this little tent to harden my knives in. It'll keep the snow out of my oil and be a little warmer inside.
I'm experimenting with wood charcoal still. Using draft to create/control airflow and temperature, firebrick to isolate the heat, and have a thermocouple in there to measure temperature.
Attachments

Sean Jones
Well-Known Member
Looks good Casey, Tracy, Lucius...
I've been fighting weather and wanted to get somewhere in my heat treat... I built this little tent to harden my knives in. It'll keep the snow out of my oil and be a little warmer inside.
I'm experimenting with wood charcoal still. Using draft to create/control airflow and temperature, firebrick to isolate the heat, and have a thermocouple in there to measure temperature.
That's pretty hardcore. And here I've been grumbling about the cold in my garage.
Randy Lucius
Well-Known Member
Glued this one up tonight. Cross cut canvas micarta and Osage Orange. I'll finish it tomorrow.


Gene Kimmi
KNIFE MAKER
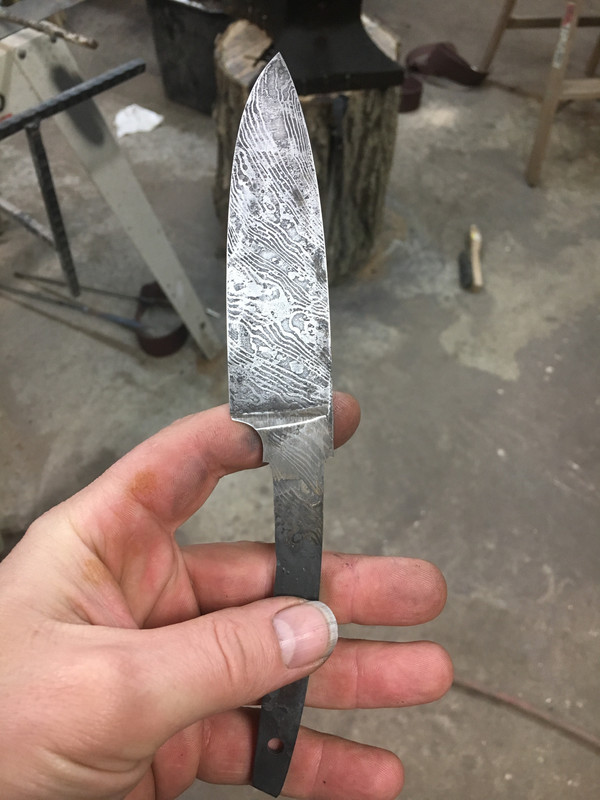
My son is home from college and he wanted to make some kitchen knives for himself and a couple for gifts. Since I have orders for others, we got started on them. Most are out of 15N20 with 2 sets out of AEB-L. These will all have a plungeless grind.

I picked up ( not literally) a new to me anvil a couple weeks ago. It's a 327 lb hornless that was imported from England. It has some pitting, but I'm in the process of cleaning it up. It has a 6" X 19" face and is a perfect fit in my smaller shop.
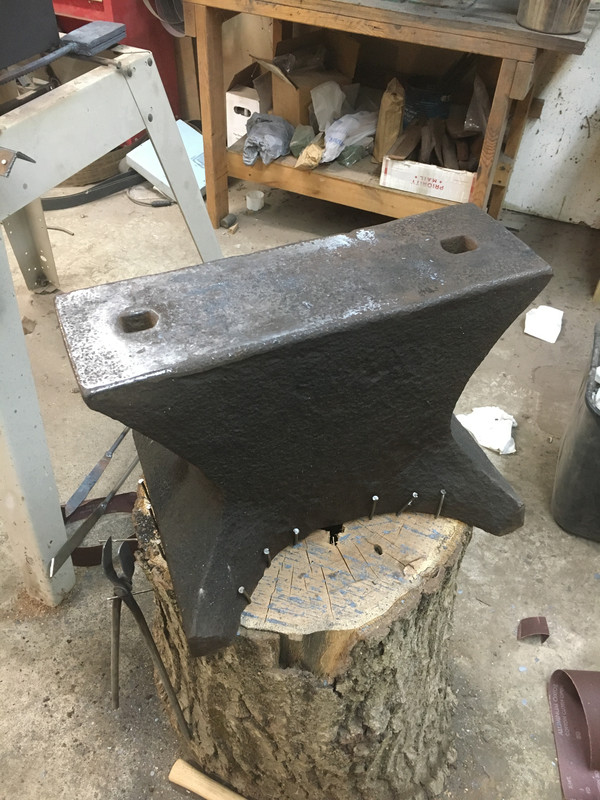
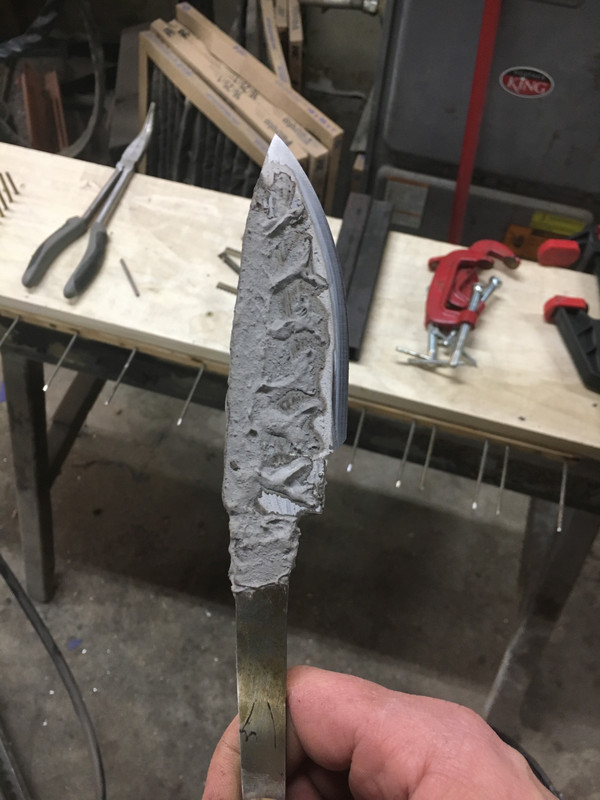
I went ahead and forged a couple out on it. A 39 layer twist damascus and one out of 1075 that I'm trying a hamon on.
I started a new billet of 1084 and 15N20 and may have been a little too ambitious with it. 15 layers of 2" X 4" is wearing me out, so I'm working on it a little at a time.
I picked up ( not literally) a new to me anvil a couple weeks ago. It's a 327 lb hornless that was imported from England. It has some pitting, but I'm in the process of cleaning it up. It has a 6" X 19" face and is a perfect fit in my smaller shop.
I went ahead and forged a couple out on it. A 39 layer twist damascus and one out of 1075 that I'm trying a hamon on.
I started a new billet of 1084 and 15N20 and may have been a little too ambitious with it. 15 layers of 2" X 4" is wearing me out, so I'm working on it a little at a time.
Daniel Macina
Well-Known Member
My son is home from college and he wanted to make some kitchen knives for himself and a couple for gifts. Since I have orders for others, we got started on them. Most are out of 15N20 with 2 sets out of AEB-L. These will all have a plungeless grind.
I picked up ( not literally) a new to me anvil a couple weeks ago. It's a 327 lb hornless that was imported from England. It has some pitting, but I'm in the process of cleaning it up. It has a 6" X 19" face and is a perfect fit in my smaller shop.
I went ahead and forged a couple out on it. A 39 layer twist damascus and one out of 1075 that I'm trying a hamon on.
I started a new billet of 1084 and 15N20 and may have been a little too ambitious with it. 15 layers of 2" X 4" is wearing me out, so I'm working on it a little at a time.
I could be wrong on this but I think your clays way to close to the edge. I always heard that you want your clay a good little bit back from where you actually want your line. I’m afraid you’ll end up with a soft edge left as it is now. But please check with somone that has done Hamons. This is just based off of research I have done.
Ps. That anvils a beauty!