Kevin R. Cashen
Super Moderator
Perhaps no topic is more overlooked and underestimated than tempering and thus it may be one of the least understood heat treatments. When compared to the excitement and dramatic results of hardening or annealing, the process of tempering seems almost anti-climactic and tempting to treat as an afterthought. But the wise knifemaker will not underestimate the importance of this operation, despite its lack of glowing steel and intense action.
One mistake that is too often made in considering tempering is to regard it as a minor form of annealing or a calculated compromise of hardening, and, of course, the greatest error of all would be to consider it less than necessary for a good blade. Although it occurs at much lower temperatures than any other heat treatment, its processes and effects are profound in their contribution to the internal structures of the steel. Tempering is not a “softening” of the steel as much as a “toughening” while maintaining as much strength (hardness) as possible.
Another all too common mistake that was given to us many years ago, I believe it could have come from the Victorian period when so many myths and misconceptions were born, is the widespread misuse of the word “tempering” to refer to the entire hardening and tempering process. The ancients seem to have known the difference between quench hardening and drawing a temper, and that is evident in our language reflecting the human failing of “losing one’s temper” as suddenly snapping under stress.
All industrial tempering operations cover the temperature ranges from 350F to 1100F. Standard tempering procedures for simple carbon and tool steels involve heating to a range from 375F to 500F to impart toughness and reduce brittleness in the steel. Tempering should immediately follow hardening and is recommended to be done for no less than 2 hours. This is to allow a thorough, even effect and to permit the steel to reach the set temperatures in ovens most commonly used for tempering.
Tempering is a diffusion based process, just like autenitizing, normalizing and annealing, in that is relies upon the movement of carbon atoms through the steel’s iron matrix to achieve its effects. The rate at which carbon atoms can move through iron is based on temperature, the greater the temperature, the faster the movement. This is why carbon can be put into solution in seconds or minutes above 1350F but it takes hours to move carbon at 400F. You will remember from our previous discussion that steel is hardened by holding at a heat sufficient to mix carbon atoms evenly throughout the iron based matrix to create a solid solution, and then quenching it fast enough to prevent their escape. The trapped carbon atoms will then distort the room temperature atomic stacking to such a degree that that the material becomes quite rigid and thus hard. In this condition the metal could literally tear itself apart if these stresses are not relieved, so a proper hardening should be followed by tempering as soon as possible.
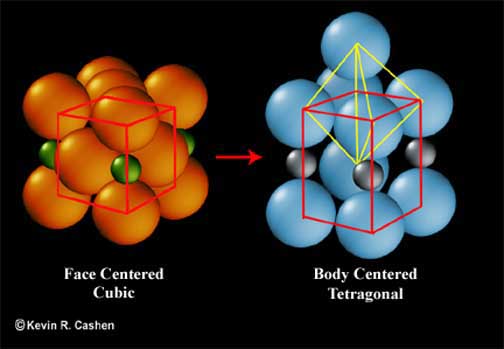
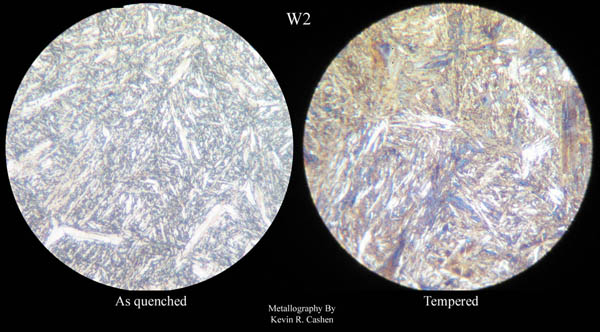
At room temperature the normal atomic stacking of iron (ferrite) is body centered cubic (bcc), but hardened steel has the added carbon atoms in the spaces between the iron atoms from the heated face centered cubic (fcc) phase distorting the stacking into a body centered tetragonal (bct). The process of tempering uses low heat to allow the carbon atoms to move very tiny distances, but enough to allow a more stable condition as the iron moves back to bcc. You will also remember from our previous discussions that when carbon comes out of solution it tends to group up and form bonded carbides. The carbon, that manages to slip out from the spaces between the iron atoms in tempering, will form very special, and extremely fine, tempering carbides. Now, when I say fine, I mean FINE! Tempering carbides are so small that they cannot be resolved with anything less than a scanning electron microscope; optical microscopes can only see the overall effect of countless unseen tempering carbides.
The fascinating internal processes of tempering
When fully quench hardened steel is heated between 250F. and 400F. the first thing to occur is a slight relief of stress and the bct stacking begins to shift to the more stable bcc, and the first tempering carbides begin to form. It is in this first stage that I have seen the most notable drop in Rockwell hardness between 375F and 400F; normally around 2 to 2.5 points (e.g. from 65 HRC to 62.5). From here there is leveling off with more temperature being necessary for every point beyond that. Subsequent tempering normally involves approximately 25F increases in temperature to lower the hardness 1 point HRC, as a very general guideline.
From 400F to 550F the steel will continue to lose hardness and gain toughness but the carbide precipitation will increase to have other influences on the steel. The loss of reinforcing carbon will destabilize retained austenite. The martensite (the hardened bct steel phase) will take on a darker coloration from the accumulative effect of tempering carbide.
In this range (450F to 550F) the fine precipitates within the martensite may lead to a slight loss of toughness as well as hardness in some alloys, but this is not too great a concern with simple carbon steels in knife applications.
From 550F to 750F the hardness continues to drop and the tempering carbides and carbon depleted martensite are transformed to increasingly coarser carbides and ferrite. This range is not used as much since it falls between the range in which the maximum strength is desired and the higher ranger where maximum toughness is needed. It is in this range that some more alloyed steels will form heavy and complex secondary carbides leading to an odd bump in hardness and tempering embrittlement.
From 750F to 1100F the heavy tempering carbides will grow and give way to large spheroidal carbide that is more easily seen with an optical microscope, and beyond this range one is indeed spheroidizing the steel. This would be the end of the tempering process since higher temperatures will indeed take the steel into spheroidal annealing.
Equipment
Tempering is a very precise fine tuning operation that is best done as evenly and steady as possible with a reliable and accurate heat source. Ovens are very good but need be as free as possible from hot spots and temperature swings to be really effective. For this, the larger the oven the better the effect from thermal mass and I have found a kitchen oven to be much better than the more space friendly toaster oven. Always double check the oven temperature with a reliable thermometer rather than relying on the dial settings, which are notoriously inaccurate on a cooking oven. Kilns are even better yet, but smaller devices can be ”evened out” by putting a large bar of steel or even fire bricks next to the knives to increase the thermal mass. Allow the oven to level out at the desired temp before adding the blade. Be certain to make a wire or metal rack to hold the blades on edge (I prefer spine down) since allowing them to lay flat with one side on a tray or facing the elements will almost ensure warping.
Those Lying Colors
Be careful not to put too much stock into the tempering colors often associated with specific temperatures. Those colors are a result of oxides formed on the steel and thus are heavily influenced by time, atmospheric and steel surface conditions. It will not be uncommon to see two blades that were tempered side by side, with very different colors due to surface conditions. It is very obvious when you see purple or blue finger prints in a mostly straw colored blade. The more oxygen present, the richer the colors, and it takes time to get the colors to come on; it is also not uncommon to take a silver blade out of the oven after 2 hours and then watch it turn straw brown as it cools on the open air.
Common Tempering Questions
Even with controlled salt baths, I still walk in every tempering cycle in a series of incremental heats to the exact Rockwell I desire. Each steel chemistry, even from batch to batch in the same steel, will shift the temperatures just a bit. Most simple carbon and tool steels fall within the range from 375F to 450F and it is up to us to adjust it from there, depending on how uptight we are about having it “just so”. For fine slicing blades that need to hold an edge the lower part of that range is best, for large choppers the upper range may be better, just remember that the more things in the steel beyond iron that you have, the higher the tempering temperatures will be.
Recommended reading on this topic: “Metallurgy Fundamentals” by Daniel Brandt, “Heat Treater’s Guide” by ASM, “Tool Steels Simplified” by Palmer and Luerssen
For information on processing of some of the most common simple steels used by knifemakers I also have these pages at my website at:
http://www.cashenblades.com/heattreatment.html
there you will find a description of the various heat treating processes, but at the bottom of the page you will see a columnar list of common steels, clicking on those steels will give a page with all the compiled information on the various operations and temperatures along with charts and other information. I hope this is helpful to anybody who can use it.
If this post, and the resulting thread, has information that you feel is useful enough to be linked to in the sticky index at the top of the page you may indicate that by voting in the pole. If you feel the information, or resulting thread, is not helpful, productive, or positive enough for all visitors to benefit from, do feel free to indicate that with a “no” vote in the pole. Both opinions will be regarded with equal value in ensuring only the best information is highlighted in this forum.
One mistake that is too often made in considering tempering is to regard it as a minor form of annealing or a calculated compromise of hardening, and, of course, the greatest error of all would be to consider it less than necessary for a good blade. Although it occurs at much lower temperatures than any other heat treatment, its processes and effects are profound in their contribution to the internal structures of the steel. Tempering is not a “softening” of the steel as much as a “toughening” while maintaining as much strength (hardness) as possible.
Another all too common mistake that was given to us many years ago, I believe it could have come from the Victorian period when so many myths and misconceptions were born, is the widespread misuse of the word “tempering” to refer to the entire hardening and tempering process. The ancients seem to have known the difference between quench hardening and drawing a temper, and that is evident in our language reflecting the human failing of “losing one’s temper” as suddenly snapping under stress.
All industrial tempering operations cover the temperature ranges from 350F to 1100F. Standard tempering procedures for simple carbon and tool steels involve heating to a range from 375F to 500F to impart toughness and reduce brittleness in the steel. Tempering should immediately follow hardening and is recommended to be done for no less than 2 hours. This is to allow a thorough, even effect and to permit the steel to reach the set temperatures in ovens most commonly used for tempering.
Tempering is a diffusion based process, just like autenitizing, normalizing and annealing, in that is relies upon the movement of carbon atoms through the steel’s iron matrix to achieve its effects. The rate at which carbon atoms can move through iron is based on temperature, the greater the temperature, the faster the movement. This is why carbon can be put into solution in seconds or minutes above 1350F but it takes hours to move carbon at 400F. You will remember from our previous discussion that steel is hardened by holding at a heat sufficient to mix carbon atoms evenly throughout the iron based matrix to create a solid solution, and then quenching it fast enough to prevent their escape. The trapped carbon atoms will then distort the room temperature atomic stacking to such a degree that that the material becomes quite rigid and thus hard. In this condition the metal could literally tear itself apart if these stresses are not relieved, so a proper hardening should be followed by tempering as soon as possible.
At room temperature the normal atomic stacking of iron (ferrite) is body centered cubic (bcc), but hardened steel has the added carbon atoms in the spaces between the iron atoms from the heated face centered cubic (fcc) phase distorting the stacking into a body centered tetragonal (bct). The process of tempering uses low heat to allow the carbon atoms to move very tiny distances, but enough to allow a more stable condition as the iron moves back to bcc. You will also remember from our previous discussions that when carbon comes out of solution it tends to group up and form bonded carbides. The carbon, that manages to slip out from the spaces between the iron atoms in tempering, will form very special, and extremely fine, tempering carbides. Now, when I say fine, I mean FINE! Tempering carbides are so small that they cannot be resolved with anything less than a scanning electron microscope; optical microscopes can only see the overall effect of countless unseen tempering carbides.
The fascinating internal processes of tempering
When fully quench hardened steel is heated between 250F. and 400F. the first thing to occur is a slight relief of stress and the bct stacking begins to shift to the more stable bcc, and the first tempering carbides begin to form. It is in this first stage that I have seen the most notable drop in Rockwell hardness between 375F and 400F; normally around 2 to 2.5 points (e.g. from 65 HRC to 62.5). From here there is leveling off with more temperature being necessary for every point beyond that. Subsequent tempering normally involves approximately 25F increases in temperature to lower the hardness 1 point HRC, as a very general guideline.
From 400F to 550F the steel will continue to lose hardness and gain toughness but the carbide precipitation will increase to have other influences on the steel. The loss of reinforcing carbon will destabilize retained austenite. The martensite (the hardened bct steel phase) will take on a darker coloration from the accumulative effect of tempering carbide.
In this range (450F to 550F) the fine precipitates within the martensite may lead to a slight loss of toughness as well as hardness in some alloys, but this is not too great a concern with simple carbon steels in knife applications.
From 550F to 750F the hardness continues to drop and the tempering carbides and carbon depleted martensite are transformed to increasingly coarser carbides and ferrite. This range is not used as much since it falls between the range in which the maximum strength is desired and the higher ranger where maximum toughness is needed. It is in this range that some more alloyed steels will form heavy and complex secondary carbides leading to an odd bump in hardness and tempering embrittlement.
From 750F to 1100F the heavy tempering carbides will grow and give way to large spheroidal carbide that is more easily seen with an optical microscope, and beyond this range one is indeed spheroidizing the steel. This would be the end of the tempering process since higher temperatures will indeed take the steel into spheroidal annealing.
Equipment
Tempering is a very precise fine tuning operation that is best done as evenly and steady as possible with a reliable and accurate heat source. Ovens are very good but need be as free as possible from hot spots and temperature swings to be really effective. For this, the larger the oven the better the effect from thermal mass and I have found a kitchen oven to be much better than the more space friendly toaster oven. Always double check the oven temperature with a reliable thermometer rather than relying on the dial settings, which are notoriously inaccurate on a cooking oven. Kilns are even better yet, but smaller devices can be ”evened out” by putting a large bar of steel or even fire bricks next to the knives to increase the thermal mass. Allow the oven to level out at the desired temp before adding the blade. Be certain to make a wire or metal rack to hold the blades on edge (I prefer spine down) since allowing them to lay flat with one side on a tray or facing the elements will almost ensure warping.
Those Lying Colors
Be careful not to put too much stock into the tempering colors often associated with specific temperatures. Those colors are a result of oxides formed on the steel and thus are heavily influenced by time, atmospheric and steel surface conditions. It will not be uncommon to see two blades that were tempered side by side, with very different colors due to surface conditions. It is very obvious when you see purple or blue finger prints in a mostly straw colored blade. The more oxygen present, the richer the colors, and it takes time to get the colors to come on; it is also not uncommon to take a silver blade out of the oven after 2 hours and then watch it turn straw brown as it cools on the open air.
Common Tempering Questions
You can relax; your knives are probably fine. In the very low temperature ranges that tempering occurs at things move VERY slowly. Here time is almost insignificant compared to even a slight change in temperature. Thus something like two hours is a minimum, but the maximum is rarely mentioned as it is of little concern other than wasted electricity. If you really forgot about the knives and remembered the next day, well then we may have reason for concern as it would take that amount of time to compete with temperature at 400F.“I forgot and left my knives in the temper a couple hours longer than I wanted too, are they ruined?”
Once again it is all about time and temperature. A torch can overcome time with greater heat applied much more quickly, but a very controlled lower temperature soak will provide a much more thorough and effective tempering, allowing you to maintain much more hardness for toughness gained. The colors come on more quickly with a torch because of the open atmosphere and intense heat.“If it takes two hours to temper how come I can toughen a knife in one minute with a torch?”
Although this appears the most obvious question to have definitive answers for, it actually is very complicated. While somebody may seem to have given you very helpful information by listing set temperatures for a single Rockwell hardness, they probably have unknowingly not done you any big favors. Nine times out of ten when folks point out that industrial specs do not apply to knives they got this idea by trying to exactly follow tempering numbers. The Rockwell hardness for a given tempering temperature is the result of the amount of carbon taken back out of solution in the formation of tempering carbides. So it should be quite obvious that this will be very dependent in the amount of carbon that was put into solution in the first place; with precise control of soak time and temperature we may hazard a guess but without it, it is a shot in the dark. The best we can really do is use the industrial specs, which are based upon ideal conditions, as our guide and proceed cautiously from there.“What temperature should I temper my blades at?”
Even with controlled salt baths, I still walk in every tempering cycle in a series of incremental heats to the exact Rockwell I desire. Each steel chemistry, even from batch to batch in the same steel, will shift the temperatures just a bit. Most simple carbon and tool steels fall within the range from 375F to 450F and it is up to us to adjust it from there, depending on how uptight we are about having it “just so”. For fine slicing blades that need to hold an edge the lower part of that range is best, for large choppers the upper range may be better, just remember that the more things in the steel beyond iron that you have, the higher the tempering temperatures will be.
Recommended reading on this topic: “Metallurgy Fundamentals” by Daniel Brandt, “Heat Treater’s Guide” by ASM, “Tool Steels Simplified” by Palmer and Luerssen
For information on processing of some of the most common simple steels used by knifemakers I also have these pages at my website at:
http://www.cashenblades.com/heattreatment.html
there you will find a description of the various heat treating processes, but at the bottom of the page you will see a columnar list of common steels, clicking on those steels will give a page with all the compiled information on the various operations and temperatures along with charts and other information. I hope this is helpful to anybody who can use it.
If this post, and the resulting thread, has information that you feel is useful enough to be linked to in the sticky index at the top of the page you may indicate that by voting in the pole. If you feel the information, or resulting thread, is not helpful, productive, or positive enough for all visitors to benefit from, do feel free to indicate that with a “no” vote in the pole. Both opinions will be regarded with equal value in ensuring only the best information is highlighted in this forum.
Last edited:
 it all makes sense!!