I think if you were to start marking with an overstitch tool, and drilling rather than punching the stitch holes, you will see a night/day difference in the appearance of your sheaths/stitching..... especially is you give the waxed artificial sinew a try, and also use the overstitch tool on the stitching after it's in place.
Judging from the pic of your sheaths, I'd guess you're doing 3 or 4 stitches per inch? If you used a #5 overstich tool to mark, and do the 5 stitches per inch, that will give your sheaths a more refined look too. With more stitches per inch (to a point), you will have less "pucker" along the edges, because the extra stitches "pull" more evenly on the leather.
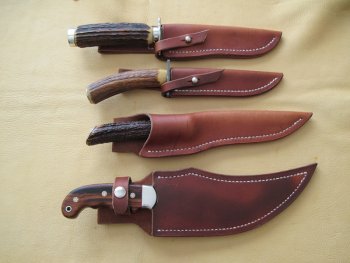
The leather is Tandy's 8/9 oz. "Crafstman" veg tanned.
Personally, I quit using an type of leather sold by Tandy years ago. I found that even the leather they label as "premium" is the el cheapo grade imported stuff. You can always tell imported hides....they are for a lack of a better term, white in color....or VERY light in color, where as domestic tanned cattle hide is more of a russet/tan color. Even those hides that the Salesman at Tandy promised me were "domestic", were pretty bad to work with, and the thing that griped me to no end was the way they accepted/took dye..... never evenly.... Always light/dark areas, and sometimes the "patchiness" was impossible to fix. I just thought that was how leather was, until I went to either of the leather below.
For a while I was buying from
Herman Oaks, supplied through an outfit in Billings, MT. (Montana Leather), but after being sent, and returning a couple of sides with a LOT of waste (the industry standard for usable area for a hide labeled as a top grade is 70%....that means when you buy a "premium" tanned side of leather, no matter the square footage, 30% waste is acceptable, but I was getting 40-50% waste due to scars, brands, cuts, etc.) that they labeled "premium", I've since been buying and using
Wickett & Craig leather and have been very happy it.
I won't try to explain all the reasons, because until you've compared/used leather from either of those sources, to the Tandy leather, you have no idea just how awful Tandy's leather really is.
The
Wickett & Craig Skirting is what I use..... it wet forms like modeling clay, and it the most uniform over a side of any other I've used. The leather I buy from Wickett & Craig is dyed "russet" which I'm really impressed with.... you can leave it the color it is, and it looks great, but it will also readily and EVENLY take dyes, which just makes it that much more versatile.
Herman Oak has a reputation in the industry of having the "toughest" leather, and it's often the choice for those who care less about appearance...using it for "wear" items like saddles, tack/harness, etc.
Wickett & Craig has the reputation as having the best looking leather, which is the main reason I choose it. Knife sheath usually don't see the stress, wear and tear of say saddles, harnesses, and other "horse" gear.
")