Plunge line struggle

BobbyD

Well-Known Member
I can really use some help here. Looking to get nice radius plunge lines And just can’t get it done. I use a 120 Ceramc belt to get to my finial blade thickness With a plunge guide. I hang my belt over the edge but I guess that belt is just to stiff. What belt and process would be better? Thanks
 
Last edited:
I can’t speak for others and this might not be the right way but the main part of the radius I do is done with a 220 j flex hanging slightly over the edge of the platen.
 
I can really use some help here. Looking to get nice radius plunge lines And just can’t get it done. I use a 120 Ceramc belt to get to my finial blade thickness With a plunge guide. I hang my belt over the edge but I guess that belt is just to stiff. What belt and process would be better? Thanks
Go to Ed Caffery's website, he has an instructional video on how to accomplish the radius plunge lines. A a quick bit of advice, get yourself a file guide and use it to start in the same place every time and Daniel is correct, you need to use a j flex belt to make the radius plunge. Lastly, it takes practice, you will not get there over night.
 
Ed, that's a Great Link. I just spent the last hour watching some of your videos. Each time I watch your videos I learn something new.

Not to sound like a broken record, THANK YOU!
 
Just finished watching it. Great video thanks for sharing it Ed. i do you a file guide but maybe I should not bring the plunge all the way to its edge with the 120 belt. Maybe it’s best to bring it to the edge with the 220 j flex belt.
 
Agreed! The plunges are the LAST THING I do in finish grinding...... I only roughly establish them when rough grinding (pre-heat treat).
 
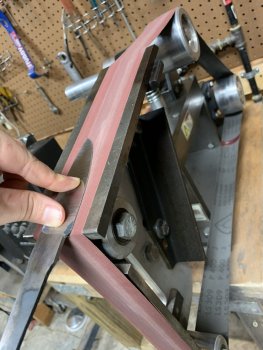
I used to do it the way most people do it until I saw someone using a device like this. I bolt it on using the bolt you loosen to rotate the flat platen. It really takes the stress out of plunges. Radius that close edge and approach it for matching plunges. Still have to be a little careful where you apply pressure as you don’t want to cut into the spine but it’s been a game changer for me. Matching radii every time.

You can also do some longways grinding on your knife using it as well.

I can’t remember where I saw this used but knew I had to make it as soon as I saw it.

If you are still struggling after you try out the methods above, maybe try to make one of these.

Will need to use a j-flex for this for sure.

95D15E4C-CE17-4A8B-9D65-31A708F242BD.jpeg
 
I've seen those in the past, and they seem to work great. Lots of options.....it's just a matter of finding them, then discovering which works best for the individual.
Things like that used to be "secret" in what I call "the dark years" when nobody shared anything about knifemaking. So glad that's a thing of the past! :)
 
Yeah Kyle Royer uses one. Would like to have on myself. Have you shared the design on here In the past that I could go back and check out?
 
Ahh, okay. I did watch some of his videos early on so I bet that's where I saw it. I haven't posted this anywhere. I just made it out of scrap that I had laying around.

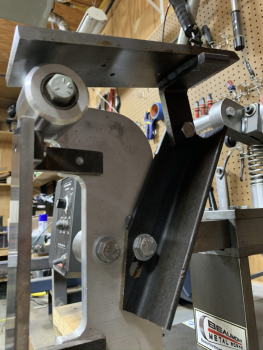
2 pieces of angle iron and a flat plate. I put the slot in the bottom for the bolt so I could have a little more adjustment as I wasn't real sure where exactly it would need to be.

canvas.png
 
I’m not sure. Originally, I was planning to do different plates with different radii depending on the look I was going for. I had one corner-rounding endmill and just zipped it across. I can check tomorrow. This one is definitely about the same to what I’d end up with on the edge of the regular platen. They come out incredibly clean this way with no deep vertical scratches to deal with when it comes time to hand sand.

Also, that top bolt has to be TIGHT to keep it from rotating once you put tension on the belt. I originally thought I’d just weld it once I figured out where it should be but have just left the bolt there.

If I was making another, I might would make the top platen bolt-on so I could easily replace the platen in the future. In this case, I welded it to the small piece of angle iron.

I also relieved that back corner (facing the tracking wheel) because it seemed like it had a bit of a hard time overcoming the static friction at first. Just takes a little playing to figure out where your grinder likes it to be.
 
I've been doing that for a long time. Not only does it make a plunge line easy, but also smooths out the bevel nicely and leaves a nice finish to the blade. With that vertical grind it's amazing how smooth a 120 grit belt leaves the blade, then a final finish with 400 grit.
 
I just started trying to make a square plunge, and they come out rounded every time. :)

Seriously though, what Ed is showing is pretty easy.
 
I tried that too. Just didn't work out for me. Like Ed said, I think it's just a matter of trying everything and figuring out what works for you.
 
Back
Top