New to CNC, looking for advice

Stang Bladeworks

KNIFE MAKER
I have been making framelocks for a little while using a manual benchtop mill. This has been great to learn on and I don't regret starting that way. That being said I have quickly learned that it isn't overly efficient. So much of my time is eaten up with manual machining setups that I dont have as much time to focus on trying new things as I would like. In an effort to free up some time and increase my output I have decided to purchase a small cnc mill.

In preparation for this I have been doing online training and researching as much as possible over the last 6 months to help with the steep learning curve. I have examined every machine that was even remotely in my budget and met my requirements. A lot of the more serious machinist recommended either haas or a used machine. The used machine was a little too intimidating for me at this stage. I did meet with haas several months ago but ultimately it landed outside my budget when equipped with the options I think I need. I have decided to go the tormach route. I contacted every knifemaker I knew of who had one to get their opinion of the machines for a knifemaking application. Almost all of them had positive feedback with the understanding that its not a heavy industrial grade machine and it will need to be programmed as such.

I am confident the machine will be capable of what I want it to do and even though its not a large VMC it will be way faster than me on my small mill. I noticed the CNC sub forum here and I figured I would ask some questions here and post what I learn as I progress. Hopefully it can help someone down the road.
 
OK first question(s)

What is the smallest endmill I can use to cut my vertical lockbar cut? My titanium is .160". I have found some .040" end mills with a DOC long enough to accommodate this, but is that too thin to be reliable. I would like to keep this dimension as small as possible to best work with my lock bar stabilizer. I plan to cut the shorter cut (lockface) with a 1/16" endmill in case there is some slight flex when the lockbar is cut free. I do plan to clamp the lockbar in place for that cut.

What is the best method for accurate hole location? I have seen some people spot drill with a chamfer mill then drill but I also read that its not required with carbide and the chamfer can actually chip the tool. I guess the theory is that a short carbide tool wont flex or wander. Maybe its better to interpolate the holes instead. This seems nice as it requires fewer tools but is it as accurate? With a predrill followed up by a reamer I know my holes will be a proper fit. For now I have no tool changer but I would like to add one down the road so I want to design my CAM with the fewest possible tools. Tormach only has provisions for 10 tools in the changer.

Any info or opinions are greatly appreciated. Thanks for reading.
 
I know several guys using Tormach's and making it work for them.

I have used 3/64 end mill for a lock cut in .125" Ti. Taking it to .160" should work but expect some breakage as you dial things in and then expect some breakage just because. Milling a lock in .160" is done all the time. Just get the numbers right.

I don't know anyone drilling with carbide in Ti or stainless. "best practice" is to spot the hole and drill with a high quality drill bit.
A 10 tool set up should work for most anything you want to do on folders.

Look into Gwizard for speeds, feeds and depth of cut. It's an amazing tool and it will pay for it's self in time and tool life.

Study every single hold down or fixture plate you can find. A good fixture plate really makes a difference and there is very little about those documented on Youtube or elsewhere. I've seen several that touch off on a hole in the center of the fixture. I tend to use the upper left corner. Guys doing big runs tend to use steel but most use aluminum in 1" thickness.

I use Solidworks and Mastercam. I will not renew those licenses going forward and will switch to Fusion360.

A digital probe to set origins is an almost must have. You will be touching off origins constantly and it saves a ton of time.

OK first question(s)

What is the smallest endmill I can use to cut my vertical lockbar cut? My titanium is .160". I have found some .040" end mills with a DOC long enough to accommodate this, ...

What is the best method for accurate hole location? I have seen some people spot drill with a chamfer mill then drill but I also read that its not required with carbide and the chamfer can actu...
 
I know several guys using Tormach's and making it work for them.

I have used 3/64 end mill for a lock cut in .125" Ti. Taking it to .160" should work but expect some breakage as you dial things in and then expect some breakage just because. Milling a lock in .160" is done all the time. Just get the numbers right.

I don't know anyone drilling with carbide in Ti or stainless. "best practice" is to spot the hole and drill with a high quality drill bit.
A 10 tool set up should work for most anything you want to do on folders.

Look into Gwizard for speeds, feeds and depth of cut. It's an amazing tool and it will pay for it's self in time and tool life.

Study every single hold down or fixture plate you can find. A good fixture plate really makes a difference and there is very little about those documented on Youtube or elsewhere. I've seen several that touch off on a hole in the center of the fixture. I tend to use the upper left corner. Guys doing big runs tend to use steel but most use aluminum in 1" thickness.

I use Solidworks and Mastercam. I will not renew those licenses going forward and will switch to Fusion360.

A digital probe to set origins is an almost must have. You will be touching off origins constantly and it saves a ton of time.
Thanks for the reply,

I am fully prepared to break some endmills, in fact I am pretty good at that already..., I have a copy of g wizard coming with the mill so I plan to use it as much as possible. When you say you don't know anyone drilling with carbide do you mean without spotting first or at all? I have been looking at tons of fixtures, I like the idea of locating on a hole with the probe.

I plan to make small fixtures to prove the programs before moving on to larger ones with multiple parts. My plan is to waterjet the blanks and secure them with bolts. I will oversize the parts to account for waterjet error then mill as much as I can leaving small tabs. Then clamp the part from an area already machined and cut the tabs. Ill try to use precision pins to locate for second or third ops. I am trying to minimize the number of operations to reduce errors from re fixturing. That being said its all just a theory still to be tested.

I have been learning fusion, thats what my online training uses and it fits my budget (more so than solidworks)

Is there a specific tool you prefer to spot holes?
 
Drilling with drill bits is just a lot cheaper than carbide is all. I do use carbide to mill a larger hole but mostly drills and then ream.
Sounds like you are thinking through the work flow a lot better than I did on my first run.
 
You sound like you are thinking through your processes well. Planning ahead. If I may ask a question or 2. And comment to some of the things I have read in this thread so far. What kind of tolerances are you trying to hold on your holes? Location and size? Fixtures will save tons of time. I try to fixture anything I can. If you can put multiple fixtures on your table set each one with a different Work offset would be wonderful. If you are doing multiples of each knife of course. As far as drilling i use carbide drills a lot. If you have a flat surface your starting the drill into no center drill is typically required. And yes you are correct center drilling then going back with a carbide drill can chip them easily. Of course there are exceptions to that. So trial and error will give you the answer. But I would start without a center drill if I were using carbide. I am not making my knives on a CNC I do all mine by hand at this time. Its a hobby for me. My full time job is where I use CNC. I drill a lot of holes in stainless there and limited Ti. Nope not an expert in all things machining but I have got enough experience to typically turn out a good part.

Mike
Thanks for the reply,

As far as exact tolerances I will need to learn but I would guess positional plus minus .0005" and size minus 0 plus .001". I build my knives with threaded hardened barrels that run through both scales and the backspacer. They are precision machined and fit tight into a reamed hole. Between these barrels and the pivot and stop pin I have 4 holes that need to line up as close as possible. I plan to drill the detent hole in the scale but not the blade. I will set locks and detents by hand for now. I have a good system and its not too time consuming. I may change that as I learn more about cnc machining. I would guess location wise it can be plus minus .005" with no real issue. as far as size I will drill it with a numerical bit so that should be OK provided the runout is acceptable. I can always enlarge the holes if I have to but I really like having a tight fit and it results in the knife going together the same way every time. I could be way off with all of this but hopefully I can figure things out without scrapping too much material...
 
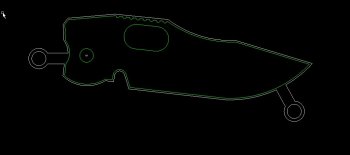
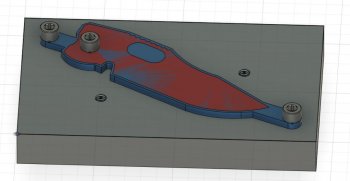
I am looking for some feedback or advice regarding my proposed process. I will attach a picture of my CAD. My intention is to get waterjet blanks cut at about .030" oversize and include locations to fasten them to a fixture plate with 1/4-20 bolts. What I am unsure about is how much to oversize my blanks and the mounting holes. For now I have oversized the holes by .010" so my holes are .260" for the 1/4-20 bolts. I am hoping this allows for some inaccuracies in the waterjet and bolts. If I don't allow enough the parts wont fit properly on my fixture but if its too loose My cuts will be messed up because the radial DOC will have a significant variance. I plan to use a 1/4" endmill to profile the outside which fits without touching the 3/8" bolt head. there is about an extra .050" clearance. I plan to leave the tabs at about .050" thick then clamp the blade down and mill them off after all the other machining is done.

Any opinions or suggestions are greatly appreciated.
 

Attachments

  • blade.JPG
    blade.JPG
    35.7 KB · Views: 16
A quality waterjet is more accurate than you might think, but any time I've required precision hole placement, I'd just have the waterjet spot them, and then drill and ream to the dimension I needed. For fixture screw holes, you'd probably be ok to run them at .003 to .005 under, then open them up to your fastener size with a reamer or quality drill bit. You might think about adding one more tab to the back of the blade, and I'd bring them as close to the blade as you can get them. Also, don't be afraid to make them a little bit wider. This should help reduce/eliminate any chatter or lift.
I'd also utilize your pivot hole and possibly the thumb hole (once machined to final) to clamp your blade to your fixture. This will allow you to completely mill off the rear tab after your first clean up, and if you take a shallow enough DOC, you could probably mill the other two off as well. Just use a washer to protect the blade finish and distribute the clamping force a little wider.

Are you planning on milling your bevels?

Hey Drew,

Thanks for the reply. Someone recommended that I move the holes to be more in line with the center of the part. I was able to do that but I have no room for a third tab. I am using 2" bar stock and I can only get 2 blades in a 12" length. I never thought about using the pivot hole as a clamp location after its machined. That's a great idea. I will widen my tabs as well. I am hoping I can get away with just 2 tabs per part otherwise I will need to find different stock. I like using 2" because I can find lots of different steels in that size. I haven't found many vendors that have a good variety of steels or any high end steels in sheet form. Can you recommend any? I would like to move in that direction once I get things figured out.

I plan to hand grind the blades at this time so I only need to profile it accurately. I will set the lock and detent by hand as well. Maybe as I gain confidence I will move some of that over to the cnc.
 
Last edited:
just a few thoughts...I did 72 of my little knife exactly how you are doing these. Fixed blade though.

Water jet is like anything....accuracy is expensive. So if you leave .03 (you can ask how much deflection at what cost) and have them rip around the profile but making the two holes .01 undersize and SLOWWWW. Then you can ream in a drill press accurately enough by hand to fixture off of...the waterjet already gave you location.

your original pivot hole for the blade makes a great tooling hole...shortens the WJ path also as you can ditch the tab. If you clamp through the blades with button head cap screws you can nip the heads a bit without messing with the clamping...and still have your cutters short and rigid. both of those tabs look way longer than necessary. I usually mill two bosses on an aluminum rectangular bar that are .001 u/s then drill and tap the center for the button heads. I've also done just one locater and the other a good fit to the screw. I'm experimenting with a 12+ inch Bowie right now with no locators...just three close fitting hold down screws. It worked great and I was able to work on both sides due to the length of the blade without losing accuracy... A very short blade would do better with 2 locators.

Two holds on a short blade it more than enough. The locators/bosses keep it from moving in a lateral direction and the button heads keep it down. Alum bar stock is generally cheaper than plate stock. 6061 is good reasonably priced material for tooling. Do not use tooling plate...it's crap.

You can rotate stock around in CAD to get a better fit. I find that often by putting the blades tip to tip with a bit of overlap you can still get between the blades with an end mill and use much less stock.

I don't know how much grunt a tormach has but you might want to try roughing and finishing a blade and if it's doable... cut out the WJ altogether. (where I'm at now) Reason is I can do the locator holes better accuracy in my mill than the WJ. Also, on a small blade it was about 6$ per blade. I can rough mill the perimeter on my small blades in 5 minutes. If I value my time at $60/hr...a dollar a minute...I'm still cheaper than WJ and get to make changes on the fly if needed(With me that's usually...lol)...Once you WJ a big batch of blades you're at the mercy of your own "thinking ahead"

Just some things that popped in after looking at your post...Hope it helps. Enjoy the new machine!

example.png
 
Last edited:
just a few thoughts...I did 72 of my little knife exactly how you are doing these. Fixed blade though.

Water jet is like anything....accuracy is expensive. So if you leave .03 (you can ask how much deflection at what cost) and have them rip around the profile but making the two holes .01 undersize and SLOWWWW. Then you can ream in a drill press accurately enough by hand to fixture off of...the waterjet already gave you location.

your original pivot hole for the blade makes a great tooling hole...shortens the WJ path also as you can ditch the tab. If you clamp through the blades with button head cap screws you can nip the heads a bit without messing with the clamping...and still have your cutters short and rigid. both of those tabs look way longer than necessary. I usually mill two bosses on an aluminum rectangular bar that are .001 u/s then drill and tap the center for the button heads. I've also done just one locater and the other a good fit to the screw. I'm experimenting with a 12+ inch Bowie right now with no locators...just three close fitting hold down screws. It worked great and I was able to work on both sides due to the length of the blade without losing accuracy... A very short blade would do better with 2 locators.

Two holds on a short blade it more than enough. The locators/bosses keep it from moving in a lateral direction and the button heads keep it down. Alum bar stock is generally cheaper than plate stock. 6061 is good reasonably priced material for tooling. Do not use tooling plate...it's crap.

You can rotate stock around in CAD to get a better fit. I find that often by putting the blades tip to tip with a bit of overlap you can still get between the blades with an end mill and use much less stock.

I don't know how much grunt a tormach has but you might want to try roughing and finishing a blade and if it's doable... cut out the WJ altogether. (where I'm at now) Reason is I can do the locator holes better accuracy in my mill than the WJ. Also, on a small blade it was about 6$ per blade. I can rough mill the perimeter on my small blades in 5 minutes. If I value my time at $60/hr...a dollar a minute...I'm still cheaper than WJ and get to make changes on the fly if needed(With me that's usually...lol)...Once you WJ a big batch of blades you're at the mercy of your own "thinking ahead"

Just some things that popped in after looking at your post...Hope it helps. Enjoy the new machine!

View attachment 73726

Thanks for the advice. For now I am looking to use waterjet to avoid having to write a program for every different size of stock I buy. My table isn't that large so I don't have the luxury of using larger sheets unless they are waterjet cut first to fit on fixtures. I like the idea of machining the pivot hole first and using it as an anchor point.

for now I have designed the blank to be held in with 2 bolts. I will machine the pivot hole first and install a third bolt. at this time all machining operations will be done and the tabs will be left at .050" thick.

Then I will install 2 clamps in the empty bolt holes and mill the tabs off completely. I am thinking of making my fixture out of 6061 as several people have recommended it to me. The thickness is modeled at .750".

Once I have proven all of my small individual fixtures I will make larger pallets to machine multiple parts at once. If anyone has any feedback regarding this method please let me know.

Thanks.
Capture.JPG
 
I figured I would update this thread as its been a while.

I have received the machine and assembled it fully. I am having some issues and I am working through them with tormach. some of the issues were just me not knowing what I was doing (I am sure there will be more of those) and some I think are machine issues. I think there is a problem with the encoder. There is an encoder test that can be run and I can not get the machine to pass. I have performed as many tests and checks as I can and reported back to tech support. They are supposed to send me some parts on Monday and I am hopeful it solves my issue.

While I am not thrilled to have issues out of the gate both tormach and their Canadian distributer have been very helpful and my questions and concerns have been addressed in a timely fashion. I will update this thread when I have more details. I will outline my issues in the hopes it can help someone down the road.
I have a program ready and some stock on hand (6061) to make a test part. I will post some pics of it when its done. once I can make one I am happy with I'll start making fixtures (also 6061) before I start machining actual knife parts. I fully expect to break some stuff along the way but I am hoping I can do a lot of learning on aluminum to keep costs down.

I was able to level the mill table to within .00015" over 10" and I have performed some basic lost motion tests. It seems that there is about a thou of lost motion in all 3 axis'. I am not sure if that will pose a problem or not. I have not looked into improving it yet. I am not sure if that is normal for these machines or not. I will likely play with it at some point. I think the sample part will go a long way in telling me. As soon as my tools arrive I will perform a runout check. So far the runout when measured inside the spindle seems to be within a tenth or two but it was just a quick test in one spot. I haven't seen anything yet that would indicate the machine wont do what I need it to do.

I did fully assemble the machine and enclosure by myself which was very time consuming but it is possible if anyone is wondering.
 
I have been lacking on my updates here.
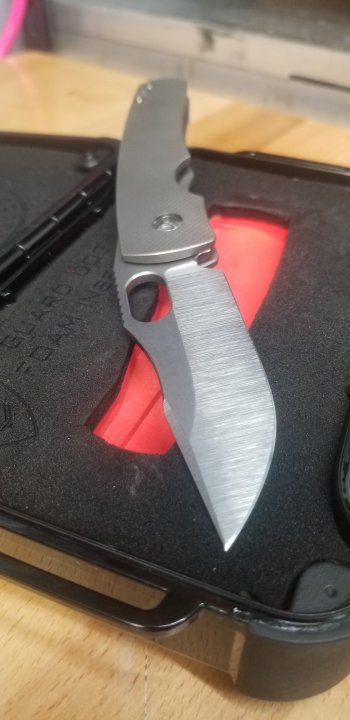
Long story short the original mill never worked properly and it wasted 6 months of my time. I purchased a different mill and have been working away at learning the processes. I have gotten to a point where I have made a successful prototype of each part. I made small fixtures that were held in a vise. I am now developing larger fixtures for my Pierson pallet system. Ill post up some pics of the first completed prototype. I have also started a YouTube channel to show some of the process. It's pretty amateur but hopefully it can help someone.

I decided to use the first prototype to raise some money for the Stollery children's hospital. It is up for waffle on a private Facebook group. I can post a link if anyone is interested. So far it has raised a bit over $3500.00 which is awesome.
 
Back
Top