my take on a leather pancake

franklin

Well-Known Member
This is the first attempt at this so be gentle.
Any advise would be awsome, i love this style sheath and would like
to do a cross draw of this, so HELP A BROTHER OUT. COMMENT!!!
So if anyone weres this kind alot please give me your ideals, thanks larry franklin
 

Attachments

  • 100_3398.jpg
    100_3398.jpg
    97.5 KB · Views: 88
  • 100_3399.jpg
    100_3399.jpg
    97.3 KB · Views: 67
  • 100_3365.jpg
    100_3365.jpg
    92.9 KB · Views: 58
Looks like a good start to me. The first thing I noticed was the crooked loop holes , get the cut closer to the edge of the hole and straight.
This is just my opinion , but I absolutly hate seeing the hide side showing anywhere , like on the back. I always use a thinner leather and put them back to back. It makes the back of the sheath look as good as the front.
Looks like you sanded the edges , keep that up.

Overall I think it looks great.
Hope you dont mind the opinion, but you asked.

Dwane
 
Dont mind at all Dwane, Neve thought of doing the back like that, mite give that a go. And the loop holes for the belt well lets say there were alot of #$%^& going on if you now what i mean, all done free hand and for me thats not a good ideal.

thanks for the comments Dwane , trying to find a cutter for the belt holes any ideal were i would find 1?
 
Franklin,

That's an excellent start you have there ! Your certainly well on your way to a pro quality sheath.

Like anything experience and practice will help you refine your technique and improve the end result.

There are commercially made chisels for cutting slots like that and may be worth it if you plan on making alot of them. That said though better results can easily be had with a utility knife and a hole punch.

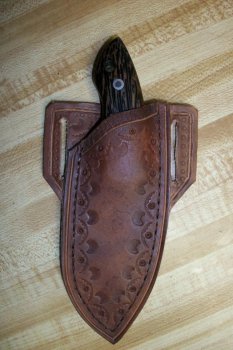
Punch two holes and cut the sides with the knife. At this point it wont be "perfect" but will be pretty close. To take it to the next stage of refinement use an edge beveler like this-

http://www.tandyleatherfactory.com/en-usd/search/searchresults/8076-02.aspx

and go around your slots front and back to take off the square edges and make them rounded. And finally burnish the inside of the slot to a smooth shine just like the welt and you'll have perfectly finished belt slots with no fuzzies.

For real pro results all edges should be treated just like this IMHO.

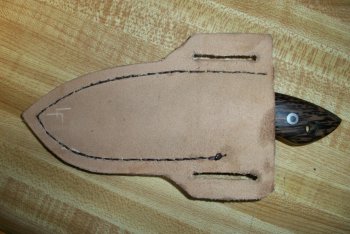
Your stitching looks VERY good ! The one thing that really grabs my attension though is where you melted the thread. I do this also to keep the thread from pulling out and I think your technique is good you just melted more thread than necessary. When I begin my stitch I start in the second hole from the back side then go through the first then continue around the welt. So now I've got my "starting tail" of thread at the second hole from the top. When I get to the other end of the welt I'll stitch the last stitch twice then go back around the welt to the beginning completing the stitch. Now my stitching is completed at hole number 1 but again I'll stitch that first stitch again and pull my "ending tail" back out hole number 1. Now I'll snip the tails of about 1/16" from the leather and melt them in just like you did. This way my stitching is locked in but my "melty" parts are teeny tiny and hardly noticible.

Leather is a pretty difficult material to cut. What ever you're cutting with it's imperative that it's SHARP. I usa a standard run of the mill utility knife with a quick change blade and got a 100 pack of blades sitting on the bench. As soon my blade isn't giving a perfect cut I'll change blades. A sharp blade will leave a smooth edge on the leather helping to make burnishing a snap.

I agree with Dwane about the rough side of the leather showing to a certain extent. I've made a couple with rough side showing on the belt loop but keep in mind the rough side needs to be treated just like the smooth side. Dyed, edged, and sealed. Also cheaper leather can be pretty darn fuzzy on the back but it is possible to sand it smooth. All I've used to this point is the cheap stuff but next time I get leather I'll pony up for higher quality.

If I was gonna make a sheath just like you have here with a two piece back I'd feel I had to stitch the entire perimeter of the back and around both belt slots. Would it be a sweet, rockin, attractive, top quality, sheath... Yup. But it would also create quite a bit more work than the way you've done it here.

To make this a crossdraw just change the shape of the back so the belt slot on the spine side is down near the center of the welt. It should work just fine with the slots at an angle just be sure to make them long enough to compensate for the angle.

Take care buddy, Josh
 
I go along with what Josh said but from what I can see you didnt put a welt in it. I would strongly recommend you do or you will have problems in the future with it.Just my 2 cents worth. KT
 
kidterico, there is a welt sorry pic dont show that. Its 8oz same as back then the front is 5/6 oz you are deffenetly right thoe every sheath from leather needs a welt IMHO
 
Wow josh thank you for taking the time for such a great reply, if you can see me hanging my head i have just been
to cheap to buy edge beveler. And the stitching all away around back and loops i was thinking the same. (sweating just thinking of all that stitching lol) I think one of the reasons my melting jobs get so big is i use 140# tensil bow string for my stitching not the thinest stuff but darn near bullet proof.
What type string do you guys use?
 
I've been using this thread-
http://www.usaknifemaker.com/thread-linen-25yd-black-waxed-p-292.html

Same thread in large spool-
http://www.tandyleatherfactory.com/en-usd/home/department/Lacing/1220-037.aspx

I find it so handy to add a little something like this thread or a pack of needles or a bottle of dye to one of my many orders from Boss (read too cheap to stock up on things like belts micarta etc etc) that I rarely ever order from tandy.

I picked up my leatherworking stuff a little at a time too which is the standard method I think. I still have some stuff on my list for leatherwork.

Here's a couple things you can get from Usaknifemakers as you can if you don't have them already-

Skiver-
http://www.usaknifemaker.com/skiver-safety-beveler-p-333.html

Edge Beveler-
http://www.usaknifemaker.com/skiver-keen-edge-beveler-p-365.html

Edge creaser- I noticed you used your edge groover for a decorative touch which is good but this is the tool for that job and will give a more attractive result (Still on my list too)
http://www.usaknifemaker.com/creaser-adjustable-edge-finesse-treatment-for-a-pro-touch-p-362.html

I still haven't sprung for the 100 pack but I'd reccomend it. You'll break alot of needles if you keep your holes tight. (I still order a 3 pack with just about every order)
http://www.usaknifemaker.com/needles-stitching-100pack-p-296.html

I'm a big fan of Weldwood contact cement ever since John Cohea turned me onto it. You can get it at pretty much any hardware, Home Depot, or Lowes I think. It comes in two different formulas "original" and I think the other is "gel" You want the original stuff like this-
http://www.dap.com/product_details.aspx?product_id=35

I have a Harbor freight in my town so I pick up packs of flux brushes for applying the cement there. Folks seem to have their own preference for applying dye. I personally like the small 1" foam pain brushes for that. I write the color it's for on the handle and re-use them till the foam tears.

Just a few things for ya to ponder.

Take care- Josh
 
No problem at all man. I'll take ya up on that beer at a show one day though, LOL.

Make another sheath and we'll go from there.

Forgot to mention that I like the pancake style. Good lookin sheath and not something you see every day.

-Josh
 
Josh gave you some great advise I use a deer horn tip and gum traganth from tandy leather to burnish the edges. Looks good Kellyw
 
I buy all my leather stuff from tandy as we have no other dealers here and ive never had a problem . I also use all the stuff josh has mentioned. Kellyw
 
Franklin, if you're going to make more pancake style you might want to invest in a "bag punch" or some people call them slot punches.. They come in various sizes from 1/4" all the way up to 2 1/2". Not really cheap, but really handy time savers and they do a really neat looking slot.

Paul
 
Back
Top