MT Bob's KITH for Fred Kingery

MTBob

Well-Known Member
With great apprehension I'm taking the plunge and getting started on the KITH for Fred Kingery.
And just to keep my blood pressure off the chart, I've decided to try something that I've screwed up several times - making a multipart handle. What a better way to truly embarrass myself than trying something that I've not been able to figure out how to do - - in front of a couple hundred expert knife makers OMG.:eek:
Based on advice from a wise knife maker who lives in Florida (Fred), I've opted to not use wood in the handles due to the high humidity differences between Montana and Florida. So, I'm planning on using Ivory and Black G-10 for handle scales, . I'm currently thinking of using vintage micarta for the liner and spacer., though that may change.
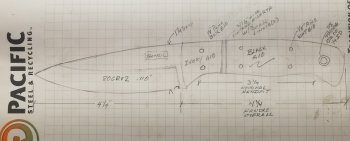
Typically, I've never planned out a knife like this. But, I thought it would give you'all a chance to give me some serious critique before I got too far along.
Before I even begin cutting steel, I'm going to figure out a method to make the multi-part handle scales.
I'm an old geezer with thick skin.... so let the comments roll!

1599517224510.png
 
I like the design and your choice of materials. The only thing I'm curious about is the height of your blade grind. Are you planning on a Scandi grind? If so, that looks about right. Otherwise I think you might want to go a bit higher on your grind. Just a suggestion. Just my opinion as I've never done a Scandi grind myself..

Hope that helps.
 
Hey there great looking design. I'm going to go ahead and give you a tip from experience. When hand sanding the handle. Make sure you use a different piece of sand paper when sanding the ivory bolster and do not try to sand both the black and ivory at the same time. The black g10 will stain the ivory. This will be ok at lower grits, so I would get your handle shaped the way you want, then sand vertically to keep them separate.

Also, watch sanding the tang as well...the metal dust will get into the ivory and stain it
Now that's a great tip, thanks! Does that same level of cross contamination take place when initially contouring the handle with a belt grinder?
 
Now that's a great tip, thanks! Does that same level of cross contamination take place when initially contouring the handle with a belt grinder?

It doesn't seem to be as bad with the belts... especially at lower grits where the belts don't load up with material as much. Another note...watch the heat when shaping the handle as the ivory g10 like to burn. I suggest going slow or light touches. Hopefully you have a vfd
 
Here is a knife a made 5 years ago...I was just a newbie and I believe this is my first multipart handle...this was ivory g10, copper pins and liners and black dyed maple burl...if you look closely you can see the staining on the bolster area.

sweptpoint-Skinner.jpg
 
Thanks Jeremy, that's a very nice handle design and finish. I do have a VFD grinder and will go slow.
Could the staining / contamination have come from the stain used in the maple burl?
 
After a couple of zig and zags I think I've finally figured out how to make a multi-part handle scale. Previous disastrous attempts at using a steel frame jig were stunning failures - one big glued up glob. Using a plastic frame keeps epoxy from sticking, resulting in an easy release. This newly named "Sandwich Jig" uses Polypropylene and Teflon. It's 3" wide and about 6" long.

1599758709292.png
Another lesson learned - make the transition piece first, before the final glue up. Here is a bulk chuck of the transition piece from which I will cut the actual piece for these scales.
1599758868142.png
After cutting the piece to approximate size I Milled it flat and parallel.
1599759043419.png
Then to keep the front and rear scales from separating from the transition piece, I milled slots in the transition piece and slots in the bottom of scales (actually drilled holes in both pieces with a countersink, next to the tang), like this.
I tried to place horizontal pins through the pieces but that failed too. The pins were too large and would have interfered with handle contouring. Perhaps I'll try the pinning technique at another time.
1599759145810.png
1599759170737.png
Here are the scale segments prior to glue up. Note the holes drilled into the base liner to connect epoxy to the scale segments. The backsides of the holes are chamferred for added bite.
1599760180098.png
1599760004406.png
Here's the glue up. It's critical to have two dimension pressure during clamping. So, I snugged and loosened the clamps several times during the glue up.
1599760542080.png
Because the black piece was .030" thicker than the ivory piece, I milled the surfaces flat. That way I can stack the scales and knife to drill pin holes.
1599761187940.png
Here's the result.
1599760447228.png
It appears that this method of making multi-part scales will work, and can be adapted to other configurations. It will be interesting to see how this scale looks after cutting and contouring.
One thing about knife making - there seems to be a hundred ways to screw things up. So far, I think I'm on about #29... lot's more to go.
Bob
 
After a couple of zig and zags I think I've finally figured out how to make a multi-part handle scale. Previous disastrous attempts at using a steel frame jig were stunning failures - one big glued up glob. Using a plastic frame keeps epoxy from sticking, resulting in an easy release. This newly named "Sandwich Jig" uses Polypropylene and Teflon. It's 3" wide and about 6" long.

View attachment 74810
Another lesson learned - make the transition piece first, before the final glue up. Here is a bulk chuck of the transition piece from which I will cut the actual piece for these scales.
View attachment 74811
After cutting the piece to approximate size I Milled it flat and parallel.
View attachment 74813
Then to keep the front and rear scales from separating from the transition piece, I milled slots in the transition piece and slots in the bottom of scales (actually drilled holes in both pieces with a countersink, next to the tang), like this.
I tried to place horizontal pins through the pieces but that failed too. The pins were too large and would have interfered with handle contouring. Perhaps I'll try the pinning technique at another time.
View attachment 74814
View attachment 74815
Here are the scale segments prior to glue up. Note the holes drilled into the base liner to connect epoxy to the scale segments. The backsides of the holes are chamferred for added bite.
View attachment 74817
View attachment 74816
Here's the glue up. It's critical to have two dimension pressure during clamping. So, I snugged and loosened the clamps several times during the glue up.
View attachment 74819
Because the black piece was .030" thicker than the ivory piece, I milled the surfaces flat. That way I can stack the scales and knife to drill pin holes.
View attachment 74820
Here's the result.
View attachment 74818
It appears that this method of making multi-part scales will work, and can be adapted to other configurations. It will be interesting to see how this scale looks after cutting and contouring.
One thing about knife making - there seems to be a hundred ways to screw things up. So far, I think I'm on about #29... lot's more to go.
Bob
I can absolutely promise that there are WAY more than a hundred! After some point, I just decided to go with the flow and quit counting!
 
Ya, you are no doubt right, perhaps I should have said "an infinite number of was to screw up a knife". What's really irritating is making the same mistake more than once!
 
After a couple of zig and zags I think I've finally figured out how to make a multi-part handle scale. Previous disastrous attempts at using a steel frame jig were stunning failures - one big glued up glob. Using a plastic frame keeps epoxy from sticking, resulting in an easy release. This newly named "Sandwich Jig" uses Polypropylene and Teflon. It's 3" wide and about 6" long.

View attachment 74810
Another lesson learned - make the transition piece first, before the final glue up. Here is a bulk chuck of the transition piece from which I will cut the actual piece for these scales.
View attachment 74811
After cutting the piece to approximate size I Milled it flat and parallel.
View attachment 74813
Then to keep the front and rear scales from separating from the transition piece, I milled slots in the transition piece and slots in the bottom of scales (actually drilled holes in both pieces with a countersink, next to the tang), like this.
I tried to place horizontal pins through the pieces but that failed too. The pins were too large and would have interfered with handle contouring. Perhaps I'll try the pinning technique at another time.
View attachment 74814
View attachment 74815
Here are the scale segments prior to glue up. Note the holes drilled into the base liner to connect epoxy to the scale segments. The backsides of the holes are chamferred for added bite.
View attachment 74817
View attachment 74816
Here's the glue up. It's critical to have two dimension pressure during clamping. So, I snugged and loosened the clamps several times during the glue up.
View attachment 74819
Because the black piece was .030" thicker than the ivory piece, I milled the surfaces flat. That way I can stack the scales and knife to drill pin holes.
View attachment 74820
Here's the result.
View attachment 74818
It appears that this method of making multi-part scales will work, and can be adapted to other configurations. It will be interesting to see how this scale looks after cutting and contouring.
One thing about knife making - there seems to be a hundred ways to screw things up. So far, I think I'm on about #29... lot's more to go.
Bob
Looks like a top notch joint to me!
 
You asked in a previous thread for critique on your knife sketch. I am a newbie too, (having made around 60 knives), and more experienced guys may completely disagree with me here, (and will probably be right), but I know that I like getting critique, so I figure I should probably give some :).

For me, I like task specific knives, such as choppers, to have more specific handle shapes, such as belly in the handle. I would flatten out the belly a bit. I think that full grinds or almost full grinds usually work better than a scandi grind, which is also one of those things suited for a specific task. I would raise the grind line. I've never made a knife with liners, spacers, or thong hole, so can't help there. You probably know this, but make sure that your ivory doesn't get to thin near the finger guard. You wouldn't want it to crack.

As you can see from my comments, I am assuming that your knife is a hunter or edc type blade. I think that different types of knives require different things and extremes, and you have to find the right grind, handle shape, thickness at edge, and etc. for each type. Hope you can find something in my comments that is helpful. BTW, your multi part handles look awesome, looks like you know how to handle a mill.
 
Alden, thank you for your thoughtful and constructive comments, much appreciated. I'm traveling right now and have limited internet access. I'm going to try to attach my KITH knife sketch to this thread to help with comments. When I get home early next week I'll update the sketch & ask a few more questions.
Thanks again for your comments!
 

Attachments

  • 20200907_120541~2.jpg
    20200907_120541~2.jpg
    559.8 KB · Views: 10
OK, I'm back at working on Fred's Kingery's KITH knife. As noted earlier, I was able to successfully make a multipart scale (my first). But, as it set on the bench "aging", I decided that I needed to make something more challenging... just for "entertainment value". Earlier Fred had posted a number of magnificent knives he made and I was very impressed with a herring bone design on one of his knife handles. So, I thought, what the heck, why not set the bar a bit higher and see if could make a handle scale with a herring bone insert design. What could possibly go wrong...?
Here's how that effort turned out.
The materials are G-10 for the red/white liner and herring bone sandwich, and Black and Red Micarta scale.
Nothing quite like trying to make a knife for an expert knife maker - talk about intimidating! This project has a pretty high pucker factor.
1603680220922.png

1603726005156.png
 
Last edited:
Back
Top