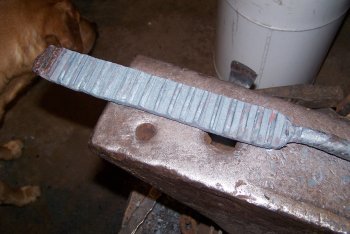
Ladder Pattern

Just got a set of ladder dies and looking forward to trying them out. Questions for all you experienced ladder guys. What's your preferred layer count for ladder, how thick is your billet before going into the dies and do you use a stop block to control the depth the dies go into the billet. I'm sure I'd eventually figure it out but would rather reduce the learning curve and the subsequent scrap trying to figure it all out through trial and error. I've done considerable Damascus just not ladder.
 
OK....first, I need to know if you are familar with how to achieve a ladder pattern, with ladder pattern dies, that the pattern being "pressed" in. This methodology requires that you grind away AT LEAST 2/3 of your finished/pressed billet. Are you aware of that?

Everybody has their favorite layer count....for me it is AT LEAST 300 layers..... anything less looks "cheap" IMO, as if the person making it was trying to save money on steel.

How thick you leave the billet prior to pressing in the ladder pattern is dictated by how thick you desire the finished blade to be. A rough foumula is that you want your billet to be 2/3 THICKER THAN THE DESIRED END THICKNESS. IF you want a finished thickness of approx 1/4", then you want AT LEAST 3/4" thick prior to pressing in the ladder (I would go slightly more). The whole idea behind pressing in a patter is that the patter GOES ALL THE WAY THROUGH THE BILLET, AND CANNOT BE GROUND OUT. The down side to the process is that you have no war around it.... YOU MUST GRIND AWAY/WASTE 2/3 OF YOUR BILLET.
No matter what I tell you, there is going to be a HUGE learning curve, simple because you're going to have to discover how, and how much you need to press to make the pattern go all the way through the billet, AND how much you mst grind away (gona be "more or less") of what I mentioned, depending on how everything in the process went). l You're also going to have to figure out an economical way to grind away 2/3 of each billet you press pattern into..... it's a LOT of time, effort, and is very spendy in the way of abrasives.

Personally, I pressed patterns for about a year, and because of the tremendous waste, not only of billets/steel, but in grinding media, time, and effort..... I quit, and gave away all my pattern pressing dies. I just don't do it anymore.
 
Thanks for your reply Ed. Yes I'm aware of the process and the waste involved. I don't see myself doing a lot of ladder but would still like to give it a go. I like your take on layer count, one of my favorites is 1000 layer random, I just think its classy looking when finished well. Would you recommend a stop block to control the depth?
 
Thanks for not getting upset at my response.....always best to preface stuff with questions, versus assuming.

A stop block(s) is a good idea, especially if you're not 100% sure you can make it stop where you want. :) I found that with my press, it's best to use 2 stop block, positioned on each side....otherwise the movement of the dies will press slightly more on one side than the other.
 
Hopefully it'll be helpful. Although "forging" by it's very nature isn't a exact science, in instances like pressing in patterns, the more precise you can be throughout the process, the better the results.

I don't know if you've thought about how you'll grind off so much material..... I've tried many different things.... milling is painfully slow, so is using a 2x72" grinder...... the most efficient methods I discovered were either a large surface grinder that ran grinding belts instead of the standard "rock" wheels, or a Cup Rock on a large angle grinder. At the time, I was using a 7" angle grinder, and the cup rocks for it were about $25 each (I tried the cheaper ones, but they literally disintegrated shortly after getting started)..... and it wasn't uncommon for me to go through one cup rock per billet.... which is one of the reasons I eventually gave up on the method.
The one person/company that I know of, that produces pressed patterns for sale has a specialized/automated surface grinder for taking down billets with pressed in patterns.
 
A follow along question. I've seen a few instagram posts where they are forging the blade to the profile they want, then pressing the pattern in. Is that the best way to do it? I would assume it would save a little material over patterning a billet then cutting the profile from the billet.
 
Yep.... those that keep doing the pressed pattern method do that.... trying to save on material.... but woooo..... there's still at least a 2/3 loss no matter how it's done. Remember how I always talk about "give-n-take"? It's in almost everything we do in Bladesmithing/Knifemaking. Each individual has to decide for themselves if the "give" is worth the "take". ;)
 
I’ve seen how Bruce Bump does his, at least then he can take his wedges and make canister billets out of those if he so chooses, lots of work and time either way. I’ve never asked but then again I don’t want to know what his bandsaw blade bill is either. Cutting that much hard steel has to burn through them
 
Sounds like I have my work cut out for me. I'll probably use a hard abrasive disc on my 7" angle grinder. It's not going to be a large billet so I'll see how it goes. I'll get back to you if and when I have something to show for my labor. Thanks to all who joined the discussion.
 
Ron.... I wasn't trying to scare you away from doing something you want to.... I just have this nasty habit of calling it as I see it, and I do my best to let people know of my mistakes....so they don't have to make them too.

When you use the angle grinder on those type billets, just be super cautious when you're getting close to grinding out the "presses"..... if you go just a tad too deep in any spot, it becomes what I call "the lowest common denominator"..... meaning that a divot will force one of two thing on you..... you either have to grind the entire rest of the surface to the bottom of the divot..... OR..... I have also seen, and done this myself..... after you're done with grinding away the "press".... go back to the forge and some flat dies to get the surfaces as flat as you can, and remove any "divots".

If I remember correctly, the last one of those type billets that I ground with a 7" angle grinder, took almost 4 discs.

Make sure you document the process and show us!! And keep us posted as you go along!
 
In my limited experience the losing 2/3 part may be a bit much In some cases especially with thick blades, but count on at least 1/2. I say that because I am using the smaller/shaollower 3/16 dies. For large kitchen knives, I can start with around 1/4 to get to the CLEAN .110 or so that I like. For me. Ladder starts to look presentable at around 180 layers but you don’t see that “3D chatoyance” until you hit around 300. 350-400 seems about optimum. This assumes pressing
asI have never done cut ladders. The other thing that I Have noticed Is that the ladders are cleaner and more consistent if you do not do any forging after you press. Create flat stock in the profile of your blade and do stock removal. Remember that the blade blank is going to “stretch” a bit as you press so that 9 inch guiro may end up at 9.5 or longer anyway. The first smith that I saw doing the straight stock removal with Damascus was Bailey Bradshaw, and he was doing it With hardened steel for any knife, not just thin kitchen knives like a lot of us do. He was also doing it from cuts form a “loaf” of mosaics that he What is slicing up with his little wire EDM machine.
 
Last edited:
As for the angle grinding, Don Hanson turned me on to using cup wheels. If you have a bigger 7 inch angle grinder from the big box store, chances are it is going too fast for a 6 or 7 inch cup wheel, but it’s just right for a 4 1/2 inch wheel. Now the bad news is that if you have the smaller 4! or 4.5 inch angle grinder, it’s typically running too fast for the 4 or 4.5 inch cup wheel. Those cup wheels appear to be made for air powered tools so you have to go down a size when you’re using the plug-in machines
 
As for the angle grinding, Don Hanson turned me on to using cup wheels. If you have a bigger 7 inch angle grinder from the big box store, chances are it is going too fast for a 6 or 7 inch cup wheel, but it’s just right for a 4 1/2 inch wheel. Now the bad news is that if you have the smaller 4! or 4.5 inch angle grinder, it’s typically running too fast for the 4 or 4.5 inch cup wheel. Those cup wheels appear to be made for air powered tools so you have to go down a size when you’re using the plug-in machines
When you say cup wheel are you referring to the diamond concrete wheels?
 
So the learning curve begins. A couple lessons learned, one is to learn to keep the notches lined up better. I think my die might be a bit too much for my 16T press. It is 6 notches wide and I'm thinking if I grind it back to 4 notches wide the press will handle it better and possibly help me keep the notches lined up properly. I'll mull that over for a while though before I do anything that drastic. I started out with a 360 layer billet 1/2" thick and had stop blocks to allow for a .200" space when the dies come down fully on the stop blocks. Looking at the edge of the billet it appears the pattern goes all the way through the billet. I know there will be areas where the pattern is messed up due to getting the notch spacing messed up. So now as soon as I get some time I'll start the grinding and after I have it flat I'll give it a test etch to see If I have anything worth going any farther.
 

Attachments

  • 114_6512.JPG
    114_6512.JPG
    1 MB · Views: 13
Back
Top