Hidden Tang WIP

Heikki

KNIFE MAKER
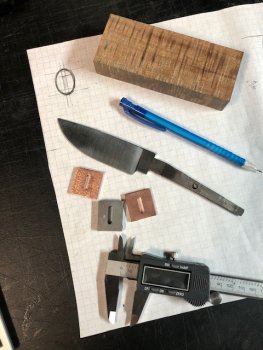
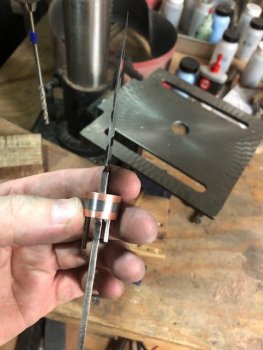
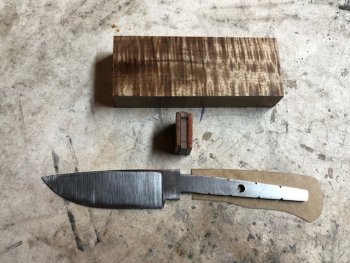
So, I'm going to attempt a sort of WIP for my first hidden tang knife. Mostly so I have a place to ask questions and get advice. This is where I'm at so far:

I have the blade profiled and pre-heat treat ground to 120. Steel is 1084. I plan to use steel and copper for the spacers, and Koa for the handle. I'm thinking of bluing the steel and maybe texturing the face of the copper. I believe I have the shoulders square.

I think the next step is to taper the tang thickness and then heat treat. Am I missing anything so far?
HiddenTangWIP10-13-19.jpg
 
Let me throw this out to you. For me, it doesn't matter whether I'm producing a full or hidden tang.....first thought is to the tapers.....that meaning, the thickest portion of any blade is the middle of the ricasso. EVERYTHING is width, tapers from there.....both forward and rearward. With proper distal tapers, it's very difficult to make a knife unbalanced...... also, the rear taper makes is FAR easier to get gap free fits.... I think Tim has one of our videos on KMT about gap free guard fits...... http://www.legacystudioproductions.net/knifemakertraining/ near bottom of page .
 
Let me throw this out to you. For me, it doesn't matter whether I'm producing a full or hidden tang.....first thought is to the tapers.....that meaning, the thickest portion of any blade is the middle of the ricasso. EVERYTHING is width, tapers from there.....both forward and rearward. With proper distal tapers, it's very difficult to make a knife unbalanced...... also, the rear taper makes is FAR easier to get gap free fits.... I think Tim has one of our videos on KMT about gap free guard fits...... http://www.legacystudioproductions.net/knifemakertraining/ near bottom of page .

Thanks Ed. I found the video and have have started watching it.
 
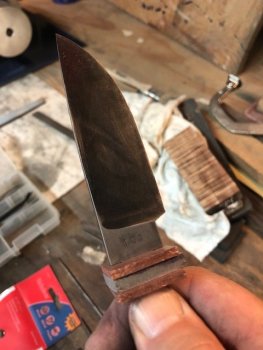
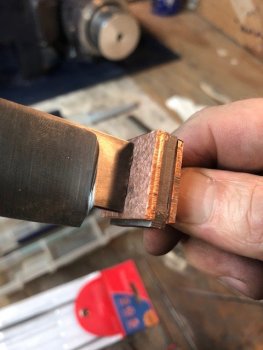
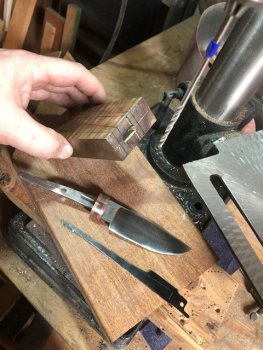
I've gotten the spacers slotted. Now I guess I'll be shaping them. This is where I may get things out of order. I'm sure the second one will go smoother.

IMG_1557.jpgIMG_1556.jpgIMG_1555.jpg
 
I would say that you've made a good start on the bolsters and, by the way, that Koa is wild looking. I'll be waiting to see the finished product.

Doug
 
Well, I haven't wrecked it yet, but the day isn't over. I made a broach from a sawzall blade (I think that was Opaul's idea) and it worked well.

IMG_1558.jpgIMG_1559.jpgIMG_1562.jpg

I can already see where I'd make changes on the next one. I think the ricasso should be about a third shorter. I may still take the spacers down a bit in diameter too - I'll probably decide that as the handle takes shape.

If you can't tell yet, this one is inspired by John Doyle's work. His knives are the high water mark for me - extremely well executed and beautifully designed.
 
Well, I haven't wrecked it yet, but the day isn't over. I made a broach from a sawzall blade (I think that was Opaul's idea) and it worked well.

View attachment 70722View attachment 70723View attachment 70724

I can already see where I'd make changes on the next one. I think the ricasso should be about a third shorter. I may still take the spacers down a bit in diameter too - I'll probably decide that as the handle takes shape.

If you can't tell yet, this one is inspired by John Doyle's work. His knives are the high water mark for me - extremely well executed and beautifully designed.
Looking really good Heikki! I like ricasso as is, but a tad shorter could dial it in. I agree with your remarks, J. Doyle sets a high standard for sure.
 
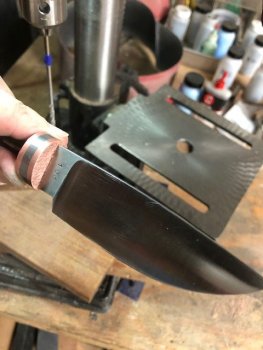
Ok, now I need some advice. What's the best way to drill the pin hole? It's 3/16" through the tang, and I was thinking either 5/32" or 1/8" pin. Do I need a pin? Any thoughts?

IMG_1563.jpgIMG_1564.jpg
 
I use 3/32" 416ss pins. I use a combination of cobalt bits and carbide bits, depending on how hard it is to drill the tang. I drill a small pilot hole, then drill with the 3/32 bit. I use a #40 carbide bit for the tang. It gives just a slight oversize for the pin. I also dome my pins as the last step after everything is glued up.

I see that you have already drilled your tang hole. I've done that once, and had issues with that. It looks like the pin hole is pretty large, so you probably won't have the problems I did. I didn't hit the hole perfectly when I was drilling through the wood, hit the edge of the tang, and broke my bit off in the wood. It was a lesson learned type moment.

Thanks. I figured if it was oversized, that would give me a better shot of hitting it. Guess I'll screw up my courage and give it a shot.
 
Something I've done, and I can't remember who suggested it, is to use a 3/16" brass pin in the tang. Cut it 1/8" longer than the thickness of the tang, then insert it and hammer it so it swells tight in the tang. Last, grind it flush to the tang. This lets you drill the handle and through the brass pin, which is a lot softer and easier to drill than the tang. I use 1/16" pins in hidden tangs.
 
Something I've done, and I can't remember who suggested it, is to use a 3/16" brass pin in the tang. Cut it 1/8" longer than the thickness of the tang, then insert it and hammer it so it swells tight in the tang. Last, grind it flush to the tang. This lets you drill the handle and through the brass pin, which is a lot softer and easier to drill than the tang. I use 1/16" pins in hidden tangs.

I'm going to try this technique. I've got some 3/32" rod stock I can use.

I'm thinking glue up will happen next, then I'll drill for the pin and start handle shaping.

Thanks everyone for the input and encouragement.
 
This is how I have done all of mine until the last one, the damascus bowie. On it, I completely finished the handle, spacers and guard before I glued it up and pinned it. I liked doing it this way much more than finishing after glue up.

Gene do you wax the tang up and epoxy the handle and spacers on then take it off, or do you just dry fit it all and then glue it up after. Gues my question is how do you keep everything lined up before you finish glue it??
 
Gene do you wax the tang up and epoxy the handle and spacers on then take it off, or do you just dry fit it all and then glue it up after. Gues my question is how do you keep everything lined up before you finish glue it??

I used pins to hold everything together. I also use really good brad point drill bits to drill the handle for the tang. So far, I have been able to drill the complete hole with these bits without having to use a broach. I use a bit that is the same thickness as the thickest part of the tang and get a pretty tight fit. Once I'm ready to glue everything up, I'll drill a couple bigger holes in the slot to allow for more glue.
 
I do the same. I use 1/16" dowel pins and shape everything before glue up. I've made a mistake or two on some of them, and at least you can recover and start over on that part.
 
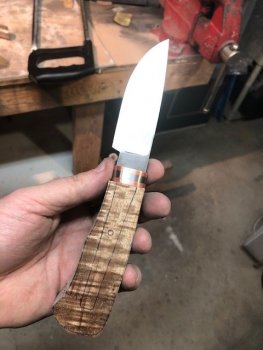
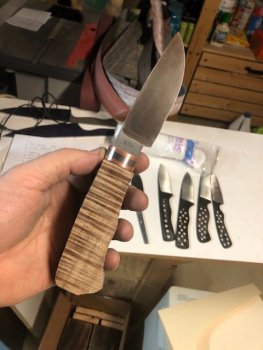
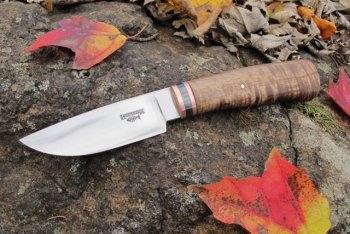
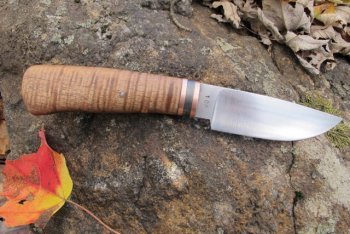
This project is finished. I learned a lot doing it, not just construction, but also etiquette (thank you @J. Doyle). I ended up using Gene's idea of plugging the tang hole with brass rod and drilling through it for a smaller pin- it worked great. I have a lot more respect for those who make hidden tangs. Keeping everything straight, symmetrical and square was a challenge. Thanks to all for the input.

The steel is 1084, the spacers are copper and blued steel. The handle is Koa from Gene.

IMG_5242.jpegIMG_5243.jpeg
 
Back
Top