Damascus billet

KenH

Well-Known Member
Looking to bounce a couple ideas around here. It's rainy today so not at all sure I'll get to use the new 12 ton press outside today or not. The next few days should be nice.

First, for Canister Damascus - for a trial run I have plenty of 1.5" square tubing, but it's only 1/16" thick walls. I've got 1084 powder (real fine) and a bit of roller chain. Is there a chance that 1/16" wall will hold together enough for a solid weld with only flat dies?

Next, for a billet I've got strips of 1075 that are 1/8"X1.5"X7" and 15N20 that is .070"X1.5"X7". The idea is to grind all sides clean, clamp in vise and weld 3 spots on each side and one weld down the middle of each end. Weld a holding rod on the end. Since I can't use it today would soaking in kerosene be a good way to hold it until ready to forge in a day or so?

On forging the idea is to place in forge at 2200F, heat until a very dull glow, pull out and sprinkle borax heavy on each side and back into forge until the billet looks like it's glowing the same color as the forge, then leave a few minutes more to be sure it's hot?

Then to press using flat dies and press. Let's say the billet is 1.5" high, how much should I press first run to set the weld? 1/8" all the way length of billet. Heat again before pressing other side? OR - try to press both sides on a single heat?

How thick should I expect the 1.5" billet to be after setting the weld?

After the weld is set how long should the billet be after drawing for cutting and stacking? Would it be best to cut billet in half, weld, draw out again, cut in half again making a total of 4 stacks? OR - would it be best to draw billet out and cut in 1/3rd for a single 3 stack to weld next time?

I know this is all VERY basic, but remember this is my first time with a press. All very new to me and knowing I'm going to make mistakes, I'd like to stack the odds in my favor as much as possible
:)


Thank ya'll for any help and guidance in this endeavor.

Ken H>
 
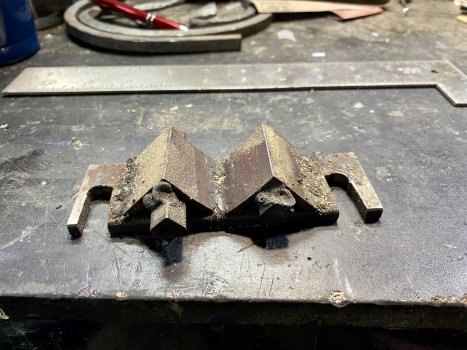
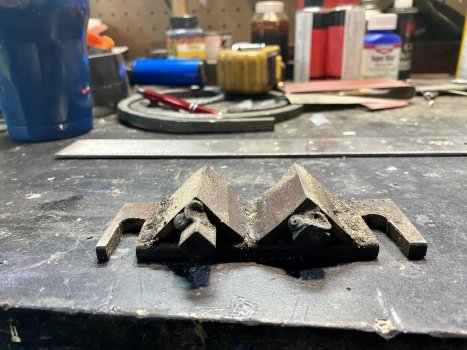
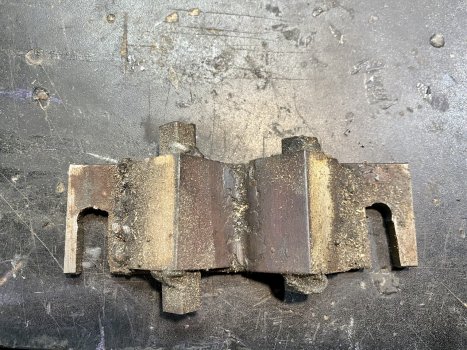
Here are my redneck squaring dies which have made many cans. Make those.
 

Attachments

  • 1DE5711E-0B49-4930-9BDE-91EE06F754D0.jpeg
    1DE5711E-0B49-4930-9BDE-91EE06F754D0.jpeg
    486.7 KB · Views: 13
  • 6E43A67A-45CF-4B30-8D3F-93C854FDEA2B.jpeg
    6E43A67A-45CF-4B30-8D3F-93C854FDEA2B.jpeg
    417.9 KB · Views: 13
  • 702F2E39-65FD-45AB-BBA5-C5DF99B40B48.jpeg
    702F2E39-65FD-45AB-BBA5-C5DF99B40B48.jpeg
    702.3 KB · Views: 13
Chris: Thanks for the photos. How thick are the sides on the angle iron? Looks like they might about about 1-1/2" square, but I can't tell on the thickness. I can do that - I've got some 1" square bar to use for the support under the angle iron.
 
When I made my squaring dies, I was told to add a third piece of angle in between the other two facing up. Weld it in. They never deformed at all under 23 tons. I also put the strengthening pieces under the two Chris did.

I got most of my angle as heavy as I could from the drops bin at the local steel supply.

Off on an adventure. Have fun!! You'll cry enough later.

And, BTW, weo gave you great advice on BF. Perhaps the most important: set the weld before you draw. A couple times. Just squish 'em together hard without putting in that drawing shear that shows one all those separated billets on FiF. Get it set well and you can draw paper thin without ever having weld faults slipping over one another.
 
On your stacked billet, I would cut the 7” pieces in half. The longer the billet is, the harder it is to get a good complete forge weld. I try to never have to forge weld a billet longer than 4”.
 
Good point Gene - I'll take your advice and cut in half for 3-1/2" stack. That will give twice as many layers for a single press and I can see where the longer billet could be more of a problem, especially since my dies are only 1-1/2" wide. This is called a "mini-press" for a reason :)

How about my question in first post about the 1-1/2" square tubing with only .062" thick walls. Is that thick enough to try a canister? OR - will they burn out too quick?
 
I never used 1/16", it was always 1/8". Given the ferocity one must expose the can to getting it hot enough, and then distorting it that much squishing before it welds, I'd stick with the 1/8 if you can get it.
 
Thanks Mike - that was my concern about the 1/16" walls. I've got plenty of that on hand, but none of the 1/8" wall..... Wait, I just remembered I've got 1/8" wall square tubing, but it's 1-1/4" OD. I think that would make a small canister just to see if I can do it. The idea is to fill with as much other stuff as possible so it takes less of that expensive powder.

I've got a 3/4" kisser block made, got the 1-1/4" canister tube cut and one end welded. I won't fill with material and seal weld the canister until tomorrow - or when ready for forge based on Ed's advice in an earlier post on how to do canister. I've also got a 15 layer billet of 1075 & 15N20 that's only 3-1/2" inches long ready for welding. I'll get the billet welded up today with handle welded on.

Next for today is a set of flattening dies that are 4" long just for flattening billets after they're drawn down to thickness for blades.

Later
 
OK, here's the first results. First photo is 15 layer billet soaking in kerosene overnight. Billet is a tad over 2" high, and 1.5" wide, and only 3.5" long. That's 8 layers of 3/16" 1075, and 7 layers of .072" 15N20.

Press-Kerosene.jpg


Here's billet soaking in forge at 2250F. I put kerosene soaked billet in forge and allowed it to heat to a dull red, then sprinkled borax on the sides. Not a really heavy coat, but did seem to seal. Not totally sure it was needed, but wanted to play it safe on first trial.

Press-Fprge-Billet.jpg


Here the finished billet for first press. It's 3/4" thick 1-3/4" wide and a good 7" long. I think my plan is to clean it up a tad, cut in half for another stack. That would give a fairly nice 30 layer billet. Maybe one more stack for a 60 layer? :)

Total forging time from putting in forge first time to final about 25 minutes. I shudder to think how long that would take with my old "arm 'n hammer" method.

Later
Press-Billet.jpg
 
Well, if I cut into 1/3rd they'd only be 2 inches long - that seems pretty short?

One drawback to the 12 ton over a 25 ton press - when pressing with flat die, after welds are set solid and billet is well over 1-1/2" wide and taking a full bite with the die it doesn't squeeze much. Best to take about 1/3 or 1/2 of a die width so the weak little 12 ton press will squeeze more each bite. With a fresh stack for first pass it will press plenty, easy 1/4" to 1/2" if you're not careful. With the half round drawing dies, they'll pinch a 1" truck axle in half with one stroke.

I would take a video of press working but it would take more hands than I've got. I'm using both hands, one on tongs, other on lever. My wife isn't too interested in this, nor is she very good with photos.

The billet I just did with a single fold over making 30 layers is now 11" long, 2" wide. I've got to re-enforce the handle as it's just about burnt into at the billet. Weight of billet is putting a heavy bend about an inch from billet. Got to find me some 3/4" rod for handles... or make a set of tongs that will hold a "stack" while it's being forged down to perhaps 3/4".

Where I cut the first billet in half the layers all looked solid welded. We'll know more when I start cleaning up the billet after it's thinned down for final cleanup. This is were a combo die set is really needed. Make a pass with drawing dies, then slide over to flattening die without having to change dies.

Once I get a couple months of this under my belt I'll know MUCH more than I know now. AND what I "think" I know now most likely will change with experience.

Later
 
That is the great thing about having your own press, you can do it your way. Have fun man I am happy for you. I know I like mine.
 
Weight of billet is putting a heavy bend about an inch from billet. Got to find me some 3/4" rod for handles... or make a set of tongs that will hold a "stack" while it's being forged down to perhaps 3/4"
I meant to mention this before you got your press. I have found it easier to have a couple pair of box jaw tongs to take over when your works stick falls off. I have 2”-1.5” and 1” box jaw tongs. I never use the 1 inch.
 
Yep, I think there'll be times when I want more in the line of large box jaw tongs also. For now, I welded a "sister" rod along side the original rod handle. That allowed it to work just fine.
 
Remember the billet I had with 15 layers for first run? forged it down to 3/4" and 11" long. Cut in half and got about 3-1/4" good stack with ends cleaned up. Forged that down to about 1/4" thick and 14" long (12" of good solid billet). Looks really good. I used SGA and cleaned up with all the edges cleaned and squared. After SGA it was .190" good clean with no scale looking, just clean surfaces. Got to thinking and got a bit froggy {g}

OK now for Today's report. I cut that 12" clean billet into 3 of 4" sections, tack welded sides, but good handle on, started soaking in kerosene while I got forge and press setup. Again, got stack nice 'n reddish looking, sprinkled a thin layer of borax on edges and put back in forge to soak. Pressed that billet, welded up nicely. I had a nice billet around 12" long and 1/2" thick. My dinky little press has a really hard time pressing after the billet gets around 3/8" thick, so I decided I'm gonna try those drawing dies knowing I've got to be VERY careful or it will pinch the billet into. I was very careful....... but not careful enough. Pinched billet too much at a couple of places and billet came into - now with 3 pieces, and rest is too thin for good cleaning up. Oh well - this is a learning experience - I NEED a decent set up kisser die for the drawing die set so this doesn't happen again.

Next I welded up a San Mai billet - 1/8" 410SS for outside layer, and 1/8" of 1095 for core. Stack is 1-1/4" wide. Seal weld all around stack to seal (normal for SS San Mai I'm told), weld handle on. Get hot and press stack, and now it's a nice solid billet. Pressed so it's now about .170" and should clean up ok with SGA. With a good ceramic 36 grit belt that SGA really does a good job on cleaning a billet. I ground a tad over one corner to see how core looks, about same on both sides:

Press-San.jpg


The core has a fairly straight line, and holding fairly equal from edge. That's something I've always had a really hard time holding the core in the center when forging by hand. I think this press is going to help that.
 
Update time: Did some work on a twist pattern Wed. This is the start - it's a 13 layer stack I forged out to 14" long, 1" wide and 3/4" high. I cut that into 4 of 3" pieces, stacked 3 of them (forgot the 4th) to give 39 layers. Forged that to a 3/4" square rod, then worked in press to make it a bit more round, then moved to anvil 'n hammer to get this look. This is after a twist, only about 1-1/2 twists. I should have done a tad more reading, I find it really needs 5 or 6 twists to make the pattern look better.
Twist-rod.jpg


As it is this 1-1/2 twists gives a pattern look like this
Twist-2.jpg

if you look at the lower left section what should be the twist pattern shows up just a little. It really NEEDS more twists. I should have done more reading before doing this. I find it needs at least 10 to 20 twists to make a decent twist pattern.

All in all I'd consider this a fail for a twist pattern, but the welds seem to be holding up without delams. It shows I NEED MUCH more guidance on making twist patterns.

Ken H>
 
Good learn! Not a failure. Save it for guards. It's got an interesting look.

Maybe watch circa 6 minutes on this Salem Straub vid to see how tight he gets the twist with his twisting lathe.

I used a pipe wrench (about 14") with a handle welded on the jaw to twist with two hands. Extra handle helps keep it from bending the billet as you twist. Works great on cable, too.

Keep it hot. It sucks the first time you overdo it and end up with two pieces, but it's a learning experience! :)
 
Boy, that's got LOTS of twists - bet that's almost like a "maiden's hair" pattern?
Depends on the layers, but the more twists the cooler it looks. That said, low layer billets of many patterns produce some very cool effects. Lots of stuff to learn with D. Learn about W patterns and crushed Ws for some very cool stuff.
Wonderful journey, enjoy!

PS Missus fitzo and I were watching FiF last night when something apparently got me out on the edge of my seat. She got a bit wistful and started talking about how much even she misses it, and maybe I could do most of the forging with a press and beveling dies to minimize hammer work? Who knows, maybe again some day. You and that little press are making us think. Thank you.

Keep posting progress and success and failures. We all learn when we tackle failures as a group.
 
Back
Top