Carl Schlieper Solingen Germany - Repair & general refurbishment

Johan Nel

Well-Known Member
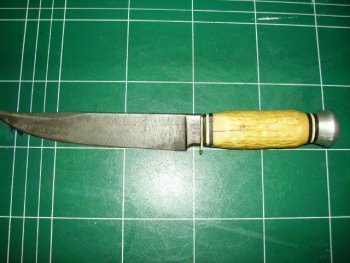
I have come in possession of a Carl Schlieper knife that needs some TLC.
From what I could gather on the internet, these knifes were mass produced and were sold en masse.
See the photo:
IMGP1756.JPG
Overall quality of the photos is not great, sorry about that.
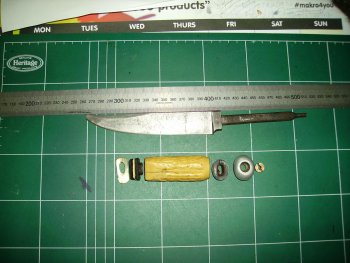
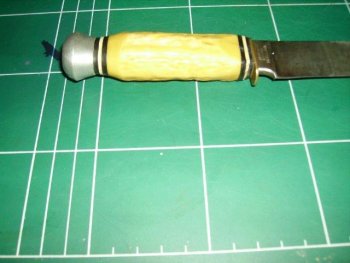
The design seems based on a Bowie with a false double edge. Overall length of the knife is about 250mm or 10 inches, with the blade being about 150mm (6 inches) and the handle 100mm or 4 inches. It has stamp on the one side of the ricasso that looks like a fanned out feeler gauge and the words "Carl Schlieper Solingen Germany" stamped on the other side. Steel is obviously a carbon steel of sorts. The tang is through the handle material and has a brass nut that screws onto the tang. Brass nut is sunk into the bolster. Front bolster is a brass plate, handle material seems to be stag or other horn with black & white spacers fore & aft. Handle is worn, but still fully functional.
IMGP1767.JPG
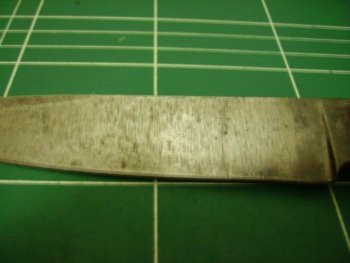
The quality of workmanship is not great, but the steel seems fine and holds a good edge. The blade is coarsely finished with grind marks clearly showing.
IMGP1759.JPG
The knife blade was quite rusted, but it cleaned up beautifully by inserting the blade in vinegar overnight and scrubbing all the crud off the next day. No serious pitting is evident.
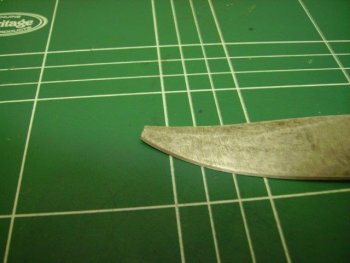
The truely sad part of this story is that the tip of the blade is broken off and was done by nobody else but "mwoa" in an effort to straighten it. Bad move!
IMGP1760.JPG
The knife still has much potential, so I thought of refurbishing the knife and do a few alterations to beautify it a but, or "dignify" it, is more my chain of thought. It is not a major collectors item, so I would not be damaging its monetary value in any way.
IMGP1767.JPG
The things I plan to do are as follows:
  1. Repair the tip of the blade by altering/filing the profile to form a proper tip again and reshape the bevels to properly fit.
  2. Neaten the overall look of the blade by removing all the coarse marks from it and define the false edge lines a little better and finish the blade to a 600 gritt.
  3. Try to lengthen the handle to about 120mm or 4 &3/4 inch. It is too small/short to comfortly fit in my hands, so that's the reason for that. Since the handle material won't quite fit anymore, I may need to change that as well. I will still see about the handle on the long run.
I am posting all of this to glean opinions and advice on what I plan to do. The first question I have is which way to go about to redivine the tip of the blade. I have seen the video by one of the other forum members where he has solved the problem of a broken tip by grinding the profile of the back of the blade until it was right again. The fact that this knife has a false edge on the back of the blade makes this approach a bit more complex. I suspect that the best approach would to redivine both the spine and the edge of the blade to meet at the cwntre of the break and then redivine the bevels of the edge and blade spine. Would you kind forum members please give your opinions? I have never done this before, hence my request.
Regards,
Johan Nel
 
Last edited:
If it were me, I would probably leave the handle as it is- but that's just me and it's not my knife. Lengthening the handle will be quite a bit of work. From what you said, it sounds like you will end up completely changing out the handle to get the length you are after. Or, you may be able to add some spacers to get the desired length and look. And then you will need to extend the tang if you intend to go with the same type of pommel. Another option would be to go to a hidden tang. But, if I were going to go to that much work, I would probably start a new knife and build it from scratch with all the qualities I want.
I would correct the tip, clean it up a little with the grit of my choice, and learn to like the knife as it was designed. It has a lot of original character and looks like a work-worthy knife.
As for correcting the broken tip, one thing to remember and be very careful about all the way through is- don't overheat the blade- or it will quickly loose it's hardness. The tip will especially heat up fast and before you know it, you can ruin the ability of the knife to hold an edge. From there, the approach taken will depend on your ability and the equipment you have at your disposal.
You will be adjusting the profile a little. I would first angle the entire false edge down just a little, and then bring the leading edge/belly up to where both can meet at the tip. With the lower edge, you will mostly just be working with the front area of that bevel. The tip is somewhat slender now, so that should look fine. To me it may even improve the look. You will be blending the new bevel line into the old, trying to make such a smooth transition that it is not obvious.
I would start with the false edge bevel, since I think it will require more finesse. On that top bevel, I would angle the whole grind line down a little more, as a downward curve on the top would probably not look. Once that is done, I would then re-radius the curve on the lower/front edge of the blade to meet up with the top one. Creating the radius of the lower bevel would seem easier to me, and that's why I would do that last. The challenge is to maintain a graceful line, that as closely as possible resembles the original lines.
You didn't say what tools you will be using. A belt grinder would make the job a lot easier if you are skilled with one. The blade will very likely be too hard to use files. So, your means of achieving results will be abrasives of some kind. What equipment or tools do you have?
If, as you said, the knife doesn't have much collector value, then it's a good project to learn on! (but so would be a fresh start with some known steel and your own design!)
Go for it!
Bill
 
Last edited:
Hi Bill,
Thank you so much for your response and input. It helps a lot in determining the best procedure to deal with the blade itself. I have files, so that is what I will be using. It will be slow going, but that is fine, I am in no hurry. I have already filed my first knife and am quite happy with the results so far. This project will be a learning curve for me, and I am happy to go through that process as well.
Regarding the handle, I hear your concern and will heed that advice for the time being. The blade is quite heavier than the handle, so lengthening it may bring better balance to the knife, or so I reason.
I will take photographs of the process and I will post it here with comments.
 
Files will be a real challenge on hardened steel if you don't anneal the blade. These older knives aren't terribly hard, so it can be done it's just going to be slow. If you don't have access to a belt grinder you can do a lot with automotive sandpaper.
 
Thanks John,
I have tested a file on the knife and it seem possible, but agree that it will be hard work to do so. Sandpaper will also be used for refining after the file work.
 
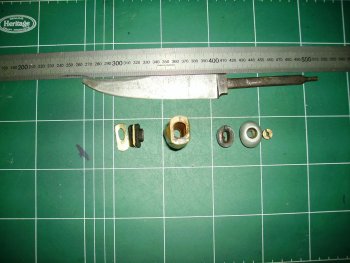
I managed to take the knife apart today. See below:
IMGP1774.jpg
It is interesting to note that the spacers has a plastic oval tube running through it and into the handle material.
IMGP1775.jpg
The cavity in the handle material is much bigger than the tang's dimension. The plastic tube seems to lock into the handle cavity and lock it up onto the tang. Notice in the photo that the tang has a distinct bend upwards when compared to the spine of the blade. I am hoping to somehow re-align the tang.
The tang itself had quote a bit of crud on when the handle material was removed. Some of this has already been removed. I am planning to leave the knife in 5% vinigar overnight in order to loosen the remaining crud & rust.
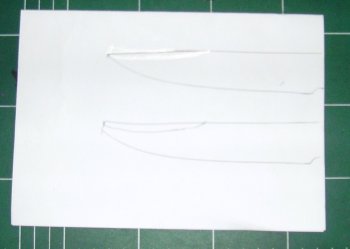
I drew an outline of the blade in order to try and visualise how best to reshape the tip of the blade. What I managed to establish was that it may be best to straighten the spine section of the blade at the clip or swedge area by removing metal there and leave the edge of the blade unaltered. See the picture below:
IMGP1777.JPG
The line as drawn in the photo seems to work. I will then perhaps alter the clip to start further back on the spine and be a straight line to the tip of the blade.
Opinions are once again most welcome.
 
Totally agree. I would absolutely grind the swedge to bring the spine down to the edge as you outline and leave the edge alone. If you don't you'll have a goofy nose on the blade.


Sent from my iPhone using Tapatalk
 
I am reviving this old thread of mine after more than two years since the last post, simply because I am not yet done and need some input from you knowledgeable gents on the forum.
I have been working on this knife on-and-off and had initially worked the blade with files to get the damaged point sorted and redo the swedge to a point. In November of last year (2018), I bought myself a belt grinder and refined the blade more, removing as much pitt marks and the original grind marks as possible and thinning the blade at places where it was thicker than the sorrounding areas, then I left the knife for a while again, waiting to recover from a neck operation.
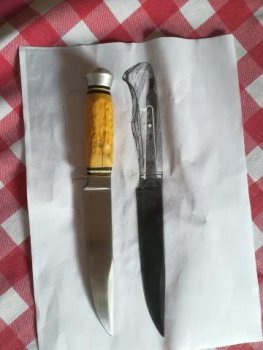
I still don't like the original handle of the knife and have been contemplating what to do about it. This last week I took the knife out of the cupboard and relooked at what to do on the handle. The tang has a distinct upward angle which translate to the handle, making it look awkward. It als has a thin brass guard that does nothing but restrict the area of the handle that can be grasped.so it doesn't handle too well. So I removed the handle material, spacers, guard, etc. and made a photo copy of the blade and started dawdling on the paper. See below:
IMG_20190507_081702(1).jpg

It is a poor cell phone image , I apologise for that, but it does give an idea of what I hope is a decent concept for an alternative handle. The knife was placed as well, to give an idea of the current state of it.
I am thinking of simple spacers on the front and cutting the through tang, changing it to a hidden tang with a pin through it. On the image, I have drawn how I plan to change the shape of the tang to get it more to the centre of the handle and get a more aesthetic profile. The tang is soft enough that I can drill through it, I tested for that. I also plan to thin the tang a little and to square up the shoulders to get a decent fit on the planned spacer.
I am happy for any comments or suggestions on this proposed handle.
 
I love your proposed design. On the ones I have done the tang was easy to work with. It would not have been difficult to heat the tang and redirect it in any direction you need it to go to suit the new handle.
 
Johan - my guess - and it is a guess is that the tang is threaded either into the end pommel or into a nut in the pommel. You may not have as much of a tang as shown on your drawing. You may wish to plan accordingly. Just be prepared.
 
Johan - my guess - and it is a guess is that the tang is threaded either into the end pommel or into a nut in the pommel. You may not have as much of a tang as shown on your drawing. You may wish to plan accordingly. Just be prepared.

Nope-I scrolled back farther. You took it apart. You are golden..
 
Thanks for all the replies gentlemen. I will then proceed with caution and see how it pans out
I have yet to decide on the handle material to use. I have numerous thoughts and most of them can be complicated if I try it. One is to use warthog tusk. Because it is so curved, I am thinking of cutting it into sections, straighten the sides to take most of the curve away, add some spacers in between, glue it up, square it all up and carve away. Easy-peasy...not!
 
I have a coupe of warthog tusks that were given to me but hadn't though about how to use them so will look forward to seeing what you come up with Johan
 
Back
Top