The Laser Thread

So once you've centered your work in Lightburn, and then I center the laser on the work table. Tell it to move to position 8 and 8. That's on the little "move" tab. You just put in 8 for the X axis and 8 on the Y axis. Next, loosen the laser head and slide it up some.

Then I put my blade under the laser as centered as looks good. You can then have the laser fire at like 1% to see where it hits. You can also click "Frame" and it will trace a square around the area where it will burn. Once I have it placed where I want it, I lower the laser until the little "foot" hits. This focuses the laser.

Definitely do some test runs on a scrap piece of whatever. You'll eventually get the hang of placing it.
Thanks! I’ll be trying that today.
 
How does one know where to position the blade on the grid to get your mark on the blade where you want it to go.
I scan my blade before putting the handle on. I pull the scan into Lightburn as a picture, trace the image and delete the original which gives me an outline. I burn that on MDF which gives me an outline of where the blade positions. I use tape to hold the blade position while setting focus.
 
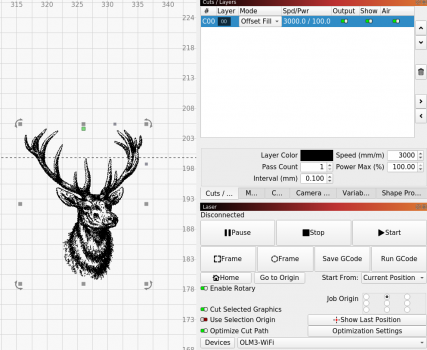
That's much how I do it for cutting leather for sheaths and stuff. For an image on a blade set LightBurn as shown in image with "Start From" set to "Current POsition". The "job origin" is "top center", or where I wish to locate the start point. Then put the blade on the laser working area, manually (by hand is fine) move the laser head to over the blade, set the focus (height), move laser head to where it looks good, then press the "Fire" button and move the laser head so the laser dot is where I wish the green dot in the deer head image to be. That can be upper right corner, top center, all depending on need.

In that image the 150mm/m should be for etching on SS. My notes show that 300mm/m worked good on the deerhead with blade paint on blade. For this etch I used "Offset Fill". LightBurn-Image.png
 
Last edited:
That's much how I do it for cutting leather for sheaths and stuff. For an image on a blade set LightBurn as shown in image with "Start From" set to "Current POsition". The "job origin" is "top center", or where I wish to locate the start point. Then put the blade on the laser working area, manually (by hand is fine) move the laser head to over the blade, set the focus (height), move laser head to where it looks good, then press the "Fire" button and move the laser head so the laser dot is where I wish the green dot in the deer head image to be. That can be upper right corner, top center, all depending on need.

In that image the 150mm/m should be for etching on SS. My notes show that 300mm/m worked good on the deerhead with blade paint on blade. For this etch I used "Offset Fill". View attachment 83911
Do you do the same when doing makers mark?
 
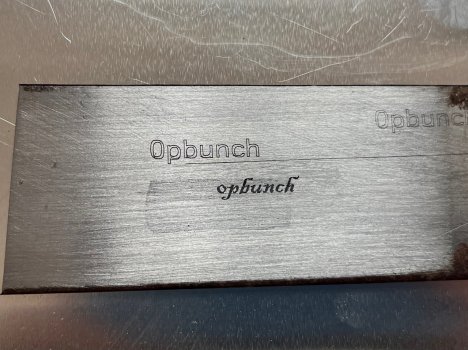
Yep, the laser doesn't really know the difference between maker's mark and the deer head. Here's a maker's mark I normally use for kitchen knives. The laser is set at 200mm/m at 100% power with 1 pass.
IMG-4425.jpg
 
Yep, the laser doesn't really know the difference between maker's mark and the deer head. Here's a maker's mark I normally use for kitchen knives. The laser is set at 200mm/m at 100% power with 1 pass.
IMG-4425.jpg
That’s using a black marker on the steel prior to etching?
 
One thing I always do to make sure I'm happy with my blade position on the laser bed is run a "Frame" and watch where it moves. It will move in a rectangle pattern showing the area where it will burn with the laser once you hit "Start". I fine tune my position this way.
 
One thing I always do to make sure I'm happy with my blade position on the laser bed is run a "Frame" and watch where it moves. It will move in a rectangle pattern showing the area where it will burn with the laser once you hit "Start". I fine tune my position this way.
Chris
Is the frame hi-lited on blade.
I had someone put my makers mark on a few heat treated knives. That’s when I only had a stamp and the set up she had projected a ‘light’ on the area. I think she did a box outline around my makers mark and she positioned the knife using this layout projection on the blade. Does that make sense to you?

No the frame is not highlighted on my laser. I believe there may be an attachment to help with this, but I just eyeball it. When I first started I would burn a piece of wood to make sure I was in the right area, I've gotten good enough at it that I just let it rip now...
 
That’s using a black marker on the steel prior to etching?
I'm not totally sure if that had black paint or not. It's really hard to tell the difference in a photo. The black paint etch "seems" to be a tad "blacker" than the non-paint etch. The non- paint etch is still "black" but perhaps not as deep a black? I've had a couple of folks look at the etches and they say one looks just as good as the other. That's why I don't use black paint on all etches.

On how to locate the blade under the etch take a look at this video, starting around the 4 minute mark. He's using the center as reference, I usually use an edge where I wish the logo located. i.e. a 1/2" from the ricasso, with the handle located on the right side, I might use the right edge of the logo.

As mentioned before I simplify the operation a bit by setting LightBurn's "Start From" set to "Current Position" and manually move the laser head to locate the blue dot (using Fire button) where I've selected as the origin (green square showing on logo in LightBurn).

Best instruction video I've seen yet!
 
Back
Top