Wa Handle Tutorial

Mike Martinez

Well-Known Member
I've been contacted by a few folks regarding a Wa handle tutorial (octagon shape) so I've decided to finish up one that I started a while ago. If any of you who would benefit from this tutorial have specific questions, please address me by PM or by posting here so that I make sure to include said information in the tutorial. I'll make sure to highlight every step and make it picture heavy so feel free to ask questions. The tutorial will be posted on my blog, to which there is a link in my signature line. Thank you all.

-Mike
 
Great idea.
My interest is how you drill and shape the hole for the tang.
....and final fitting of the handle to the blade.
Thank You in advance.
 
I really like the look of Wa style handles. I do wonder how durable they are. Realistically, they are on kitchen knives typically, which don't get the beating outdoor knives do. However, were one to want to use them for say a heavy use butchering knife, how durable are they, and what techniques make them more or less so? I had trouble with splitting on the only one I've done, so I made a 0, 90, 0 grain three layer laminate out of the same wood as the rest of the handle. This was used as the collar (proper name?) then the rest of the handle was fitted against it. As far as I know, it has not split. The first attempt did split and was removed and the new style used.
 
Like anything else, its a compromise. Most if not all Japanese knives will not see the use or misuse that western knives tend to see so the handle isn't much of an issue for everyday slicing, mincing and breaking down of animals. If you're concerned about the handle holding up, you can use a tenon and mortise joint to hold the ferrule (collar) to the rest of the handle and combine it with something like linen micarta. Leave the handle a bit thicker that typical (this depends on the size of the tang) and you'll have improved strength. I've made a few micarta and wood handles for aesthetic's sake but noticed their toughness while trying to remove one after a "blemish," in the wood forced me to reconsider its finished state.

If you're still unconvinced, rather than the octagonal shape you may opt for a D-shape that allows for the handle to be "thicker," without upsetting the balance and feel of the handle. Of course, unless you handle a few well made handles prior to making your own, you'll start behind the eight-ball so to speak. Its also worth mentioning that the same concept of rat tail/ stick tang is used in many western knives and holds up well. Puukkos come to mind... they are quite the workhorse.
 
The heavier duty outdoor type knives I've seen have metal ferrules, some cut so a finger guard can be bent out to one side. This seems pretty stout to me, but I've never used one. I was thinking of using copper for a ferrule for strength and aesthetic reasons. Any issues with copper on a kitchen knife?
 
Some of the older Japanese knives I've seem had copper ferrules and were okay. Personally, I prefer the materials mentioned in my previous post for aesthetics and ease of working. I'm not sure what type of kitchen knives other than a big bone chopping cleaver would require such tough handles, but to each their own. I've used compression nuts to make ferrules for tool handles before, you may want to give them a try. The brass seems to hold up well under heavy use and the threads keep it on the tenon superbly tight and without movement. Just remember to use stabilized woods or woods that don't require it due resistance to movement around water.
 
Looking forward to reading it! I've done a few Wa handles, mostly Oval and 1 D shape so far, but no Octagons; that's coming up soon though! I use aluminum tubing to connect the pieces of the handle together and then shape the tang to slip tightly into the tubing. I shape the whole handle and then attach it to the tang with epoxy. As for removing it, well, it's epoxied, so the handle will most likely be destroyed in the process!
 
I have a design for a large outdoor knife, but the steel is already hardened, so I have to use a stick tang. We'll see how it works. Those compression nuts are a good idea.
 
Taz575:

Great idea with the tubing, I'm sure it makes one heck of strong handle. Since you've been doing D shaped handles, you should have no trouble with the octagon shape. Tough the octagon shape requires a more technical approach and a gentler touch, the muscle memory gained from your prior work will be invaluable. You won't have much trouble with the transition in shape.

me2:

The compression nuts make a very tough ferrule. I epoxy them on top of using the threads. By the way, the threads on the nut will but easily into most woods with not much effort, the epoxy only adds peace-of-mind. I'll post pictures of some in use.
 
Yeah, gentle touch isn't me usually!! LOL. I used to set my workbench on fire from the sparks when I used my Grizzly to hog out my blanks :) Now I have a VS KMG, so there are less fires :) I have a 6x48 belt/9" disc sander I can flatten and square everything up with, then do the tapers and then the corners on the disc sander with the table angled so the angles are the same, then switch over to the KMG flat platen to use the finer belts with the variable speed. Just need time to practice it!

I also have a jointer? that I can use to square things up, just gotta find a place for it in my shop first!
 
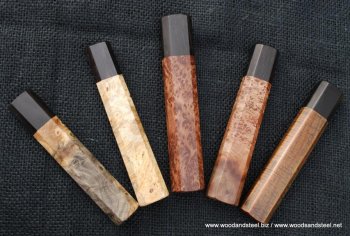
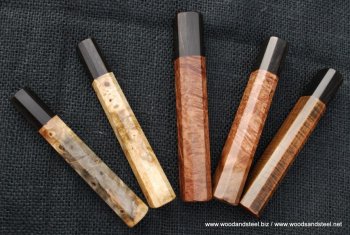
I finished these guys up last week but putting the tutorial together has been more of a pain. My photographer (11 year old son) took close to 1000 pictures and vetting through the vast sea of digital shots has been a very slow process. Anyhow, here is the end result. Let me know what you guys think.

DSC_0232.jpg

DSC_0231.jpg
 
Last edited:
Back
Top