Tutorials on Ricasso end scale shaping?

Mark Barone

Well-Known Member
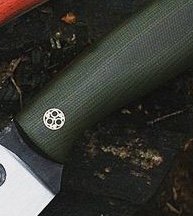
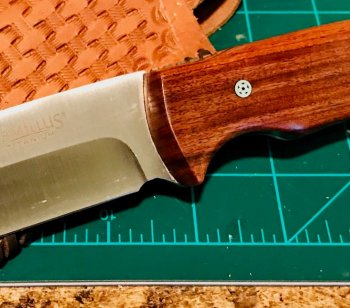
This area seems to give me some trouble I play it safe and have done mostly a straight cut and like slight angle as shown on a previous knife. I want to have a bit of a radius and a slight angle. Does anybody know of a good video that shows this process. I want it more like the green handle knife shown. Do I cut radius first then but the angle on it. Then I feel when I hand sand at the end I’ll mess it up. I apologize if i I cannot get my concern across in words. A537A312-4B48-4BC8-949F-7640C8F2EFAA.jpeg6F859B7D-C8ED-4B7E-BD14-1820681A41B6.jpeg6F859B7D-C8ED-4B7E-BD14-1820681A41B6.jpeg
 
After you drill your pin holes through your scales, just put them together and run a pin through the holes so they will be pinned together like they would be on the knife. Then shape the end of the scales on the grinder the way that you want the top to be shaped.
 
The way I do it is to scribe a "grind to" line on the front, use my rest on an angle and chase the curve or straight bevel that I want. I then change the grit and repeat till I get it fine enough, hit it on the buffer easy...
 
This area seems to give me some trouble I play it safe and have done mostly a straight cut and like slight angle as shown on a previous knife. I want to have a bit of a radius and a slight angle. Does anybody know of a good video that shows this process. I want it more like the green handle knife shown. Do I cut radius first then but the angle on it. Then I feel when I hand sand at the end I’ll mess it up. I apologize if i I cannot get my concern across in words. View attachment 72470View attachment 72471View attachment 72471
I struggled here too until I started taping my scales together and shaping the ends at the same time.
 
I pin the scales together, grind the curve I want and then push the pins flush with the scale on one side and then grind the end to the angle I want on my disc sander with the work rest set to the angle I want. Typically 30 degrees. Flip, push the pins flush again, and repeat. I then hand sand to the finish I want. I usually grind one side till it just barely touches the other side but a flat could be left there if preferred.
 
Ok thanks for the tips. One more question, after you get the edge you want, do you stay away from it when you are profiling the handle? I am assuming the scales must be the thickness I want them to be. If I do the edge and then after try to thin down the scales while they are on the knife, I will clip the edge correct? Actually I think that is where I’m going wrong. I have a hard time judging scale thickness. I always over shoot and shave it down at the end.
 
Last edited:
The way I do it is to scribe a "grind to" line on the front, use my rest on an angle and chase the curve or straight bevel that I want. I then change the grit and repeat till I get it fine enough, hit it on the buffer easy...
I think I will try this. I like the idea of a line. I can’t eyeball things to well.
 
Over the years I've accumulated a lot of handle templates, after I drill my scale pin holes I take a pencil or a sharpie and draw around the tang,then I remove thg he scale and lay the correct template down on the scale and do the same for the front of the scale,I do this on bothe scales,after I cut them out I take one and grind to my line on the front at 90 deg,then I pin the scales together and grind the front of the other one till they are exact matches,then simply grind the round over profile or whatever profile you want on the end and finish them both out with some hand sanding and hit them on the buffer.takes about 30 min total from start to finish.
 
I place my pins the same distance on both ends of the scale. When I shape the front of the scales I grind a pretty steep angle to a thickness of about 1/16-3/32". I scribe a radius for the front. I sand and buff that as a finished area. When I sand the scales the shape of the finished area helps to keep things even.
 

Attachments

  • 20200315_191651.jpg
    20200315_191651.jpg
    186.7 KB · Views: 6
I did what others have said, put the scales together without the blade (I used doubleback tape). I then shaped the top to bottom curve first on a sander. Then clamped them in a vise and rounded them the other way by hand using strips of sand paper down to finish sanded (shoe-shine style I guess you'd call it). I have tried to do it after they were glued up and it's a bear trying to keep from scratching the blade. Once glued up, I still had to sand the rest of the rough scale down to the blank, and shape the contour, but was REAL careful not to ding up that front face or corner.
IMG_8646 (2).jpg
 
These are really helpful answers to a difficult question. I, for one thank you all for the help. And thanks Mark, for asking.
 
My advice has already been mentioned..... but I'll add my thoughts. That being, get the pin holes drilled (with the PROPER size bits) ;) then put the scales in place with pins,PROFILE the handle material to match the knife (this something a lot of folks miss, and then don't understand why the front of their handle looks "funky". Once the handle material profiled, take the off, then pin the two handle together...... then shape and COMPLETELY FINISH THE FRONTS OF THE HANDLE MATERIAL.
How do you decide on a shape?? Try to picture the OVERALL knife in it's finished form, and create a shape that complements the overall shape/design of the knife. Don't be afraid to try different shapes! I did, and stumbled upon a unique design where the top of the handle material sweeps rearward..... it works well and for a while it separated my knives from others....until other makers picked up on it, and started doing it too.:)

Like this:
set1.jpg


Once you have the front of the handle scales shaped and finished, the idea is to NOT touch them again period....they are not done. The way you protect them when gluing is to pin them in place, then use Vaseline on the fronts of the handles and blade..... then glue it up. Any cured glue will pop off easily with a sharpened brass rod. I have a "scribe" made specifically for this purpose.....nothing more then a 3/32" brass pin, ground to a fine point, a held into a handle with a 4-40 set screw..... of you can just sharpen an brass rod and us it that way..... why brass? It won't scratch the blade! :)
 
These are really helpful answers to a difficult question. I, for one thank you all for the help. And thanks Mark, for asking.

Yes definitely a area that could have its own specialist dealin* with it. I’ve been playing it safe but need to increase my skills.
 
My advice has already been mentioned..... but I'll add my thoughts. That being, get the pin holes drilled (with the PROPER size bits) ;) then put the scales in place with pins,PROFILE the handle material to match the knife (this something a lot of folks miss, and then don't understand why the front of their handle looks "funky". Once the handle material profiled, take the off, then pin the two handle together...... then shape and COMPLETELY FINISH THE FRONTS OF THE HANDLE MATERIAL.
How do you decide on a shape?? Try to picture the OVERALL knife in it's finished form, and create a shape that complements the overall shape/design of the knife. Don't be afraid to try different shapes! I did, and stumbled upon a unique design where the top of the handle material sweeps rearward..... it works well and for a while it separated my knives from others....until other makers picked up on it, and started doing it too.:)

Like this:
set1.jpg


Once you have the front of the handle scales shaped and finished, the idea is to NOT touch them again period....they are not done. The way you protect them when gluing is to pin them in place, then use Vaseline on the fronts of the handles and blade..... then glue it up. Any cured glue will pop off easily with a sharpened brass rod. I have a "scribe" made specifically for this purpose.....nothing more then a 3/32" brass pin, ground to a fine point, a held into a handle with a 4-40 set screw..... of you can just sharpen an brass rod and us it that way..... why brass? It won't scratch the blade! :)
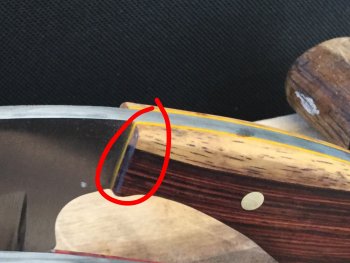

thank you Ed. I do like that swoop. You may have touched upon this. So after I glue and clamp, the glue pops out on the ricasso and I have been cleaning it up with a q tip and acetone. I know from previous experience no sanding can be done in that area, post glueing. However, I think that sometimes the acetone pulls a little glue from under the scale. I don’t like that but don’t know how to prevent it. Is that what you use the Vaseline for?
 
Like most of the previous replies after I get the profile shaped I determine how I want the scale edge shaped and located near the plunge line. It may take several on and offs to get them trimmed just right. I leave a little extra for the hand sanding part. I then pin them together and scribe the line I want to grind to. Then I put them still pinned together in the vise and complete the hand sanding using a backer on the sand paper. Once satisfied I’ll put a buffed finish on them. After that it’s glue up time and subsequent fit and finish.
 
Back
Top