Tang Dynasty Dao inspired short sword (15.5" blade) wip

kevin - the professor

Well-Known Member
Hello Everyone,
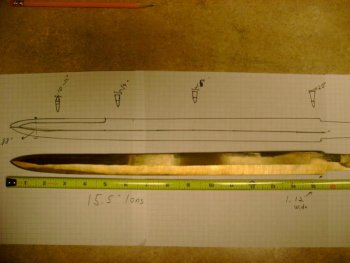
I have been working on this blade for several weeks now. It is an "inserted edge" construction, which has a long name in Chinese. You all know it probably better as san mai. There are two plates of welded and folded extra-improved plow steel cable sandwiching a plate of W2. The cable, especially after welding and folding, is much like low-manganese 1075 (it began life as steel with 80pts of carbon but less manganese than 1080 - I am always on the lookout for these types of resources).

So, outside plates have 75-80pts carbon, the center core has 100pts. This means that the cutting edge will have 100pts while most of the spine will be 80pts.

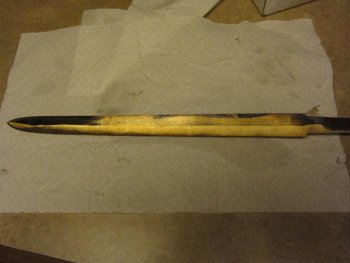
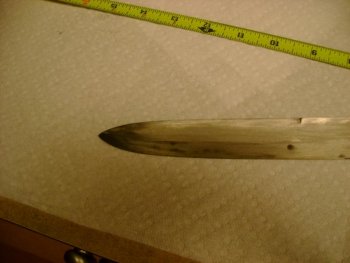
The first pics show the blade rough ground and clayed for heat treat.

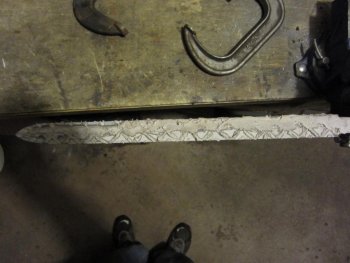
I will hopefully walk you guys through polishing the redneck way, and we will end up with a blade with a nice grain structure from the cable on the back bevel and a vivid hamon on the W2 of the edge bevel. Hopefully.
 

Attachments

  • IMG_0408.jpg
    IMG_0408.jpg
    75.7 KB · Views: 47
Last edited:
After hardening in 120F water for 3 sec and then Parks 50 for about 20 sec, and then tweaking and bending hot blade before the martensite could fully set. I ground the oil and junk off to get a quick glimpse of the hamon. When you take the blade across a fresh belt, right after hardening, you can see the hamon for a little bit. You have to cut through to clean steel, get past the decarb, and you have a glimpse of what may be if you polish correctly. This lets you know if you need to re-harden. It is only a shade of the finished product, but it is obvious enough to have an idea. Unfortunately, you can ruin a hamon with tempering, and I had to temper this one twice to straighten the tip.

Usually, with a clayed blade, you can cold straighten. But, this design, too much near the tip is hardened, so I had to bring the tip in line by clamping to straight stock and tempering for a second time. Hope it did not harm the hamon. If it did, I can take one last shot at it later but will have to use only Parks for the quench and hope the edge does not ripple. I left it a little thicker than I normally would at this stage just in case.

Here is the blade, after quench, grind, and two tempers. Then, another pic after just a bit of filing and grinding to show the planned outcome. I am trying to convince someone to collaborate with me on this and make the fittings for it. We will see, if the blade comes out good enough that I want the rest of the world to really see it. This is the first I have ever made of this style, and it is really a complex geometry. I am finding it tricky!

BY THE WAY - AFTER THE BLADE IS ACTUALLY POLISHED, I WILL PHOTO IN LIGHT BOX. THESE PICS ARE JUST FOR THE WORKING STUFF.
 

Attachments

  • IMG_0414.jpg
    IMG_0414.jpg
    71.3 KB · Views: 24
  • IMG_0416.JPG
    IMG_0416.JPG
    70.8 KB · Views: 28
  • DSC01721-1.jpg
    DSC01721-1.jpg
    46.1 KB · Views: 32
  • DSC01726-1.jpg
    DSC01726-1.jpg
    43.4 KB · Views: 23
Last edited:
This is the result of about 5 hours of polishing. This is just the "base polish," and I am not quite done with this side. The other side needs at least another two hours. When the base polish is done, there won't be any divots or dips from the mistakes on the belt grinder (I gotta learn to just STOP at 120 grit until I can get some ability with the higher belts. I can't "feel" them bite and I screw my lines every time and the edge of the belt cuts little divots across my ridges that take a lot of work to fix with files and stones).

Once I get the base polish down, there won't be anything but scratches from stones and sandpaper. At that point, I will be a little over HALF done with polishing.

It is about now that I remember how much I like to make 4" hunting knives.

Anyway, I can't tell where the cable ends in the san mai and the W2 starts. I have a feeling that the cable will end somewhere just past the beginning of the actual edge bevel. So, the whole back half of the blade plus just a little more should be cable. That will look cool, since the hamon will start just about where the edge bevel and the back bevel meet (by what I can feel with files and paper when I polish).

Once polishing proceeds through the grits of paper up to 2500, it becomes fun, at least. That is when etching and work with loose pumice begins. I like that part a lot, because that is when you get to bring out and decide which parts of the hamon to emphasize.


I hope that all of the work to get there will seem, "worth it." It always does if there is a nice hamon underneath it all.

There almost always is!

thanks for looking, I know progress is boring at this point.


kc

IMG_0420.jpg
 
Starting to look real nice , Whats the length ? Steel sounds cool . Still working on Tamahagane blade . I will say one thing about it , the more I polish it the harder it gets . I had a hardness test RC done on wakizashi and the edge was 66 and the mune and blade above shinogi is around 45 or so . Must have had surface steel that was a lot softer , but as I polished it
Just got harder . good luck on your blade ..... Bubba
 
Thanks Bubba, this blade is 15" long and just over 1.10" wide. It will be about .2" thick at the forte, and .10" thick at the tip. It should be a light, stabbing, slicing fool.

can't wait to see the other blade, either.

The pic above with the outline drawing has dimensions and cross-section shapes and measurements, but they are probably too small to see with the pic shrunk down for posting on the forum. I moved the shoulders forward half an inch since that set of measurements, and polishing would have made everything a bit thinner. Still, they are about right.

kc
 
Last edited:
Kevin , I polished it some more today , my hands are so darn sore , from wrapping handles and sharpening with waterstones , that japanese Ito cord will wear a hole in your finger .. The waki is coming along fine , Should be a great blade . Steel is really hard, I am telling you . Had to break out a nice new Binsue-do stone so it would look crisp.
Your blade is very nice , like to see her when finished . I have never made a chinese sword , at least not a Jian or a dao.
A few chinese laminated cleavers and a few others but, no big swords. Looks great , I have a lot of irons in the fire so to speak . I need to get a few things out of the way , so I can concentrate on my swords . Have 3 in the works including the Wakizashi..... good luck on that blade ... Bubba
 
Hey Guys (Bubba and Tai especially if you read this) - I had to re-heat treat the Tang Dao imitation. In the first heat treatment, there was a curve that I got rid of by clamping the blade to a heavy piece of straight stock and giving it an extra temper.

Unfortunately, the hamon, which was there and nice right after quench, went away in the part of the blade that was touching the heavy piece of stock.
I polished to 600 grit and etched to see where the cable ended and w2 started and see the hamon. It wasn't there for the last 4-5 inches of the blade.

So, I have a contingency for this... the first heat treat is water into oil in and interrupt quench. This time, I just re-clay, and use a quench of just Parks 50. The blade is too thin for water at this point (it is down to almost sharp). In fact, I ground the edge back about 10 thousandths to get it a little thicker.

I know how to reduce decarb to almost (almost) nothing for this - cover whole blade with thin coat of satanite, then run a very rich fire. Heat the entire forge to very hot, but then back WAY down on the one burner I was using (I turned second one off for actual heating). I can get a good, even heat with the forge very hot and by pumping the blade under one burner. I don't need to use two until the blade gets longer than 20".

Here is where in need HELP - The blade had a very small positive (tip up) sori. Now, it has a pronounced negative (tip down) sori.

How can I adjust the curve of the blade without re-heat treating it (I don't know if it will survive 3, and it would still just be guessing to get the curve right)?

What can I do to get the blade straight that won't wash out the hamon or break the edge? How did the Japanese smiths handle this? Things like this had to happen to them, too.

Otherwise, how should I mount a 15" long blade with a slight downward curve?

help!
kc
 
Hello Kevin thats a tough one , Generally a heated copper block is used to adjust sori and, I assume it could be used to straighten kissaki . I believe anyway you do it , It will have to be HT again . Here are a few pictures of yoshindo Yoshihara
adjusting the sori . I have never tried it myself . You may want to email walter Sorrels he may have a idea or two . I do understand that sometimes too short a quench will cause this . Initially during quench the blade first curves down then as quench progresses it will start to curve upwards . Its a tough one , may have to reclay and and quench . I know its heartbreaking after all that work . I really dont have a difinitive answer , I wish I did . I have heard of some smiths that heat the tip of blade and tap it ( spine down) with wooden mallet or in my case a baseball bat...... put blade on soft piece of wood or soft copper ...

Good luck Bubba


walters email walter sorrells <walter@waltersorrells.com>
 
Last edited:
Bubba - I have tried that to no avail with modern steel.
Howard Clark emailed me back and said the same thing, as did Owen Bush.

So, re-heat treat.

Hope Parks is as gentle as it is supposed to be. Actually, you often get a nose dive in oil. I am just going to pre-bend by the amount it dove. If I get a gentle positive sori, this blade will be a lot like a certain style of Japanese blade instead of Chinese. I can live with that. At least then I can get someone to make me a tsuba and I can mount it.
kc
 
I have some copper tsuba blanks , you are welcome to one of them , they already have blade ana (hole) but, its small so it can be fitted to almost anything . Good luck buddy .Let me know and I will send it to you ...... Bubba
 
Hello Kevin give me a call , when you get time . your mail box is full so, I couldnt leave you a message .... Bubba
 
!@#$%^&*( THIS ONE IS DEAAAAD!

It is quenched, straight, and has a wonderful hamon. But, the act of quenching and straightening when it was this thin put too many little dings and dents. There is no way I will be able to resolve these issues. If I grind all the crap out, then grind the other side so the bevels match, the thing won't be stiff enough for its intended purpose.

I could chop it short an maybe make a dagger, but I don't want a dagger, I want a sword.

Back to the drawing board. This often happens the first time with a new design. Heck, it happens about one out of 3 or one out of 5 anyway between breakage and my perfectionism.

grrrrrrrrr

kc
 
I know exactly what you mean , I lose a few now and then . They seem to run in cycles. Do you need a tsuba . I have some that are cut from 1/4" copper with hole already cut. Hole is kinda small so it can be filed to fit sword . It can be engraved or hammer finished or whatever . Let me know and I will send you one . You also may want to thin it down to 3/16" or so . Take care .... Bubba
 
thanks man. I don't need a tsuba, now. I just need to figure out what I am motivated to make next. I have a billet I am working up to layer count that will be a sword (probably a jian, if not, then a goose quill dao). I often make a knife or two for the fun of it between swords since they are so much work, and so fragile, compared. Plus, I should get my new MicroMark Hi Torque Mini Mill in the next week. I will want to make some guards and fittings for knives to start the learning process and play with that thing, for sure!

thanks,
kc
 
Thats fine , I am also working on a new sword billet sanmai with blue (aogami)paper core. with about 25 layers of folded iron each side right now its abour 20" long but pretty thick and about 1/1/4 " wide .should draw out to about 24 -25 inches
I am nearly finished with another wakizashi I forged Quite a while ago , its made from 9260 monosteel with a real nice temper .Should be a great dozo cutter.All done in black with copper fittings. I was going to use Shibuichi but I did not make enough . I want to use that on our collaboration piece , which is nearly polished as, once said you can use it for shaving and a mirror.I saw those little mills , would be great for doing Bo-hi HMMM ? how long is the travel on the mill ??
good luck on new blade . Going to St Louis today to buy some fine silver for habaki I need to make. Take care will talk later

Bubba
 
Back
Top