You are using an out of date browser. It may not display this or other websites correctly.
You should upgrade or use an alternative browser.
You should upgrade or use an alternative browser.
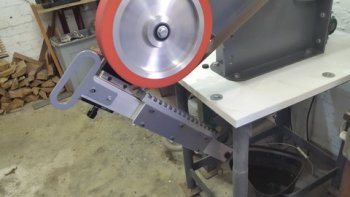
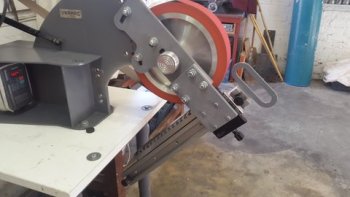
Surface Grinder - surface grinding attachment
- Thread starter KenH
- Start date
Stang Bladeworks
KNIFE MAKER
Now that is cool, very impressive.
Thanks for the nice words Boss, Never thought of it until just now, I should have posted this in the WIP forum - never can tell when a person might get lucky {g}Ken,
Great pictures and post.
I am in the process of making one of these based loosely on yours.
I will post pic's of the build as I progress so we get a good reference thread.
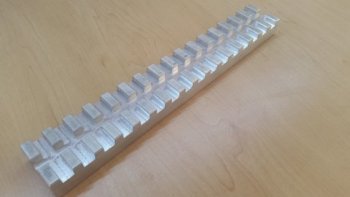
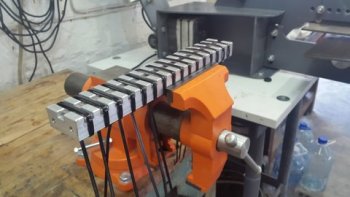
in South Africa we could not get 50 x 10 x 5 magnets so I used 20 x 10 x 5 magnets ran them down the spine as well. the slots for them is 11 mm with 8 mm space between. used cable ties to make sure they did not jump out of their slots while glueing them in. Thanks to all that posted picks & videos which helped me in my build. going to assemble tomorrow & will send picks
Attachments
making some progress on our SGA.
Before anyone asks, sorry no plans. I looked at Ken's pictures and parts list and cobbled it together.
Hopefully it works!
Before anyone asks, sorry no plans. I looked at Ken's pictures and parts list and cobbled it together.
Hopefully it works!
thanks to all the others I adapted their designs to a Vormac machine made here in Cape Town South Africa, still a lot of work to get it right.
now it is working & much better that I ever hoped for
now it is working & much better that I ever hoped for
Attachments
close to done.
mocked up and mounted. Fits both the KMG and Uber grinders.
It does not taper handles. Maybe the next one will. It shouldn't be that hard to do.
mocked up and mounted. Fits both the KMG and Uber grinders.
It does not taper handles. Maybe the next one will. It shouldn't be that hard to do.
Magnets used: https://www.amazon.com/gp/product/B075WRM6S7/ref=ppx_yo_dt_b_search_asin_image?ie=UTF8&psc=1 around $20
linear roller: https://www.aliexpress.com/item/32842691822.html?spm=a2g0s.9042311.0.0.1ad24c4dzZWx5s around $120
cross slide: https://www.aliexpress.com/item/32658472868.html?spm=a2g0s.9042311.0.0.1ad24c4dzZWx5s around $45
Metal cost is simply a wild guess. Maybe $100?
Fasteners maybe $30
A metric tap we needed was $10
The metal used is what I had on hand. If I had to buy the metal for this I probably would have tried to use 1/2" aluminum bar stock and sticking with the 1" surface bar. I used 1/2" and a little 1/4" mild steel. I had Luke ( my son-in-law) mill the slots in the aluminum bar to fit the magnets. He is taking machining classes and got to put some of his new skills to use. It took him a couple hours that I was glad I didn't have to do. It's tedious.
A simple 1.5" square tube was used for the tool arm.
The construction time is 70% matching and drilling holes to mount the linear roller and cross slide. Almost all of it was drilled and tapped. I did weld the tool bar to the mounting tab because the rest can be taken apart. The cross slide required metric fasteners. The rest I used 1/4-20 socket cap screws. There was some countersunk screws used to fasten the cross slide to the tool arm mounting plate. This was nothing more than drilling countersinks to depth enough for the socket caps. The rest I left proud.
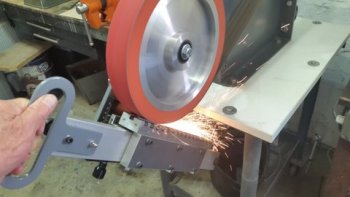
I have done one test. I used precision ground 01 in 6"x1" stock. I took it down .015" in just a few passes. It held .002" which isn't terrible. I put a finish belt on and it cleans it up very nicely. Much nicer than I anticipated.
To square the wheel to the surface, you basically grind the surface plate with the wheel and you have matching surfaces. This does create a shallow 2" groove in the plate. This design does not adjust vertically so your work area is 2".
This design does not taper handles. It could with some modifications but that is for another time. I don't have a need for that and I have other projects to work on.
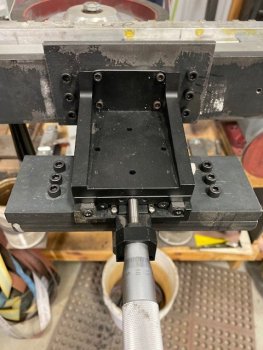
The cross slide is mounted upside down and horizontal. It is meant to be a Z axis (up and down) cross slide but it is now an upside down Y axis.
The bottom 1/2 plate is welded to the tool arm.
The upper 1/2" plate is drilled and countersunk with 9 through holes (not visible) to hold the cross slide. It is also drilled to mount to the lower plate. The lower plate was drilled and tapped to match the upper plate. This holds the whole thing onto the tool arm.
I did not disassemble the cross slide for the 9 holes to mount. I taped a piece of paper to the based of the slide and with a pencil shaded the bottom. This transferred the hole pattern to paper. I then taped the pattern to the upper plate, center punched the hole pattern, drilled and tapped to match. The through holes were slightly oversized since this isn't high precision and getting 9 holes to match isn't to be disrespected.
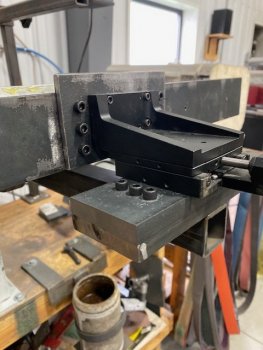
There are springs inside of the cross slide that pull it "back". The adjustment knob is graduated but I'd guess it is metric graduations and basically is nothing more than a guide.
The vertical plate is 1/4" and fastened to the 1/2" surface backer plate via drilled and tapped holes. The cross slide is also fastened to the backer plate with drilled and tapped holes. A hole transfer punch comes in handy here.
It's important that the whole assembly be perpendicular to the wheel. Dressing the surface eliminates any taper but still you want it as perpendicular as possible to minimize your dressing step.
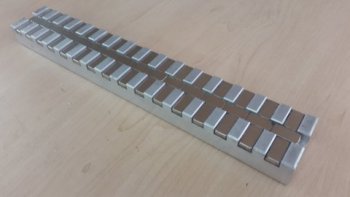
We used gflex epoxy for the magnets. JB Weld is magnetic and will crawl all over the magnet before it sets.
The magnets are fierce. I have (nearly) zero worries about the metal sliding off when grinding. I had to use a screw driver to pull one piece off. The slots were milled with a 1/4" gap between them. Watch finger pinches when adding or removing stock from the plate. The magnetic pull is really something.
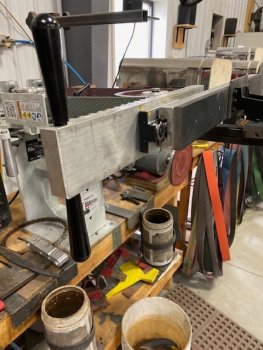
You can see the magnets do not fill the milled grooves. I had 3" aluminum bar on hand so that is what I used.
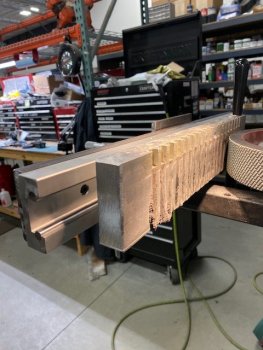
The "surface" is 1" 6061 aluminum bar. I did not surface grind this where some might want to. It was flat enough. It is backed up by 1/2" bar stock. It is not bending.
The handles are 3/8-16 drilled and tapped into the surface bar. The surface bar will slide out on one end. This is intentional. The handles prevent it from shooting out if the grinding wheel grabs it. Fast and even light passes work best.
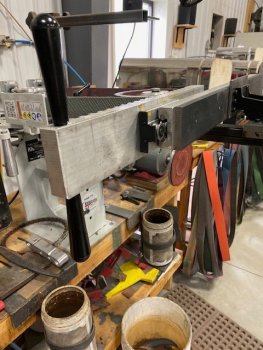
I have not tried non-magnetic material yet but double stick tape and light passes should work just fine.
A lot of the build time was just head scratching trying to figure it out. This can be built with a metal saw and drill press if you can get the surface plate slots milled for the magnets.
This tool fits my KMG-TX and Uber grinders.
I chose horizontal since it seemed to be easier.
Total cost is around $300 to $350 and a bit part of that is a wild guess on what the metal will cost.
For metal when I need precision thickness, I will use this to get close and then switch to my (stone wheel) surface grinder.
For non-metal I will use double stick tape and then hand lap on a surface plate to thickness.
I expect this will be awesome for damascus billet clean up to stack it or just to get it to a reasonable thickness.
Thanks again Ken for posting your building information.
linear roller: https://www.aliexpress.com/item/32842691822.html?spm=a2g0s.9042311.0.0.1ad24c4dzZWx5s around $120
cross slide: https://www.aliexpress.com/item/32658472868.html?spm=a2g0s.9042311.0.0.1ad24c4dzZWx5s around $45
Metal cost is simply a wild guess. Maybe $100?
Fasteners maybe $30
A metric tap we needed was $10
The metal used is what I had on hand. If I had to buy the metal for this I probably would have tried to use 1/2" aluminum bar stock and sticking with the 1" surface bar. I used 1/2" and a little 1/4" mild steel. I had Luke ( my son-in-law) mill the slots in the aluminum bar to fit the magnets. He is taking machining classes and got to put some of his new skills to use. It took him a couple hours that I was glad I didn't have to do. It's tedious.
A simple 1.5" square tube was used for the tool arm.
The construction time is 70% matching and drilling holes to mount the linear roller and cross slide. Almost all of it was drilled and tapped. I did weld the tool bar to the mounting tab because the rest can be taken apart. The cross slide required metric fasteners. The rest I used 1/4-20 socket cap screws. There was some countersunk screws used to fasten the cross slide to the tool arm mounting plate. This was nothing more than drilling countersinks to depth enough for the socket caps. The rest I left proud.
I have done one test. I used precision ground 01 in 6"x1" stock. I took it down .015" in just a few passes. It held .002" which isn't terrible. I put a finish belt on and it cleans it up very nicely. Much nicer than I anticipated.
To square the wheel to the surface, you basically grind the surface plate with the wheel and you have matching surfaces. This does create a shallow 2" groove in the plate. This design does not adjust vertically so your work area is 2".
This design does not taper handles. It could with some modifications but that is for another time. I don't have a need for that and I have other projects to work on.
The cross slide is mounted upside down and horizontal. It is meant to be a Z axis (up and down) cross slide but it is now an upside down Y axis.
The bottom 1/2 plate is welded to the tool arm.
The upper 1/2" plate is drilled and countersunk with 9 through holes (not visible) to hold the cross slide. It is also drilled to mount to the lower plate. The lower plate was drilled and tapped to match the upper plate. This holds the whole thing onto the tool arm.
I did not disassemble the cross slide for the 9 holes to mount. I taped a piece of paper to the based of the slide and with a pencil shaded the bottom. This transferred the hole pattern to paper. I then taped the pattern to the upper plate, center punched the hole pattern, drilled and tapped to match. The through holes were slightly oversized since this isn't high precision and getting 9 holes to match isn't to be disrespected.

There are springs inside of the cross slide that pull it "back". The adjustment knob is graduated but I'd guess it is metric graduations and basically is nothing more than a guide.
The vertical plate is 1/4" and fastened to the 1/2" surface backer plate via drilled and tapped holes. The cross slide is also fastened to the backer plate with drilled and tapped holes. A hole transfer punch comes in handy here.
It's important that the whole assembly be perpendicular to the wheel. Dressing the surface eliminates any taper but still you want it as perpendicular as possible to minimize your dressing step.

We used gflex epoxy for the magnets. JB Weld is magnetic and will crawl all over the magnet before it sets.
The magnets are fierce. I have (nearly) zero worries about the metal sliding off when grinding. I had to use a screw driver to pull one piece off. The slots were milled with a 1/4" gap between them. Watch finger pinches when adding or removing stock from the plate. The magnetic pull is really something.
You can see the magnets do not fill the milled grooves. I had 3" aluminum bar on hand so that is what I used.

The "surface" is 1" 6061 aluminum bar. I did not surface grind this where some might want to. It was flat enough. It is backed up by 1/2" bar stock. It is not bending.
The handles are 3/8-16 drilled and tapped into the surface bar. The surface bar will slide out on one end. This is intentional. The handles prevent it from shooting out if the grinding wheel grabs it. Fast and even light passes work best.

I have not tried non-magnetic material yet but double stick tape and light passes should work just fine.
A lot of the build time was just head scratching trying to figure it out. This can be built with a metal saw and drill press if you can get the surface plate slots milled for the magnets.
This tool fits my KMG-TX and Uber grinders.
I chose horizontal since it seemed to be easier.
Total cost is around $300 to $350 and a bit part of that is a wild guess on what the metal will cost.
For metal when I need precision thickness, I will use this to get close and then switch to my (stone wheel) surface grinder.
For non-metal I will use double stick tape and then hand lap on a surface plate to thickness.
I expect this will be awesome for damascus billet clean up to stack it or just to get it to a reasonable thickness.
Thanks again Ken for posting your building information.

