Stainless Bolsters - Glue or No Glue Before Peening?

MTBob

Well-Known Member
I finally took the plunge and tried my first pinned dovetailed stainless bolsters on a steak knife (photos later). To get the bolsters initially positioned, I epoxied the bolsters onto the blade. Before glue setup I removed and cleaned the pins, then tapering the pin holes, smashing the pins with a press, then peened the pin heads, and finished surfaces. The pins are invisible and the finish on the 416 SS is superb, hoorah!
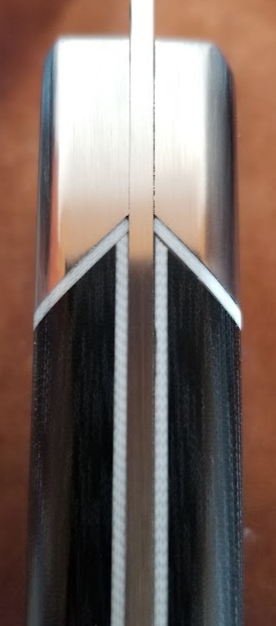
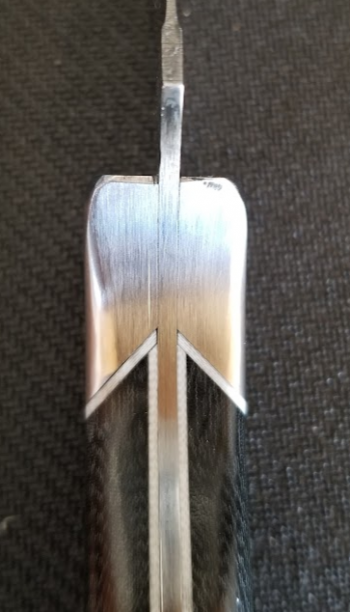
But, I notice a very very small line between the blade and the bolster, at the spine and bottom of the bolster. I was hoping that the blade and bolster would finish out appearing as one piece, with no visible line.
Now I'm wondering if I should have skipped the glue step and directly mounted the bolster on the blade with only the pins. If I do that, I'm a little unclear how I'd keep the bolsters in place and tight to the blade while pressing and peening the pins.
Suggestions?
(PS: I made the mistake of asking my wife if she wanted a set of steak knives. The answer - yes. But, crap, she wants 10!)
 
I’ve seen people use super glue to hold them in place while they drilled for the pins, then knock them off and clean off the super glue residue before reinstalling them. Never tried that myself though. I use super glue to hold them for drilling, then clean it off, slide the pins in and solder them, then press the pins, then clean off the solder. I use a vise grip with a short nail welded onto each jaw to clamp them, so there isn’t a big heat sink from your clamp when you are trying to solder it. Works good for me. Doesn’t seem to matter how good you get them fit, there is always that line, which is why I solder them. I’m curious too, to see what other ways people have to approach that.
 
Not sure what you mean by a very small line between bolster and knife. Here is a knife I finished recently. It has brass bolsters. It is easy to see where the bolster stops and the knife begins. The only help I can provide is the word “flat”. If the bolster is flat as possible and the knife blank is flat as possible then the connection between the two is easier to hide. For me stainless bolsters are harder to work with as opposed to brass. It is just a more difficult process to shape stainless over brass. Looking forward to your pictures.

872-FACFB-2813-43-EC-891-D-60-B5-BF0-ED462.jpg


BA38-AC9-A-1-ED6-4394-BB5-B-298-D3-F9-C2191.jpg
 
Here's a closeup of the mating lines I'm talking about between the bolster and blade. The lower finger relief area (second photo) seems to fit better.
Ed: What kind of solder do you use to connect the bolster?
Dennis: Do you solder your bolsters? And, what steps do you use to attach the bolster?
BTW: I'm still not satisfied with my G-10 liner/dovetail match-up. I'm able to get good 45 degree matching cut on both the SS and G10 using my mill. But, I think I'll change my assembly steps to try to get a perfect better dovetail fit with the white liners.
Every knife is a learning experience!!

1644689544268.png
Damn scratch still shows up, argh!
1644689759657.png
 
MTBob - Here is a link to a KITH knife that I made. On page 6 I start a build along on how I make bolsters. Hope it helps you out a bit. But, in knifemaking we are ever changing, as I learn new stuff, I incorporate it into the next build. Same goes with bolsters.

 
I use Safety-Silv 56, I believe it’s called. It’s a 1100 degree silver solder, and so far the best I have used on stainless. It’s expensive, but worth it. You want to keep your blade clamped in a heat sink when you do it. I put a 60 grit finish on the bottom of the bolster so it creates grooves that the solder can flow through. It matches nickel silver perfectly, it’s slightly “yellower” than stainless steel.
 
There are TONS more experienced people here who can help you other than me. With that said dump the white spacers and use black. Dark spacer material blends in with glue way way better than white. Second dump the 416 SS bolsters and use Nickle Silver. Way harder to get a great finish other than satin using 416 SS. Dam those scratches. Third I use a slow set G flex epoxy between bolsters. I peen them and every once in awhile still compress bolsters to knife between peening using a vise and constantly during peening.
 
I put epoxy under my bolsters mainly to be sure there is a seal under there to keep "crud" out. Not a ton of epoxy stays under there after peening and pressing (I press my bolsters on with a bottle jack press).

I've had that space you're seeing happen. I've fixed it by filing perpendicular to that black line. It will often "move" a little bit of the metal so that gap disappears.

Stainless bolsters are difficult and take a lot more time than brass.
 
Here's a closeup of the mating lines I'm talking about between the bolster and blade. The lower finger relief area (second photo) seems to fit better.
Ed: What kind of solder do you use to connect the bolster?
Dennis: Do you solder your bolsters? And, what steps do you use to attach the bolster?
BTW: I'm still not satisfied with my G-10 liner/dovetail match-up. I'm able to get good 45 degree matching cut on both the SS and G10 using my mill. But, I think I'll change my assembly steps to try to get a perfect better dovetail fit with the white liners.
Every knife is a learning experience!!

View attachment 80209
Damn scratch still shows up, argh!
View attachment 80210
Bob, for that fit up between the bolster and handle material, I will use my disc grinder. I use a 22 1/2 degree bevel because I prefer the look over a 45. I start by putting a rough bevel on with the belt grinder just to get most of the material close to shape. Then using a 220 disc, I set the table on the disc grinder where I want it, and get the bolster material beveled exactly where I want it. Without changing the table angle, I then finish bevelling the handle material. I will do the bolster “right side up”, and the handle “upside down”, so that the angles match each other perfectly regardless of weather the angle is exactly 22.5 or not. If it’s say, 22.7, it won’t matter that way. If I’m doing a liner, then I glue that material onto the handle material, so it overhangs the tang side of the scale a little bit. I then flat sand the excess on a granite block to clean it up. Then I will lightly touch up the beveled side again on the disc to make sure that angle is exact. After that, I glue and pin the scale. I have found that this will give a perfect fit up. Takes a little time, but it gives a flawless fit up.
As a little side note, if you need a granite block for flat sanding, look up someplace that does granite countertops. When they cut out holes in the countertops for kitchen sinks, those pieces are usually just scrapped. You can get some nice flat 1” thick polished granite sink sized pieces for free usually. They aren’t as flat as say a Starret granite gauge block, but they also don’t cost $5000 either :)
 
Are you using a tapered reamer on your bolster holes before you put your pin material in it? I like to use reamers so that when you expand the pin , it actually drives the bolster material tighter onto the blade making the line nonexistent. Comment about getting away from the white liner is spot on.
 
You know this thread has raised a good point and a couple of you guys have touched on it.

Sometimes the BEST approach and BEST wisdom is in walking away from a process, method or material that causes you grief and makes the end product something you're not happy with.

Periodically examining your approach and making changes will make you a better knifemaker.
 
MTBob - Here is a link to a KITH knife that I made. On page 6 I start a build along on how I make bolsters. Hope it helps you out a bit. But, in knifemaking we are ever changing, as I learn new stuff, I incorporate it into the next build. Same goes with bolsters.

Dennis: Thank you for this bolster WIP, very helpful.
BTW, your other WIP's - particularly leather working - have been a great help in learning new processes. Thank you for your time and effort in documenting your work steps.
Bob
 
Thanks guys, a lot of good advice, much appreciated. Let's see... a few thoughts:
I put epoxy under my bolsters mainly to be sure there is a seal under there to keep "crud" out.
I've had that space you're seeing happen. I've fixed it by filing perpendicular to that black line.
Great tips. In fact, since I'm using 26C3 for the blade, and since with use it's subject to staining / rust, sealing up the bolster/knife surface makes sense.
for that fit up between the bolster and handle material, I will use my disc grinder. I use a 22 1/2 degree bevel
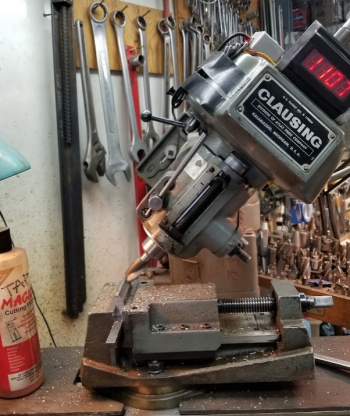
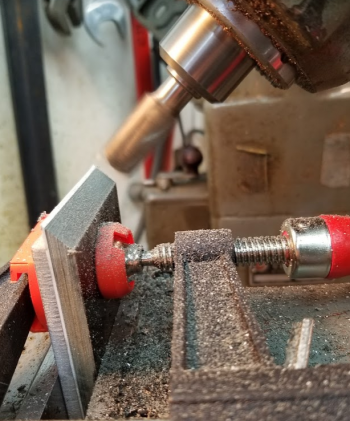
Since I don't have a disk grinder, I've opted to use my mill to cut the bevels. I may reconsider changing angles.
1644768302467.png
1644768406956.png
 
Last edited:
Are you using a tapered reamer on your bolster holes before you put your pin material in it?
Yes, it seems to work well.
Comment about getting away from the white liner is spot on.
I think I understand this, and other's, comments about a white liner. At various steps in finishing the handle I've had discoloration on the white G10 liner edge, and have had to re-sand it to remove the discoloration. I've used white liners in the past on non-bolstered handles with no problem. Are you saying - Never use a white liner - or, Never use a white liner with a stainless bolster - and/or Never use a white liner with a black G10 scale?
 
Sometimes the BEST approach and BEST wisdom is in walking away from a process
Love that comment - sage advice. I've got a spot in the shop for all my UFO's (Un-Finished Objects), a humbling reflection of my abilities. I see these UFO's not as failures, but an opportunity to learn. But, sometimes the project is just one big steaming turd - and ends up in the junk pile, never to be attempted again. This set of steak knives isn't there yet.
 
Back
Top