Stacked Leather Handle Help

Lucky777Leather

New Member
Ok guys be gentle I'm a rookie to the wonderful world of knife making. I have a question about making a stacked leather knife handle. This will be the first time I am making this type of handle. Seems relatively self-explanatory. Can someone explain the steps for me on how to do this. I plan on using some spacers in some small metal washers in it to add a different type of look. When I go to sand and shape that handle what grit sandpaper should I use? What do you use to coat the handle once you are complete? Does anybody know of a step-by-step type of guide to help learn this process. Any help would be greatly appreciated.
 
While leather washer handles are somewhat "traditional", because you are dealing with a "natural" material, that expands and contracts dramatically with temp and humidity, they simply do not stand "the test of time". I have seen, and used some leather that has been "stabilized" and although it holds up better then the raw material, the stabilizing on minimizes it's "movement" Personally I avoid building leather "washer" handles.

That being said, I have seen and used a couple of differnt methods. The first involves saturating the layers of leather with resin/glue, then stacking and compressing to create a "block". After its cured, treat the resulting "block" as you would any other "handle block". The second and most common method also has a couple of variables involved. Both involve cutting slightly oversizes pieces of leather, punching each and then sliding them over a "stick" tang to create a "stack". Glue is often applied to each side, of each piece, and finished off with some type of a compression mechanisim such as a butt cap or a nut that can compress the overall stack. After the "glue" is cured, the entire knife handle (guard, handle and butt cap) are ground/finished down together. The second method was/is to not use any "glue" and compress the stack down with the butt cap/nut, and then grind/finish down the handle.

One interesting variation that I have seen, but not done myself, is to coat the knife's tang, guard, and butt cap/nut with a release agent (in this case vaseline) and glue/stack the handle as described above. Then when its cured, remove the handle and grind/finish it down as a seperate piece. This is done when the configuration of the guard and/or butt cap are such that grinding/finishing everything together would ruin either or both.

In the past, when I did a few leather handles, I would use the same grit belts as I did for woods....generally start out with a 50, then jump to, and finish up with a 220 on the leather. For the guard and/or butt cap/nut, they were finished down to whatever finish best matched the particular knife.

I'm certain what I've explain is not the only way, nor likely the "best" way(s).....but it is the methods that I have seen, and/or what I personally have used. The difficult part of leather handles is finding something to keep them stable. If "raw" leather is used, expecially on a knife that will see much use, the leather will eventually loosen, and/or start to "rot" away. I can't count the number of old military "Ka-bar" knives that I have seen over the years that once had leather handles....and had nothing left but a guard, tang, and a butt cap. As I said in the beginning, because of the drawbacks, I just choose not to build this type of knife handle.
 
Hello Lucky7's and welcome to Knife Dogs!
Mr. Caffrey is undoubtedly more experienced than myself but I have another method that I personally have found to like better than what has previously been mentioned. How I did the few that I have, is I took all the precut leather washers and soaked them in water until completely saturated. I then took them out and ran them through a diluted wood glue and stacked them on an all thread with over sized washers(doubled up) on each end. Then using the nuts on each end tightened the whole stack down as tight as I could. As it continued to dry I would tighten it down even more. I believe I tightened down on the stack about twice a day for a week to 10 days. I left it clamped up like this until I was ready to install it on the handle. When it came time to take it off the all thread I had to thread them off all the way. The stack came off in a solid block almost like wood that I couldn't pull apart or take apart short of cutting with a saw. If you want to add spacers for color or flare, do so on the all thread as well. I epoxied the seems where the leather touched the guard or any spacers and also filled the round cavity either side of the tang with epoxy as well. I have both threaded the tang and peened the tang to secure the butt plate. For shaping use fresh belts, 50 or even a 36 grit for most of the shaping. Be careful, the leather clogs the belts rather quickly and will burn quite easily. After shaping, I put on a Tru-oil finish, 10 to 12 coats if I remember correctly. As Ed said, the leather will move, but so do all natural materials. I have not noticed any degradation of the material but these have yet to see much in the way of use, abuse and/or time at only a year since I made them.
Another option you might want to consider, and I know of several makers who recommend this over using leather, is birch bark. I have used it as well using exactly the same procedure and like it quite well.
A couple shameless photos for reference. :what!:
LHCk1oc.jpg

0QlxYZB.jpg


Good luck
Chris
 
I guess it's time to spill the beans.
I've had many requests for the ins and outs and WIPs over the years but never got around to it. Here's my way of doing it after about 30 years of trial and error with the best results to date.


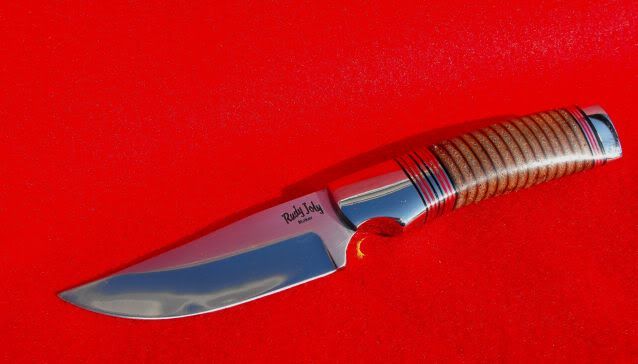
*Start with a finished blade with the tang about 1/3 higher than it is wide. Guard or bolsters attached. This adds stability to the washers and keeps them from twisting.
*Lay out your tang so when all the washers,spacers and whatever do-dads you're using leaves you at least 4 full threads into your butt cap/pommel. Thread the tang 1/2" or better. I draw out my knives and stick to the plan.
* Cut your leather into roughly 1-1/4"x 1-1/2" rectangles. Don't worry about punching the tang holes, I fit each one individually because my tangs taper.
*Take your washers and place them in a sealed container of satin polyurethane for 3 days. I use a vacuum jar and leave it under vacuum until I see no more bubbles escaping. After removing them let dry for at least 24 hours. I make enough to handle several knives.
*When dry, I rough up the faces on a 80 grit belt. Just a quick pass on each side. Done. Fit your individually cut spacers and washers dry on the tang for a test fit.
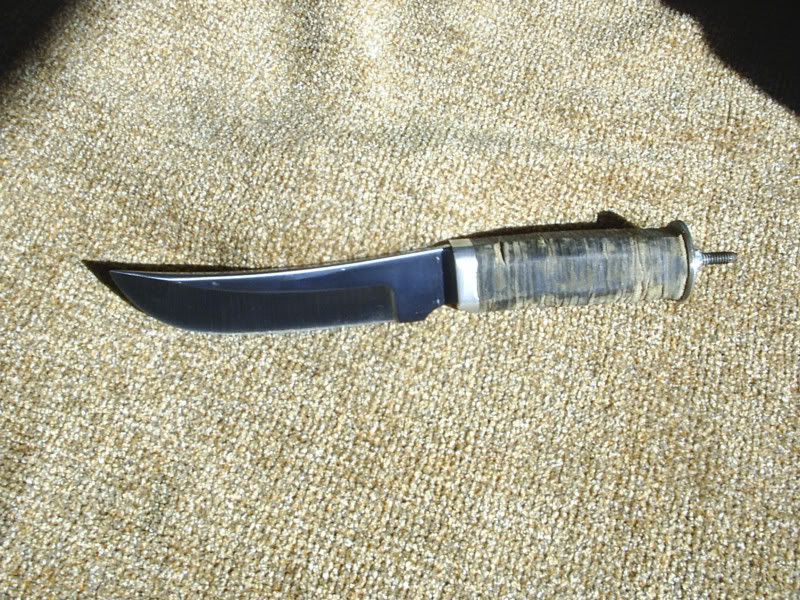
*Once you're happy remove everything in order and start mixing epoxy and do it for real. Epoxy each face. When you get to your last spacer, squeeze everything down with a fender washer and nut (pic # 2) with a square of wax paper between the washer and last spacer. Tighten it firmly but you don't have to use the hammers of hell on it.
*Put the whole mess in a warm dry place to dry 24 hrs. This gives you time to work on your pommel. Tip...tap your pommel about 4-5 threads deep and DON'T final shape it. Screw it on the tang firmly THEN rough shape it. If you shape it before fitting it won't allign properly. Punch radiating cuts around the threaded hole with a sharp punch, mix epoxy and put on pommel. Let dry.


I cut out the general shape on the band saw and do most of the rough grinding with a 220 belt then finish as desired. Finish with a good wax and buffing. I guess I'll start thinking about a WIP with pictures.

Rudy
 
Back
Top