Small Bowie Almost Complete Pics

opaul

KNIFE MAKER
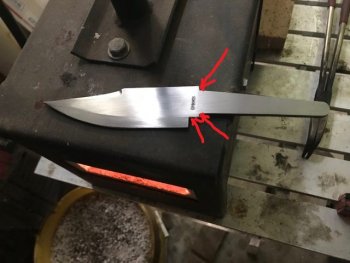
Thought I would try making a smaller Bowie knife. I've heard the smaller ones have been called gentlemen's Bowie's but I'm not sure of that. I got the profile cutout, did the preliminary grinding, thermal cycling and heat quench done today. I'll get the tempering finished this evening. Stell is 1075 from the steel baron.

 
Are the Gentlemans bowies generally as deep (spine to blade) when they are shorter and that is not a critique of this blade OP. I guess my mind, being obsessed with design, automatically questions much of what I see to find reasons etc for how things are done and how they might effect the intended purpose. While I am asking questions, I see you have chosen to go with the square edge relief in front of the guard so is there or was there a reason, other than a way to keep blade depth and not have to have a very long lower guard to cover it.
 
Are the Gentlemans bowies generally as deep (spine to blade) when they are shorter and that is not a critique of this blade OP. I guess my mind, being obsessed with design, automatically questions much of what I see to find reasons etc for how things are done and how they might effect the intended purpose. While I am asking questions, I see you have chosen to go with the square edge relief in front of the guard so is there or was there a reason, other than a way to keep blade depth and not have to have a very long lower guard to cover it.
Gruff- I wish I could answer the width depth question but this is how the sketch came out for the blade using a piece of elk antler I have on hand.
From previous suggestions on building a Bowie it was suggested to have the ricasso profile match the hidden tang handle. I do Plan on a small profile bolster.
So with the blade and handle it’s going to be about a 9” knife.
 
OP I love the scandi grind on the Bowie. Did you take it to zero or is there a secondary bevel?
Thanks Chris! I did take it to zero. However, when I started the finish grinding after tempering I decided to do a full flat grind.
In retrospect I now should have left it as a scandi grind.
 
Thanks Chris! I did take it to zero. However, when I started the finish grinding after tempering I decided to do a full flat grind.
In retrospect I now should have left it as a scandi grind.
I liked it because it is atypical of a bowie and IMO sometimes that is a good thing. For my camp and field use knives I mainly use scandi grinds because they can be easily sharpened in the field. Just fine a smooth rock, match the angle and sharpen.
 
opaul, I initially wrote this last night and then hesitated as you are not asking for advice but this is something I was taught from the time I started knife making! One of the first things known makers told me it that square inside corners or 90* corners, were a perfect place for stress fractures to start!

Those inside square corners will often cause a stress factor during the quench! If you leave the inside corner rounded even slightly there is less chance of that happening!!

OP stress.jpgWell try as I might I having trouble finding documentation for this problem. Except for this one, https://knifedogs.com/search/261304/?q=stress+fractures+from+inside+corners&o=date
When starting to square off for the guard or at the ricasso if you use a round file in the corner and then square off the remainder, is suppose to be the better idea! Something like this! Sorry this is such a bad photo but you can see the radius somewhat! The area the guard is fitted to is also radiused!
IMG_3240.JPG

Any way I like the profile of this one! This is information you can file away for later projects!!
 
opaul, I initially wrote this last night and then hesitated as you are not asking for advice but this is something I was taught from the time I started knife making! One of the first things known makers told me it that square inside corners or 90* corners, were a perfect place for stress fractures to start!

Those inside square corners will often cause a stress factor during the quench! If you leave the inside corner rounded even slightly there is less chance of that happening!!

View attachment 68761Well try as I might I having trouble finding documentation for this problem. Except for this one, https://knifedogs.com/search/261304/?q=stress+fractures+from+inside+corners&o=date
When starting to square off for the guard or at the ricasso if you use a round file in the corner and then square off the remainder, is suppose to be the better idea! Something like this! Sorry this is such a bad photo but you can see the radius somewhat! The area the guard is fitted to is also radiused!
View attachment 68765

Any way I like the profile of this one! This is information you can file away for later projects!!
Thanks CCraft - I'm always open for advise!
 
Dang OP, that turned out super nice! I like that a lot, very pleasing to the eye and looks comfy to me.
 
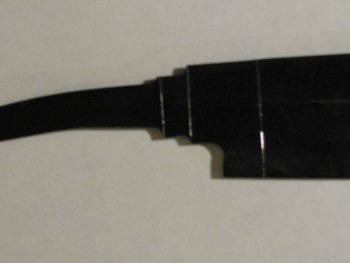
I really like the profile of that guy. One question what is the dark line? Did you edge quench it?
The dark line on the blade is oil. I tried furnace cement for the first time on Aldo’s 1075. The first HT and quench didn’t do well so I had to HT and quench again. It left what you see as a Hamon pattern. I haven’t been able to get a good HT or a Hamon with this batch of 1075. However the second time was a charm and it cane out nice and hard.
I’m glad you like the profile, I think it blends nicely with the curve if the elk antler.
 
Back
Top