Scottish Sgian-Dubh

HHH Knives

Super Moderator
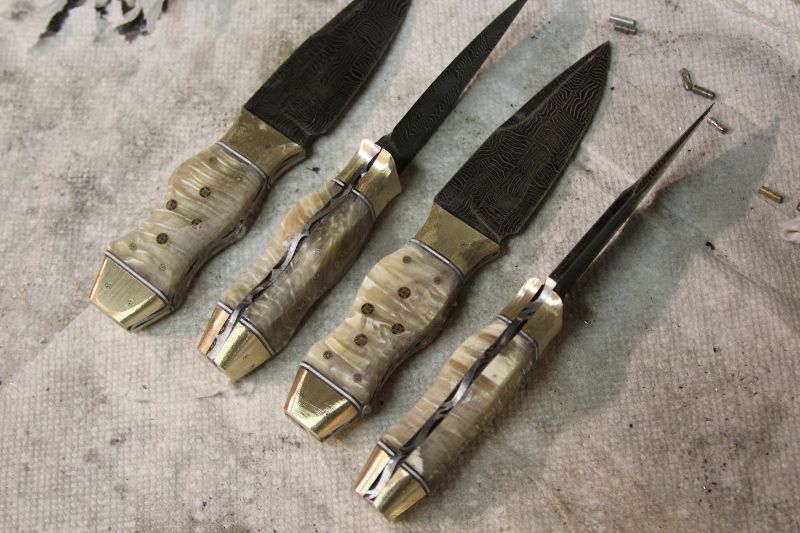
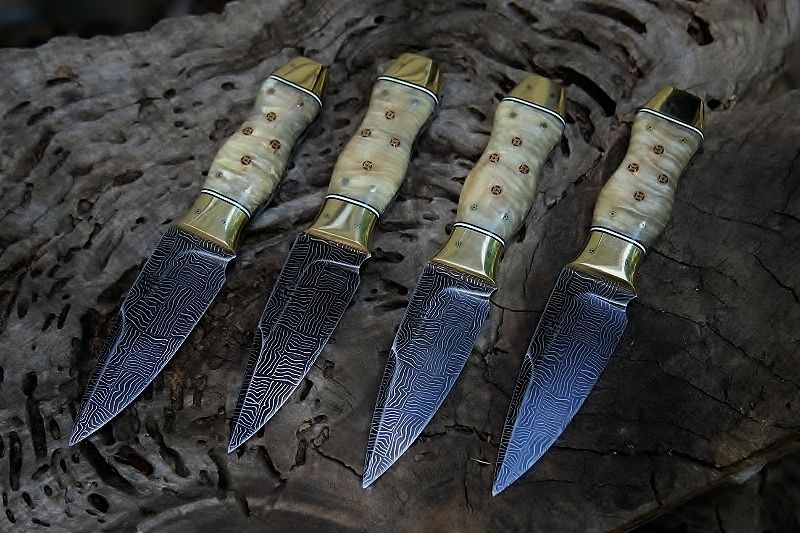
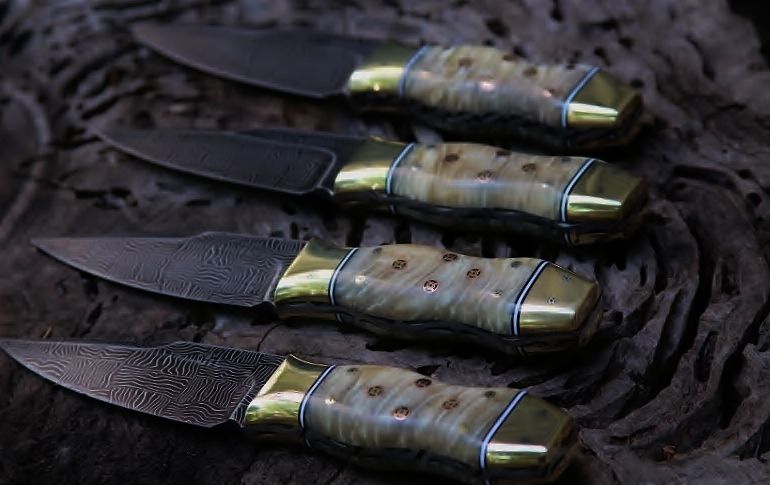
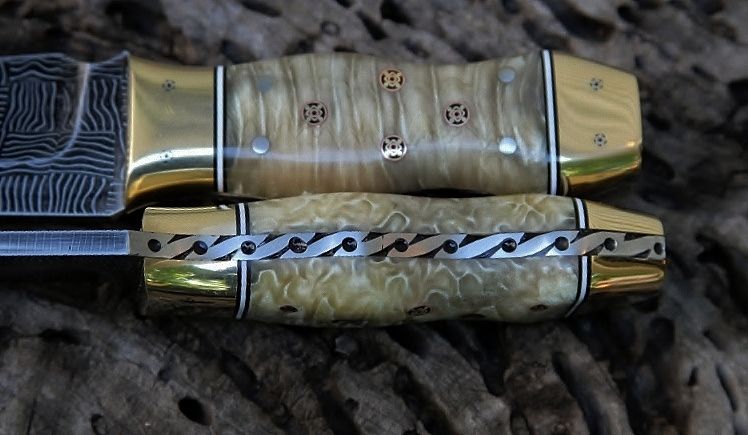
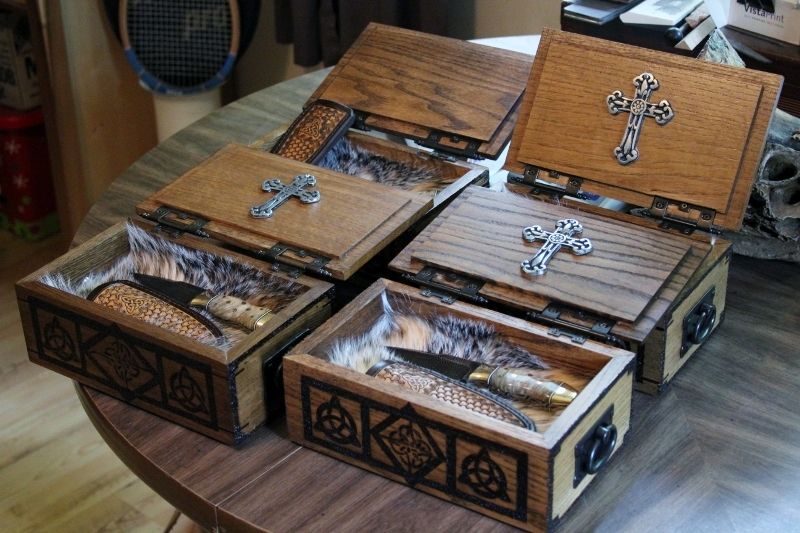
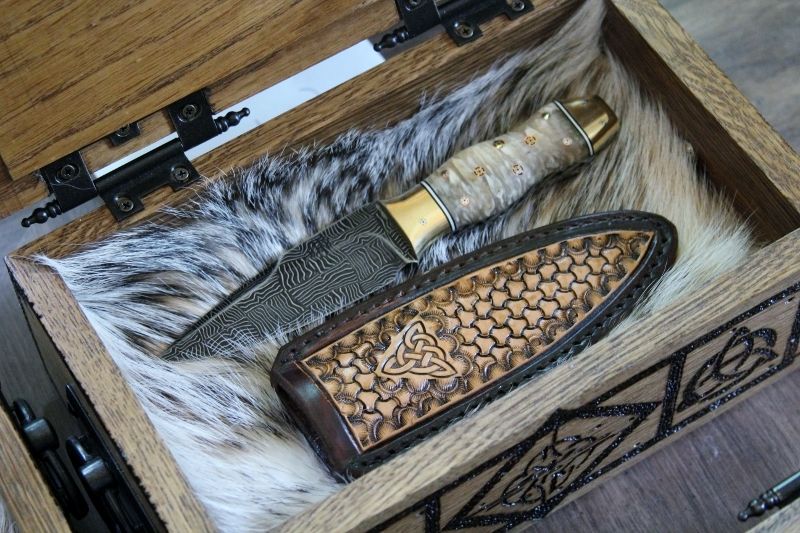
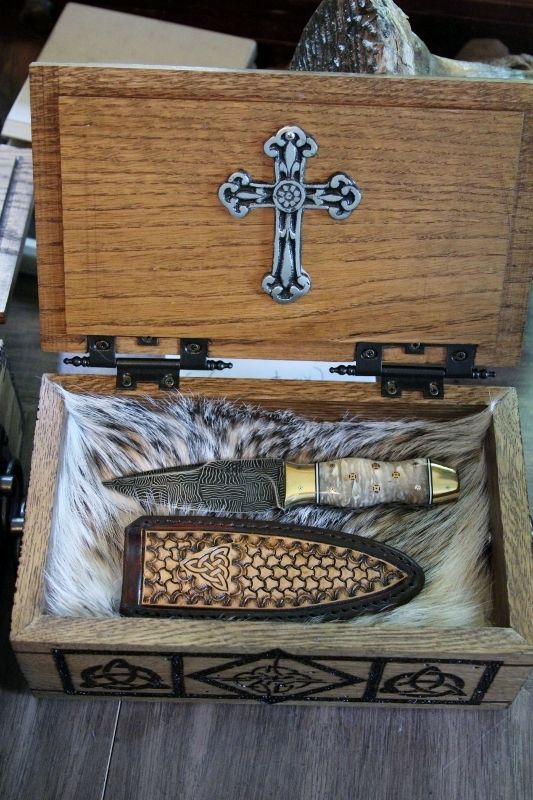
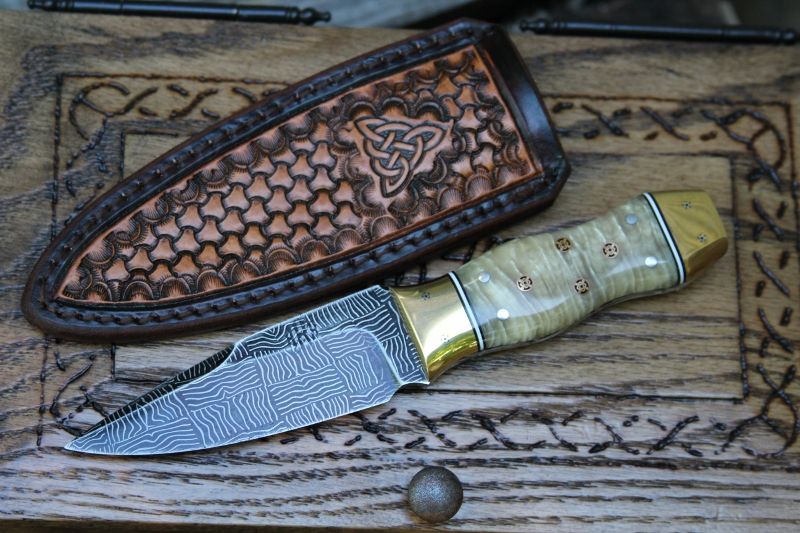
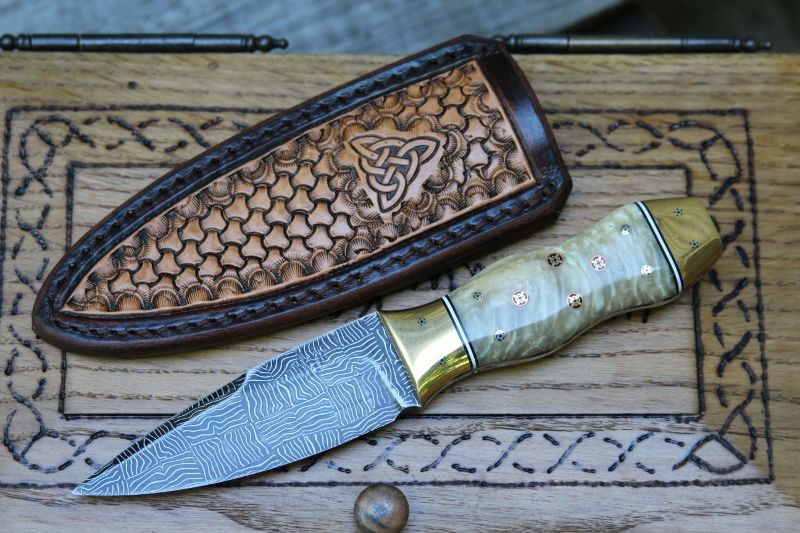
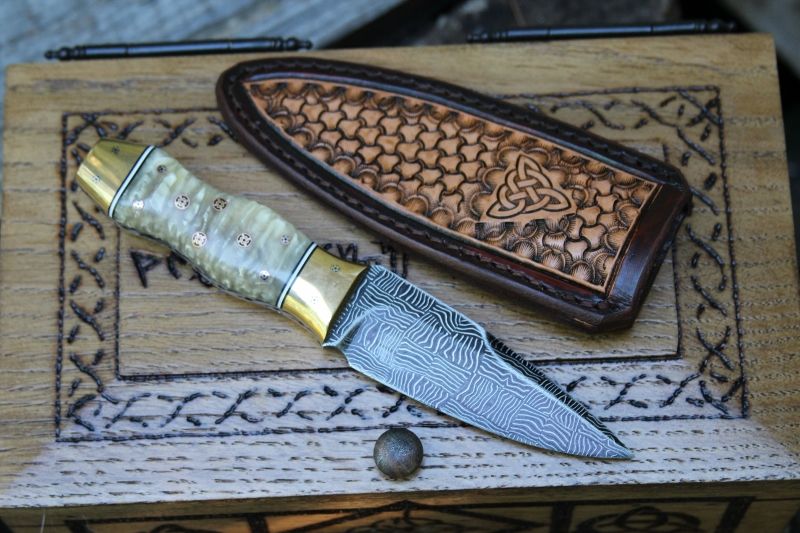
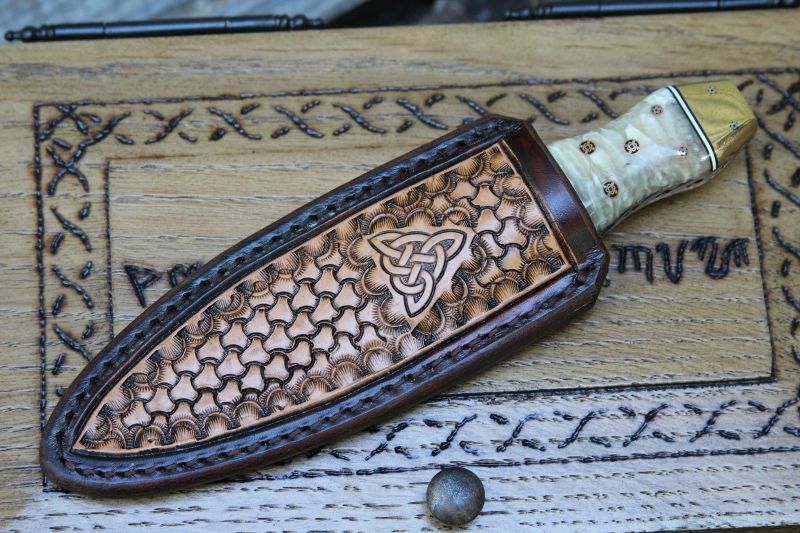
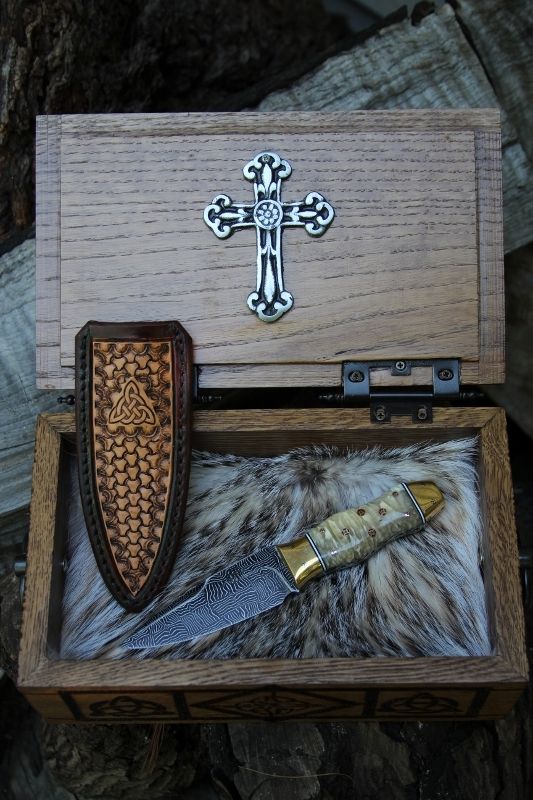
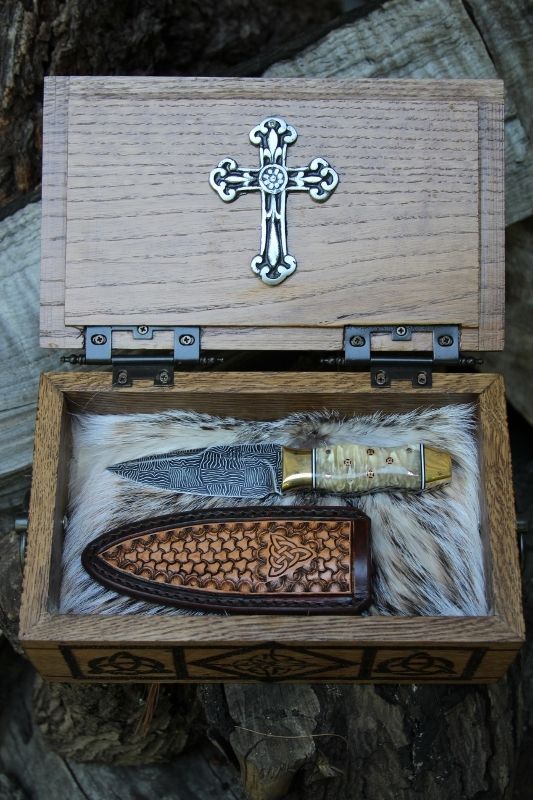
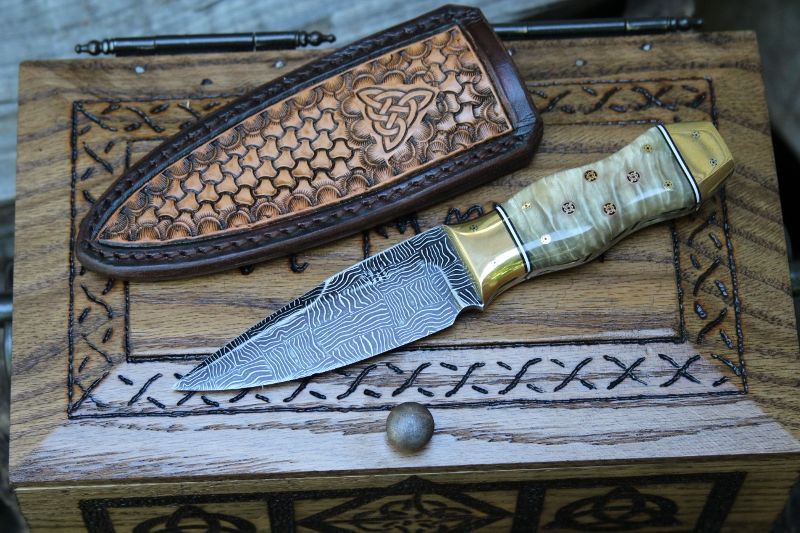
Hello, If I may I want to add a Work in progress post about a set of 4 knives I made. These are Scottish style sgian-dubh knives.


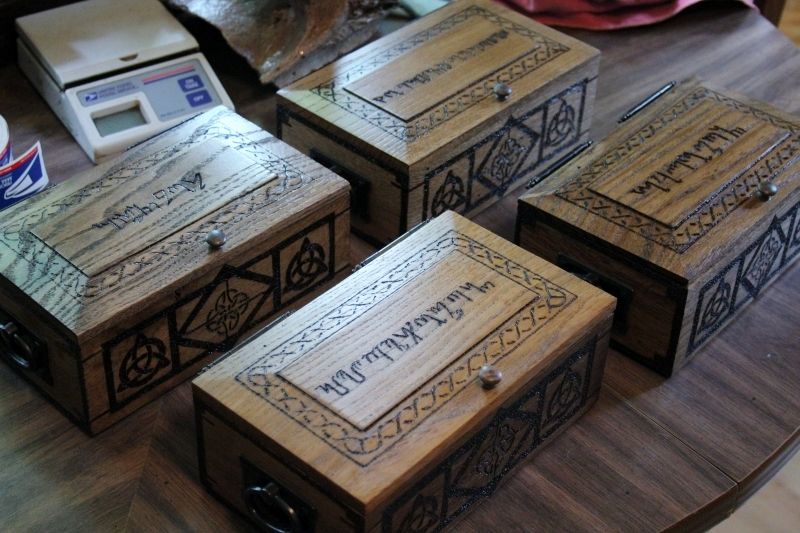
The set of 4 will be a family heirloom and passed down from generation to generation. One knife is for the Father, and 2 are for his sons, and the 4th is for the oldest grandson. These are the first sgian-dubh I have made, and actually had to Gogle search to read about them and there use and heritage etc.


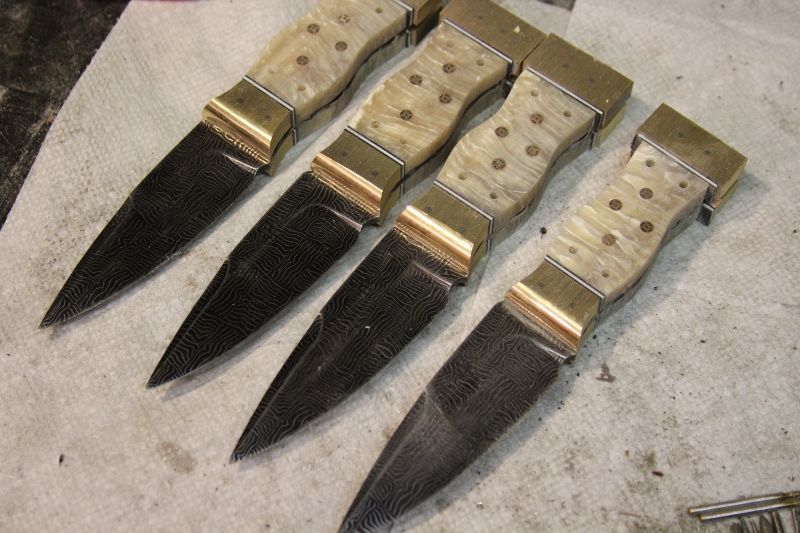
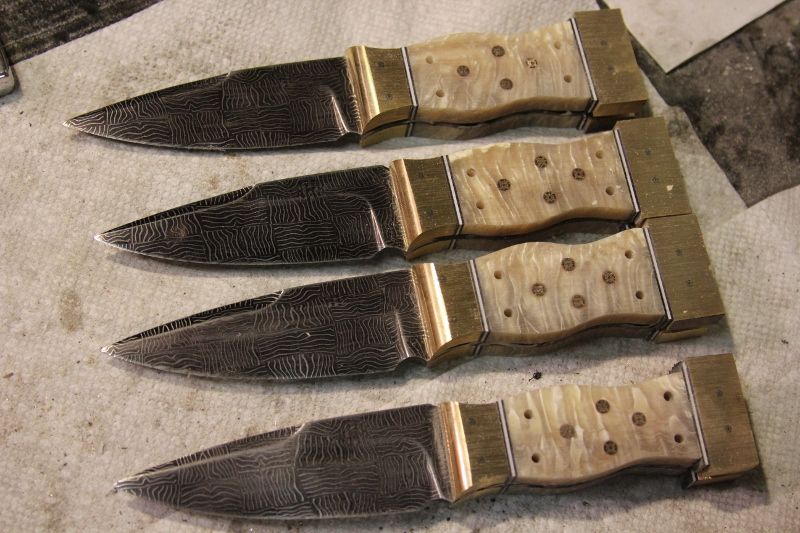
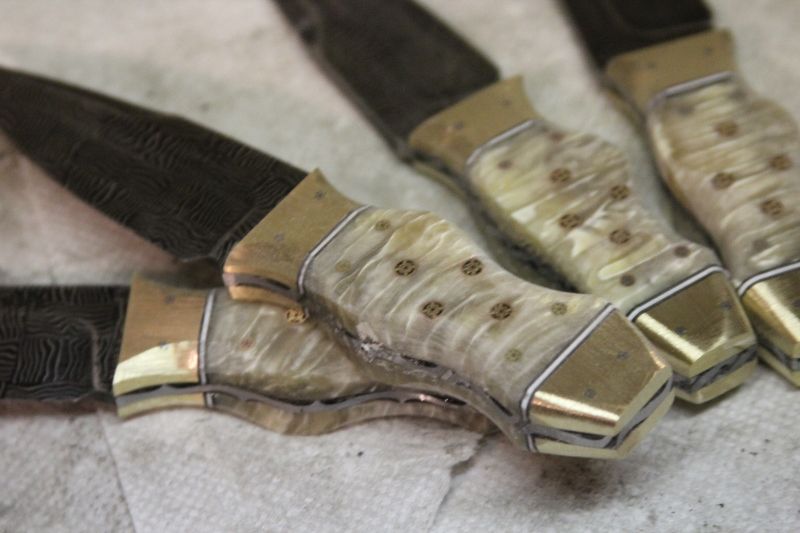
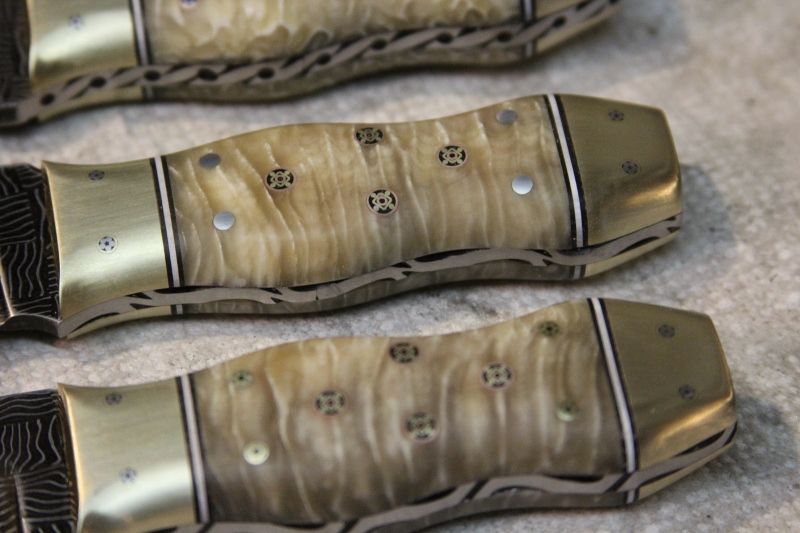
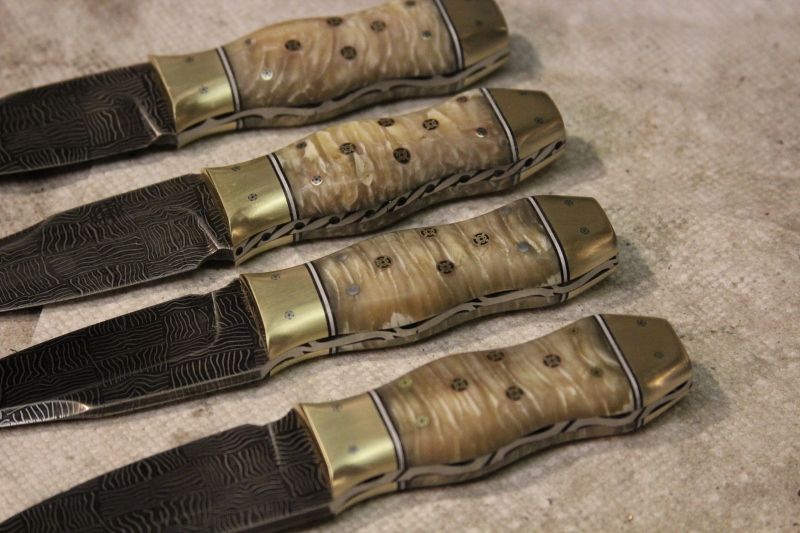
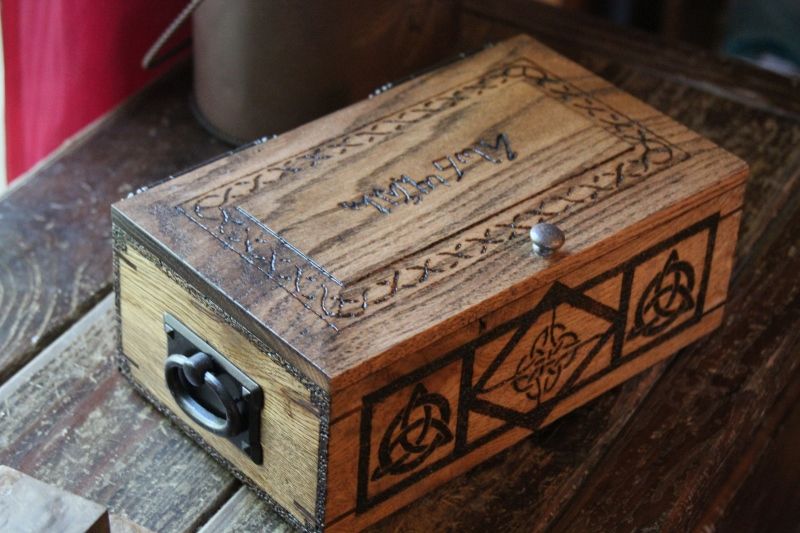
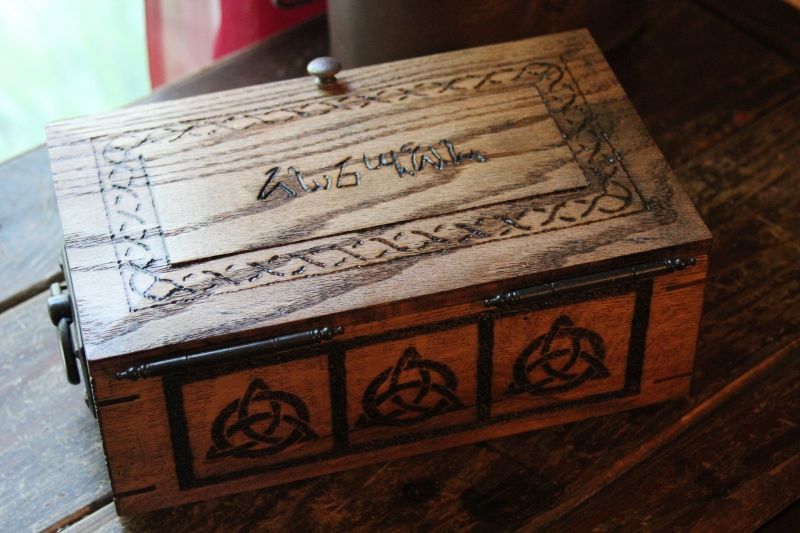
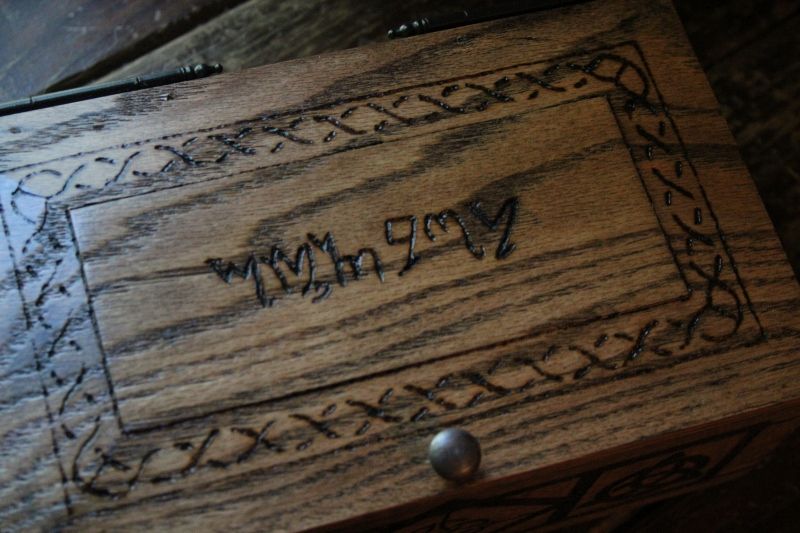
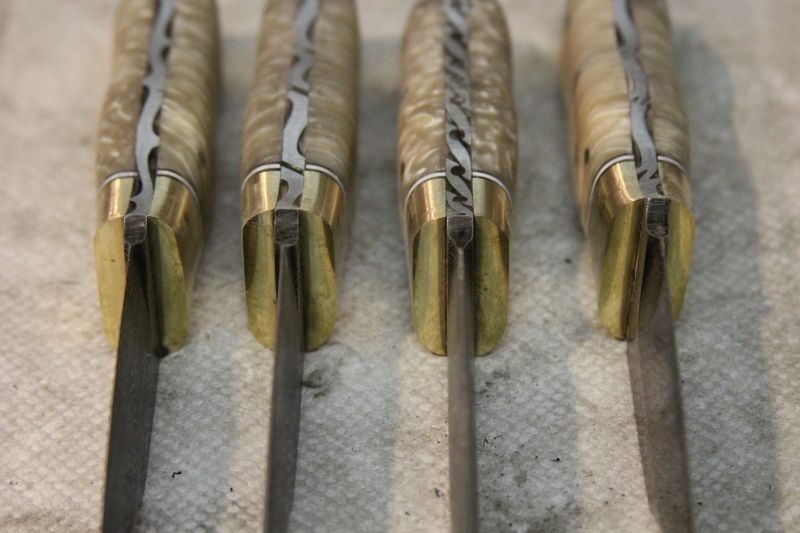
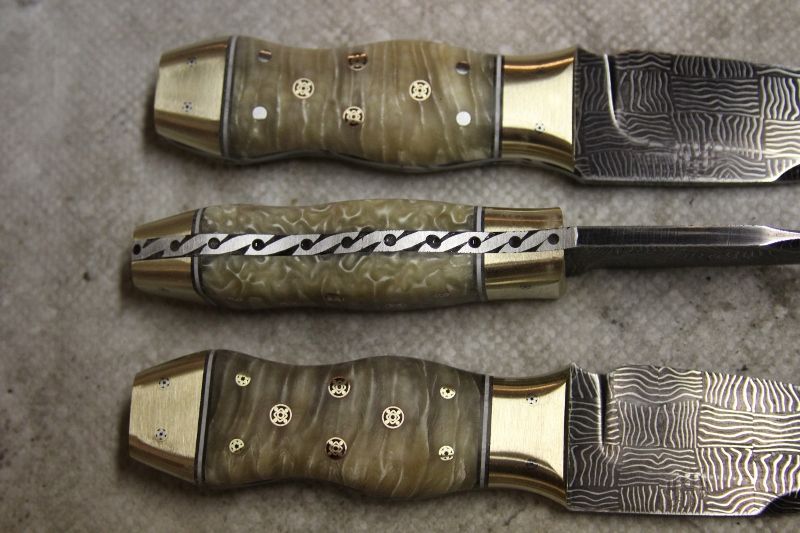
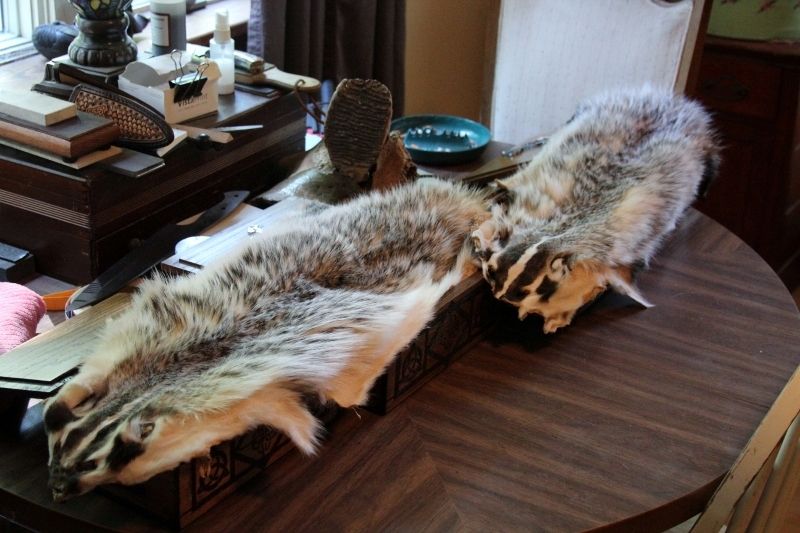
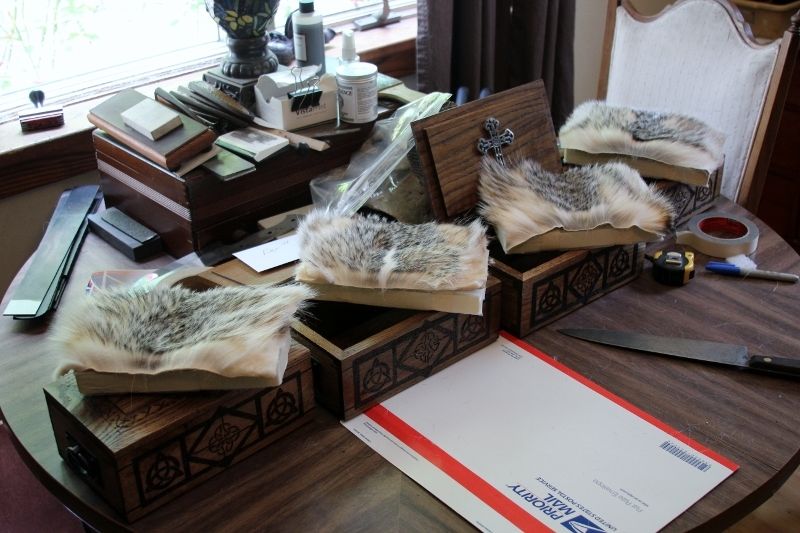
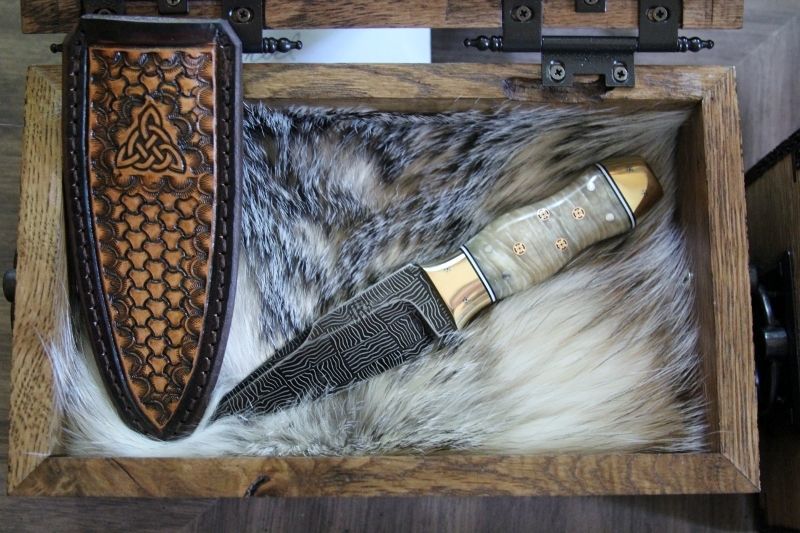
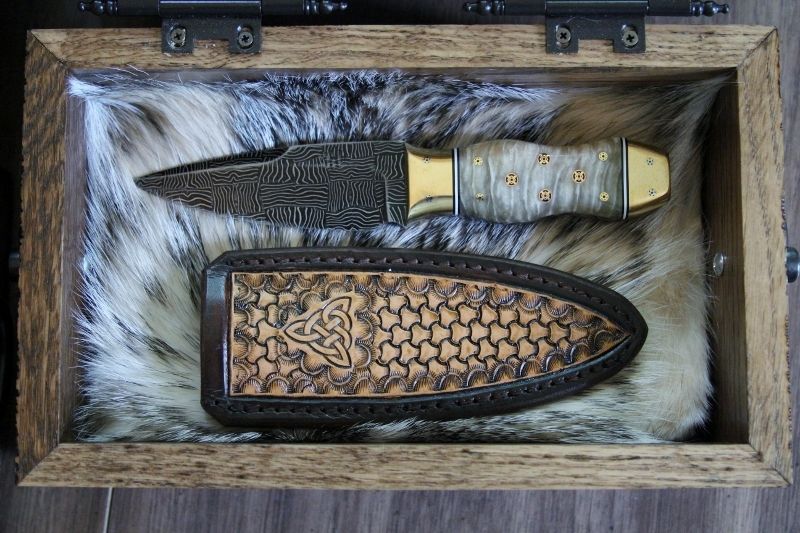
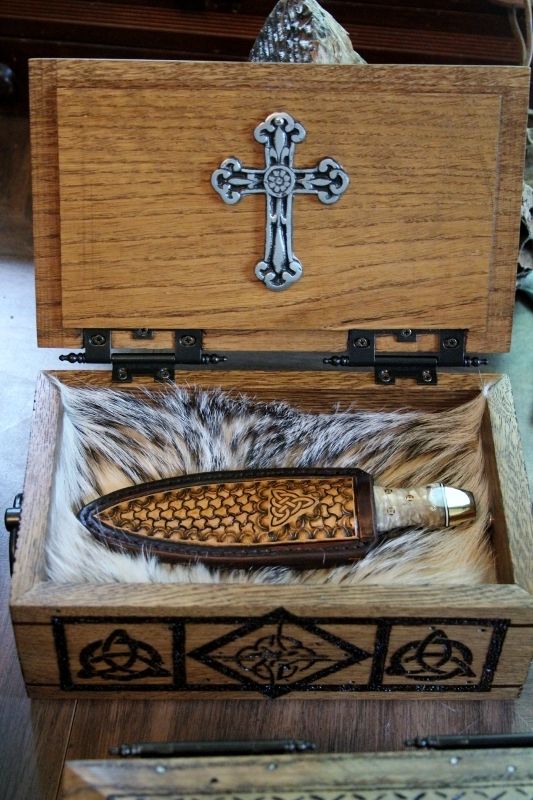
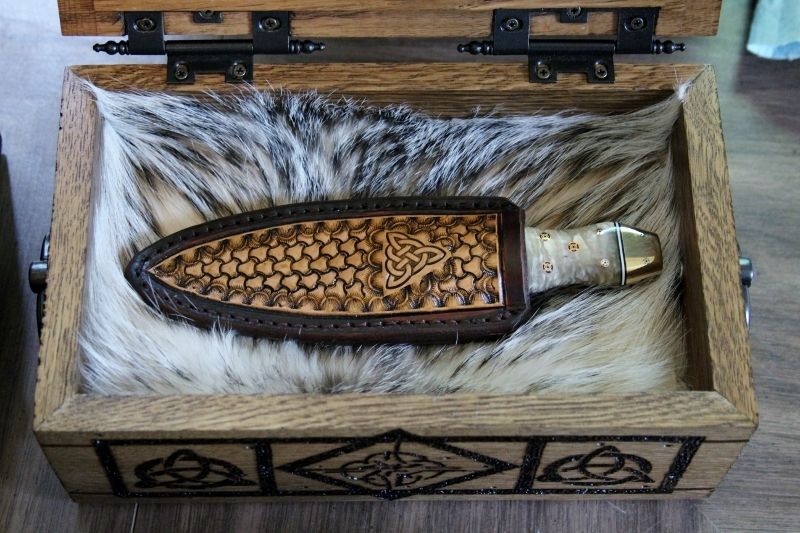
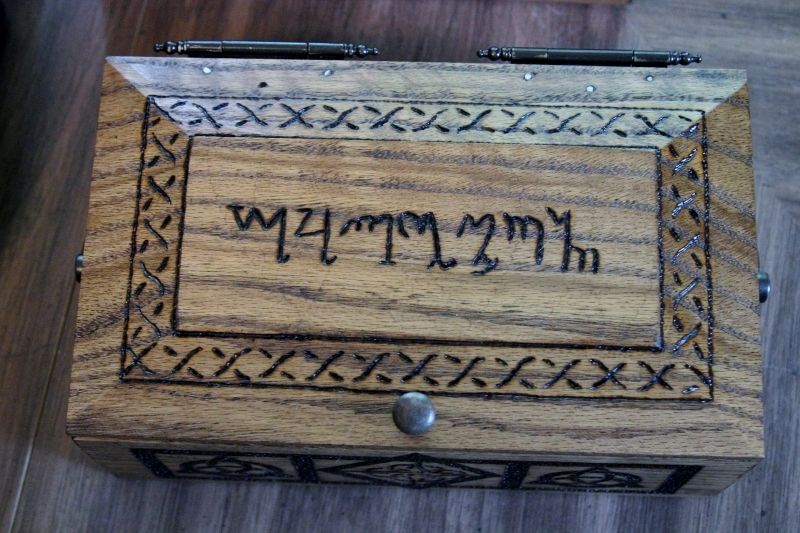
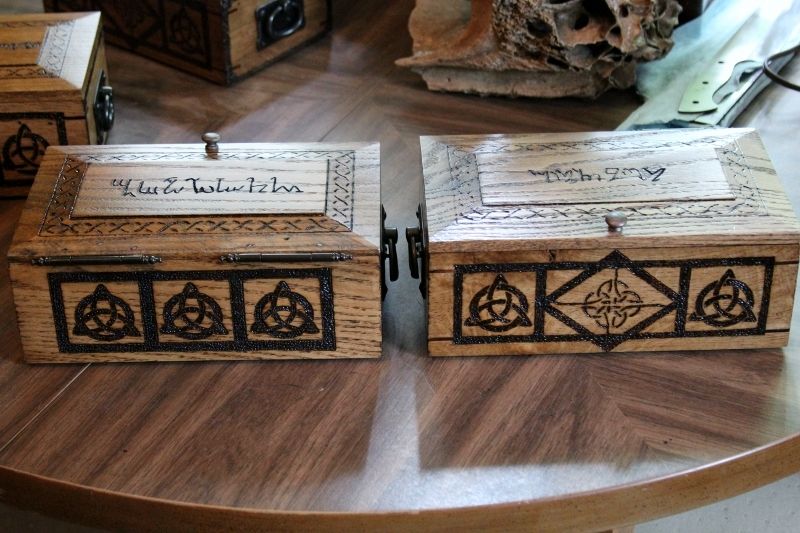
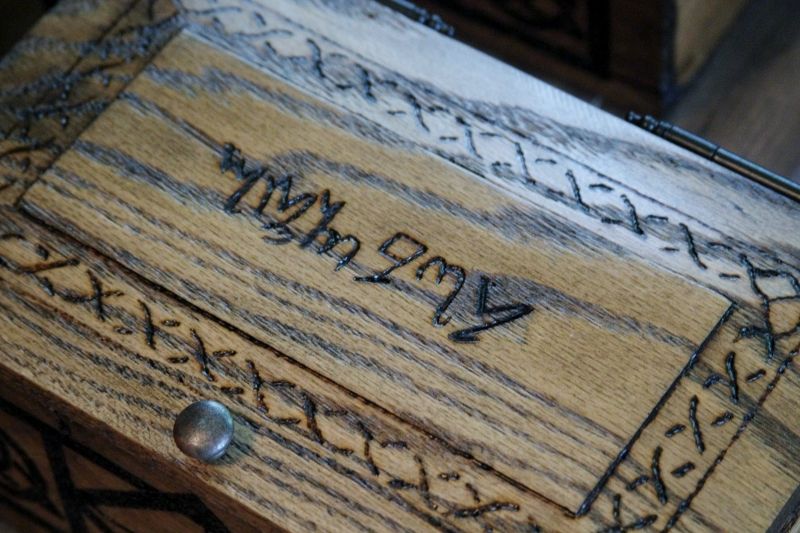
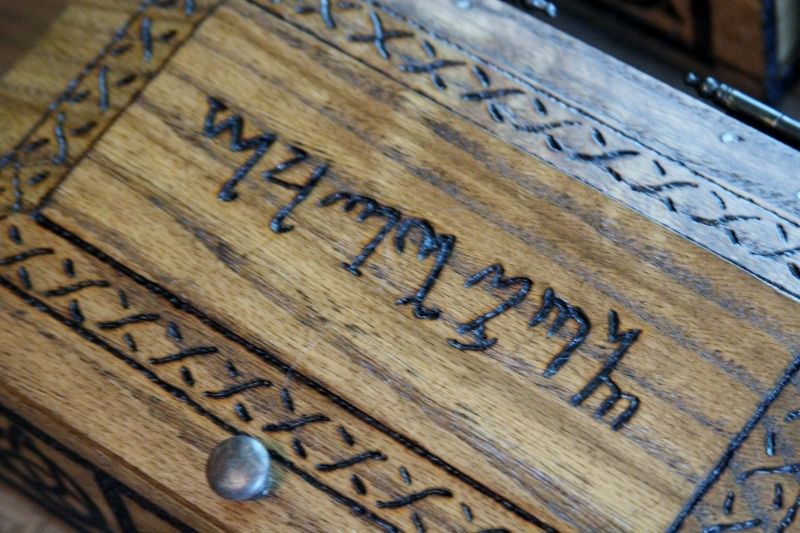
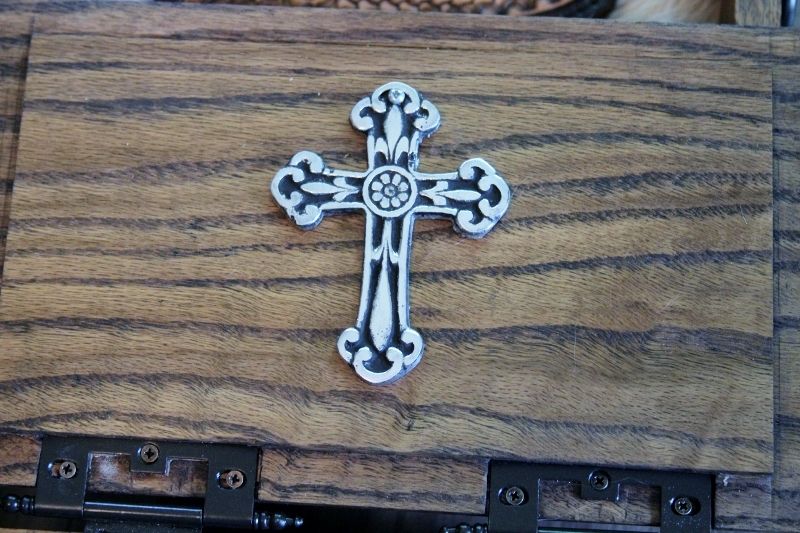
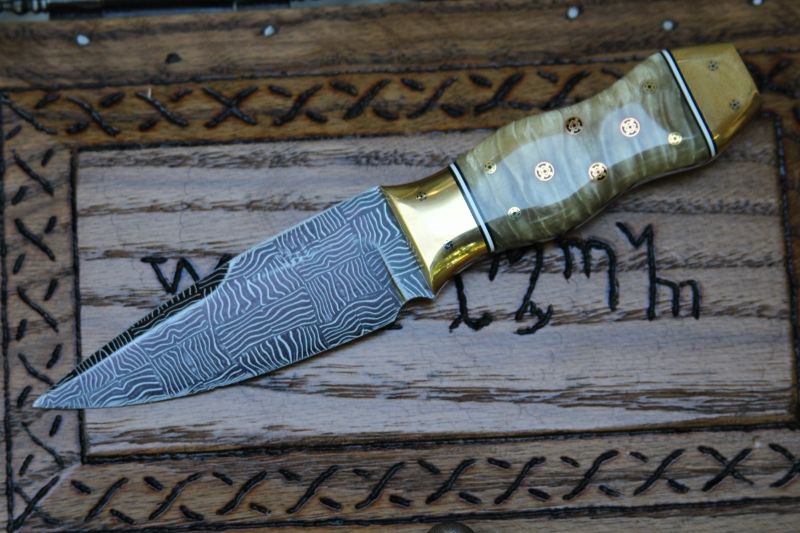
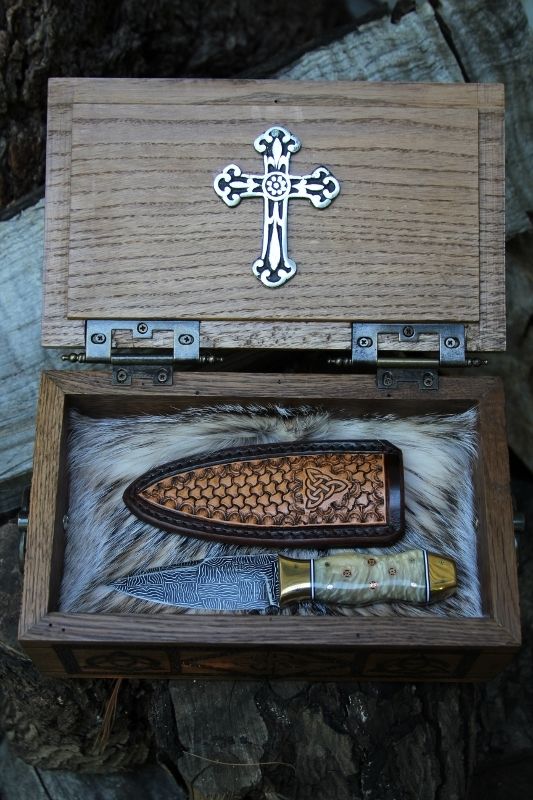
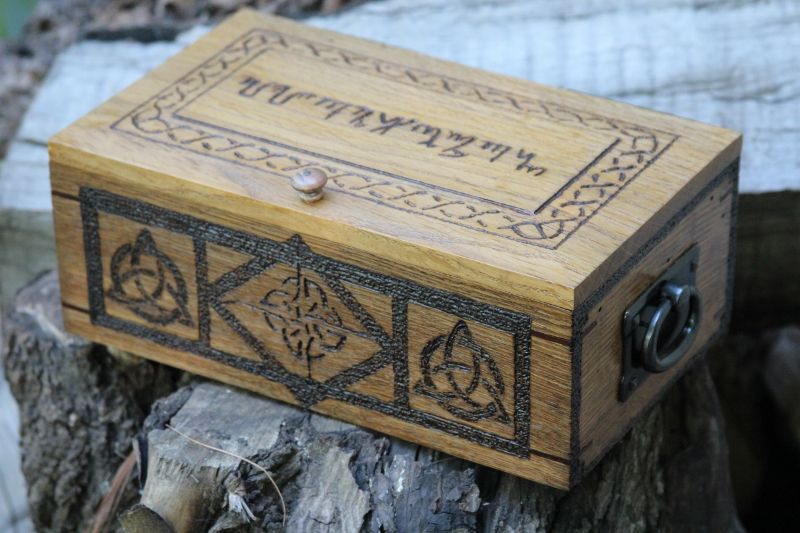
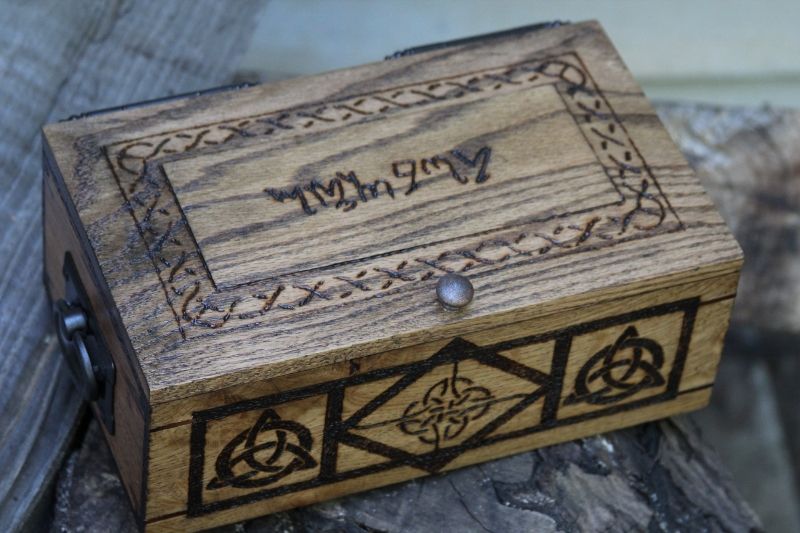
The Plan, was to make 4 sgian-dubh style knives with Damascus blades and damascus bolsters and burl wood handles. each to come with leather sheath and presentation box. Sounds easy enough, right? NOPE!!


The steel and pretty much every other aspect of the original plan had other ideas. and they actually ended up telling me what they wanted to be. Anyone who forges blades or works with raw materials will understand what im trying to say! lol But in the end. They turned out to be exactly what they should be. Not necessarily what I thought or my client requested. Yet as often in my experiences, BETTER then if I had of done it my way! :) Crazy.. yea.. But so so true!


So heres the pictures!! Thanks for checking out the thread!


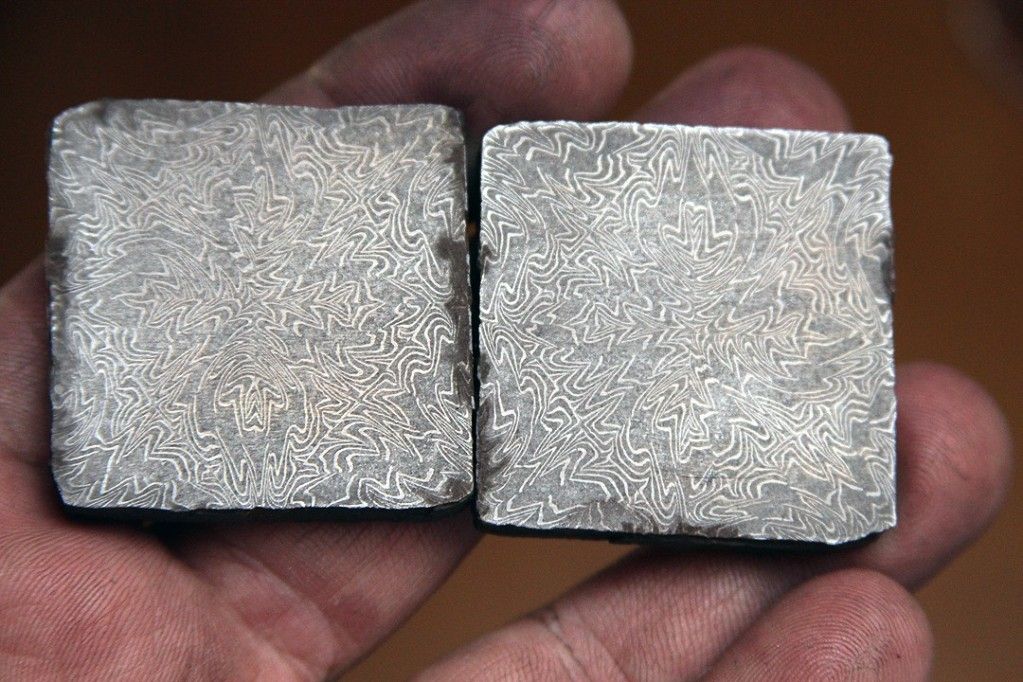
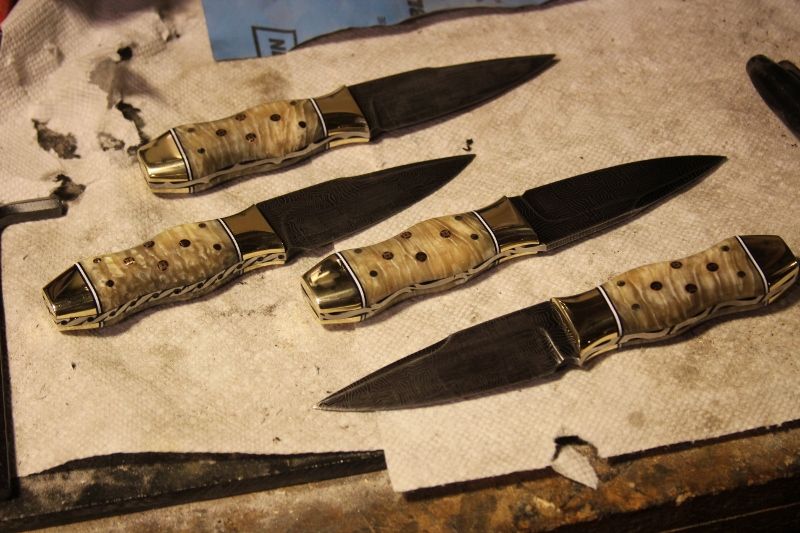
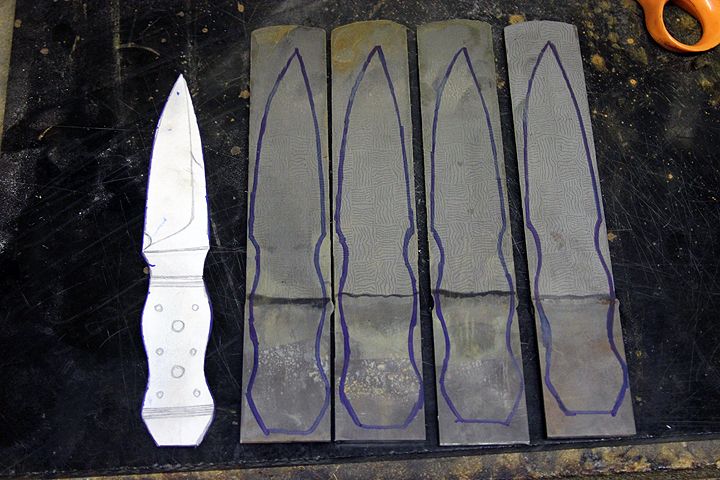
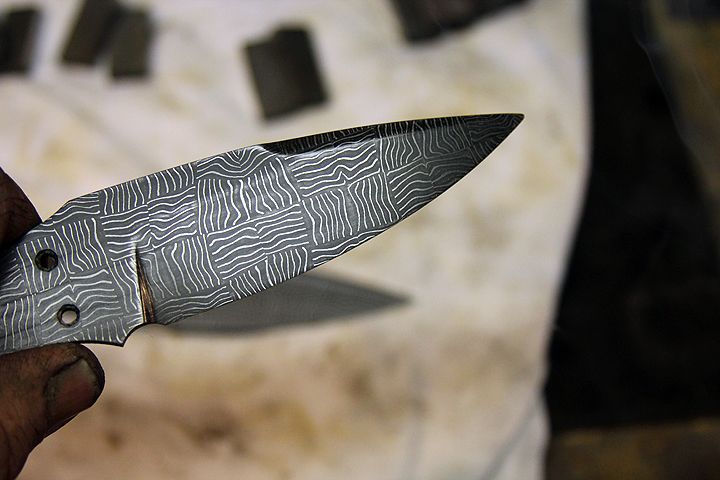
Randy Jr forged me some cool Basket weave pattern steel to use for the blades.


IMG_8708.jpg


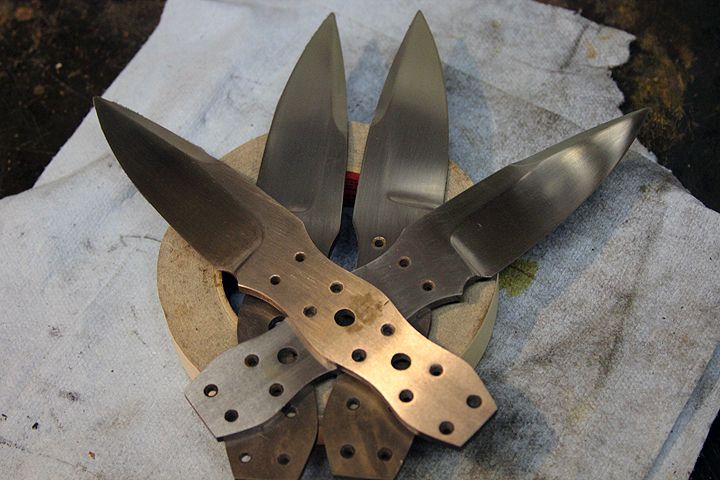
I transferred the pattern to the billets and went to work!


IMG_8715.jpg
IMG_8723.jpg


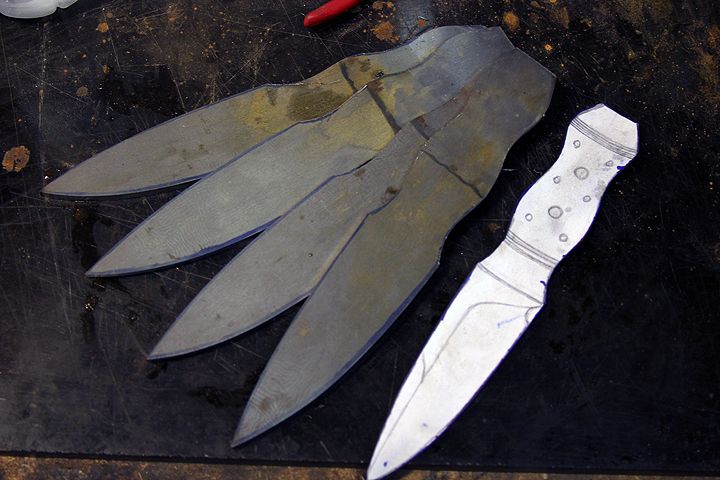
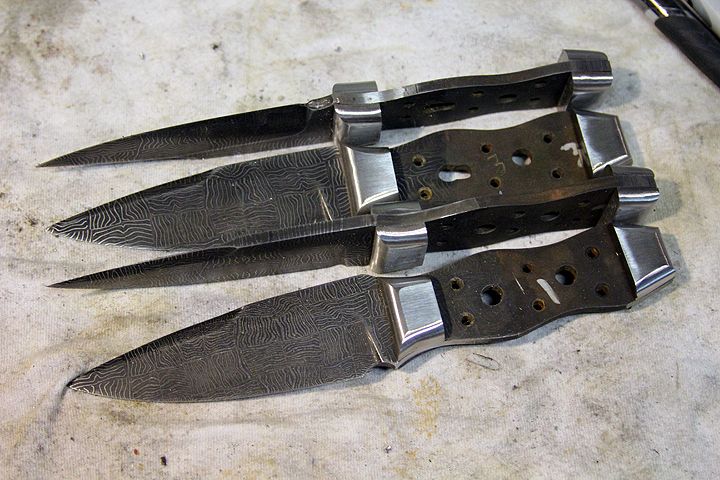
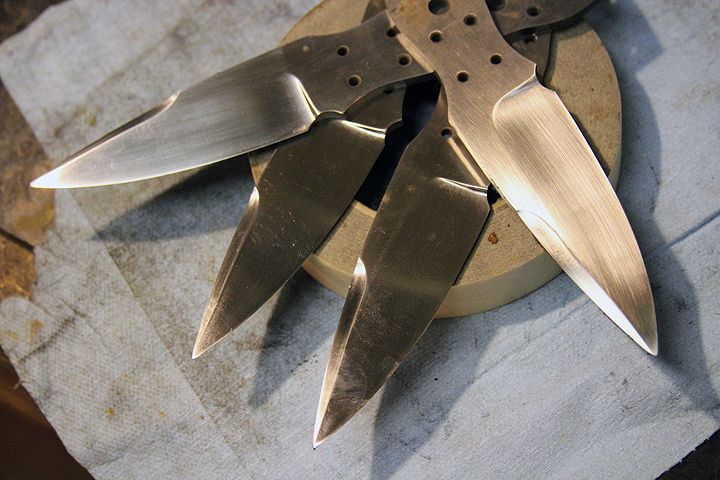
Ground the blades and heat treated them. So far everything is going way to mooth! :D


After heat treating I hand sanded them to about 600G.


IMG_8729.jpg
IMG_8737.jpg


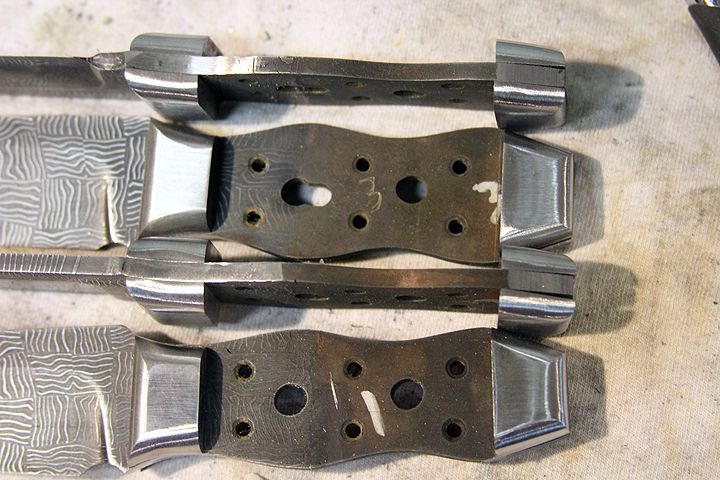
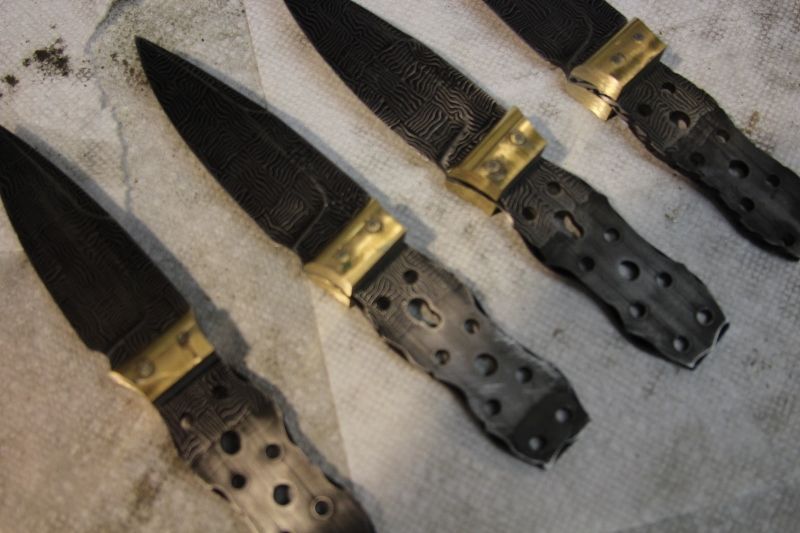
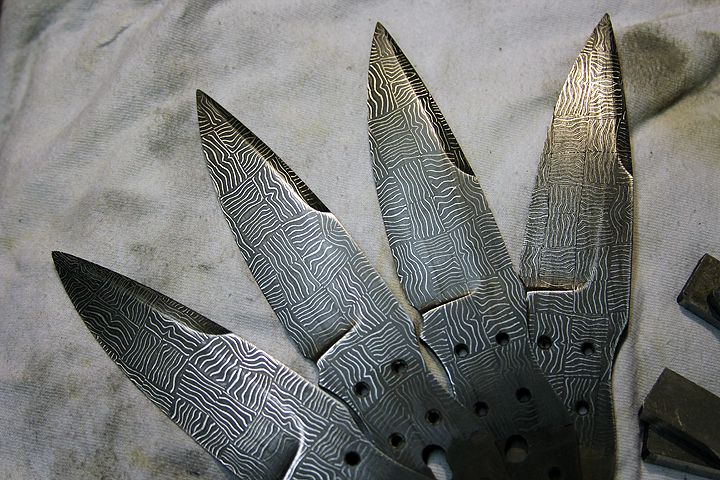
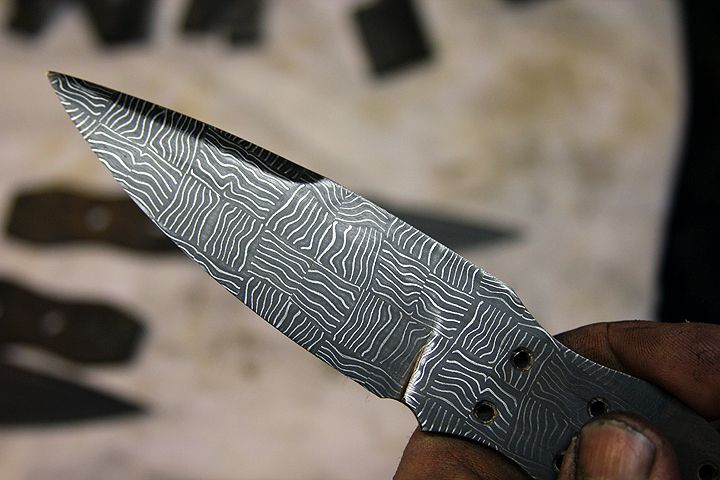
Next a quick dip in the ferric to see how the pattern will look.
This is where stuff started fighting me! I had one blade that just didnt wan to etch the same as the others. lol And after 2 days of working on it, I finally sanded the blade back down to 600 rit and it cooperated! :gaah:


IMG_8833-1.jpg
IMG_8850-1.jpg
IMG_8849.jpg


Thats it for now, Ill update this As soon as possible!
Thanks for looking, As always.. CComments and or critiques are welcomed!
 
These are really turning out to be quite a set of blades!


After fighting the etch it was time to make the damascus bolsters. I had Randy Jr forge me a special bar of Explosion pattern and went to work cutting and shaping them, fitting them to the blades, etc.


DamascusforsaleHHHKnives039.jpg


Even though these knives are very similar, each one is different (hand made) so everything had to be numbered. After getting everything where I was happy with them I tried to etch them.. And thats when stuff really became difficult. They did not want to etch right. It was weird, one would etch beautiful an d deep and the next one would not hardly etch at all. I fought with the damascus bolsters for 4 days. YEP.. 4 full days of sanding and etching and hand sanding and etching and finally.. I threw then away!


Here are a few photos of the damascus bolsters after they were shaped and ready to be etched.


IMG_8884.jpg
IMG_8875.jpg


At this point I was FRAZZLED and set the whole project on the back corner of my bench and moved on to another project. Experience has taught me that's sometimes best. Rather then taking another step forward only to find myself going 3 steps back!!!


I contacted my client, and let him know about the set back. After talking about other options we thought that BRONZE would be cool. So I picked up a bar of it and started over on the bolsters. After getting the Bronze in hand, and putting it up to the burl wood we had originally planned on using for these handles. It was clear that they just didnt go together. So After some looking through my stash of handle supply's I found these! :) And it was on!!!!


IMG_9400800x533.jpg


So its Bronze and Musk ox horn for these beautiful blades!!! And the journey continues!!!
 
It seems the Dubhs were now HAPPY.. and they wanted to be Bronze and musk ox.


Funny how stuff evolved. and yet the changes I am sure were for the better!


Heres some shots of the process as I fitted the bolsters and horn. And started shaping the handles.


IMG_0431800x533.jpg
IMG_0436800x533.jpg
IMG_0440800x533.jpg


After some shaping!


IMG_0452800x533.jpg
IMG_0447800x533.jpg


And finally all contoured and pretty close to the final handle profiles..


IMG_0508800x533.jpg
IMG_0504800x533.jpg
 
OK back to the project!! Now Although I am a good woodworker and have the tools or access to them to make the boxes, I contracted these out to another artist. He does amazing work and anyone who wants to have a box made should at least talk with my buddy Tom. I cant give his info here but would be happy to share his contact info with anyone who asks through PM.


So The boxes needed to be very traditional, and Tom did his homework, The material s and styles of carving he used as well as the symbols and names on each box..


First off each box needed to have a unique name in script burnt into it. Next they had to look old while being new and Tom nailed it by treading the oak with some special process to make it appear older, and brought out every grain in the woods. All in all Ill let the photos tell the story, But to say I was happy with how they turned out would be a huge understatement!


Here is a sneak peak at one of the boxes.


IMG_0416800x533.jpg
IMG_0420800x533.jpg
IMG_0419800x533.jpg


From this point I will line the boxes and finish them out! More photos of that when I get that far!


Randy
 
After a few more hours of hand sanding ad fine tuning, Here are some shots of the finished blades. :) And actually where I am on this project right now. The bolsters are not brass even though they look like it in the photos, They are Bronze and have a mirror polish. :reporter:


My next steps will be to fit and finish the inside of the boxes and line them with the badger fur. Then add the sheaths and final edge to each knife and there ready for there big photo shoot!!


Thanks guys for checking out this thread. and I hope to have some finished photos very soon.


A few shots with dramatic lighting! lolol


IMG_0555800x533.jpg
IMG_0548800x533.jpg
IMG_0543800x533.jpg


And a few more to show the actual details and such.


IMG_0597800x533.jpg
IMG_0595800x533.jpg
IMG_0480800x533.jpg
IMG_0492800x533.jpg
IMG_0535800x533.jpg


I forgot to mention that each knife has a unique file work pattern that runs around the entire handle. :toxdance:


As always, I thank you for taking a minute of your day and checking out these knives. Comments and critiques are always welcomed.
 
Made some progress!!
Alright! I was able to get some work done on these. I cant remember if I told you but the plan for the insides of the boxes were to line them with Badger fur!!!


First I found 2 beautiful Badger pelts and had them sent over.. Gota love GOOGLE!!!!


So I fitted each box with the very durable high density foam.
Then prepared the pelts to be cut.. These both are beautiful pelts. Im super happy with them and it was hard for me to cut them They are just TOO COOL!!!! But I cut them! lol Anyways, after careful measuring and precise lay out. I cut both pelts oversized slightly from what I would need. I attached the pelts to the foam inserts using 3M spray adhesive. I allowed a little extra space so I could fold the leather around the corners of the foam, which made the insert fit snuggly. Actually by the last one I was feeling quite cocky and very proud of them all!! Finally I positioned them back into each box. and was grinning from ear to ear.


Honestly, When my client asked for Badger fur, I really wasn't sure and because I have never done anything quite like this was hesitant. yet agreed. Now that there done, I couldn't imagine them not lined in Badger fur! Its just AWESOME..


A single design aspects like this can make or break the look of the whole package.. And thankfully The fur really complemented the box, sheath and knife and solidified the whole thing somehow!


Thanks for looking and for all the comments and likes etc. Ill add more photos soon


IMG_1133800x533.jpg
IMG_1042800x533.jpg
IMG_1050800x533.jpg
IMG_1116800x533.jpg
IMG_1122800x533.jpg
IMG_1118800x533.jpg
IMG_1141800x533.jpg
IMG_1142800x533.jpg
IMG_1128800x533.jpg
IMG_1148800x533.jpg
IMG_1167800x533.jpg
IMG_1178800x533.jpg
IMG_1102800x533-1.jpg
IMG_1180800x533.jpg
IMG_1101800x533.jpg
 
Each of them are bar none the best sgian-dubh I've laid eyes upon, but 4 of them together, and the sheaths and boxes to boot! This scotsman is overwhelmed right now, words failing.
 
Got to acutually hold and look at these knives!
And to say that the photos dont do them justice is an understatement!
Beautiful workmanship and such attention to detail in all aspects.
I had the pleasure to meet Randy Sr and Jr as well as Mrs Haas.
Thank You for taking time out of your day, and allowing me to visit with you guys in your shop.
First rate Folks, and top notch knives!!!

God Bless
Mike
 
Those are absolutely wonderful! I'm sure they'll be treasured for generations.

But all-in-all: OVER THE TOP SCOTTISH BLING!
 
Thank you all for commenting. Im gona try and get some GOOD pictures of these. the final photos are OK but I think I an do better!

Many thanks for the encouragement and checking out our work. Its always nice to hear from you Dog's!!!
 
And today these were sent to there new home, :) These were a great challenge yet I enjoyed working on them. I am proud of how they turned out and I know the new owners will cherish and pass these down from generation to generation.


I had one last chance to get photos and wanted to share a few with you all!

IMG_1235800x533.jpg
IMG_1223800x533.jpg
IMG_1281800x533.jpg
IMG_1268800x533.jpg
IMG_1264800x533.jpg
IMG_1259800x533.jpg
IMG_1255800x533.jpg
IMG_1249800x533.jpg
IMG_1243800x533.jpg
IMG_1239800x533.jpg
IMG_1208800x533.jpg
 
Back
Top