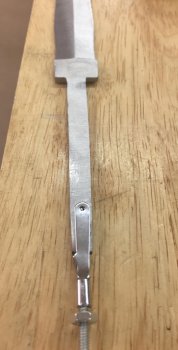
Question about threaded butt cap

C Craft

Well-Known Member
When using a threaded rod for butt cap attachment on a knife, is there a certain type of rod you like to use??? IE, zinc coated, stainless steel, brass, etc. etc.!!

Next question how do you attach the rod/all-thread to the knife or do you attach???

In this tutorial by Mike Carter he shows how he does attachment without weld!!

http://knifedogs.com/showthread.php?4316-No-Weld-Butt-Cap&highlight=tutorial+Mike

Also do you thread the butt cap itself or do you attach/weld a nut to bottom side of the butt cap!!

I am sure there are many ways of doing this process so look forward to hearing discussion on the subject! If your tried something and it failed I would like to know! If you found a better way, I would like to hear of that as well!!


I am working on a knife that is going to have a threaded butt cap and would really appreciate any info that you can share with me!!
 
When using a threaded rod for butt cap attachment on a knife, is there a certain type of rod you like to use??? IE, zinc coated, stainless steel, brass, etc. etc.!!

Personally, I use 4-40 threaded rod for most of those applications. If it's a really large blade, I might go with 8-32 threaded rod, but I always use a fine thread.....it makes for better "fit ups". I try to stay away from the zinc coated variety, simply because I have lung issues, and I generally cut a slot into the existing tang, and solder the threaded rod in place. In some cases, if there is enough room, I place a nut on the end of the threaded rod, and make the slot in the existing tang a "T" to accommodate the nut....then solder that in place. Over the years I've found that coarse threads, such as 1/4-20 not only contribute to "sloppy" fits, bar are really "overkill" for the application, and because of the size, they can create other issues that are not easy to solve.

Another method that I've learned/used over the last few years is to use one of these....
https://www.amazon.com/Great-Planes...F8&qid=1485450931&sr=8-1&keywords=4-40+clevis

All you have to do is thin the tang down to fit, drill a 1/16" hole for the clevis pin, and you have a receptacle for the threaded rod. Since the clevis can "move" a bit, it won't "pull off" during glue up, and once the glue is cured, it's there forever! :) I've come to really like these little gems!

do you thread the butt cap itself or do you attach/weld a nut to bottom side of the butt cap

Personally, I don't like the threaded rod showing, so I create a "nut" (usually something like a cobry bolt) that is the EXACT same material as the buttcap, but a little longer then what I need. Then I drill and counterbore the buttcap, and during the glue up phase, put the nut in place on the threaded rod (the nut has an internally threaded shank, so it goes through the buttcap and threads onto the rod...I tighten it down with a small pair of channel lock pliers. Don't over do the tightening....that can cause things to "pull" one way or another, and you often won't see it until AFTER the glue is cured). Once the glue is cured, I grind the nut off flush with the buttcap. If I'm lucky, and my fit is really tight, I can make the nut "disappear" into the butcap, but more times then not there is a slight, visible line surrounding the nut.

Keep in mind that when it comes to buttcaps, my application is almost always on hidden tang designs. For a full tang, Mike's WIP is a very good method.
 
Last edited:
Ed, again you come thru with great idea - I just ordered those clevis set you linked to. I've got a couple of blades been sitting in drawer for a yr or so trying to decide how I wished to put a butt cap type handle. See, things like is why you're up for "best educator" award.

Ken H>
 
Ed, once again thanks. You take the time to go in-depth with the explanation! From the first time you gave me advice I have appreciate your approach! It doesn't matter if your a newbie or a seasoned maker, you always bend over backwards to lend a hand!

You see I don't really get the opportunity to see others work as it is going together and, well I have an idea..................! Then you start taking that idea to completion and half way thru it or worse at the very end you realize. This wasn't as good of an idea you thought it was. So sometimes I turn to the forum to pick others heads and I really love it when they include the why!!

That steel 4-40 clevis is pretty slick idea!! Thanks again!![h=1][/h]
 
The threaded butt cap is perhaps the method I have used the most in my career, I think it is a very elegant, sturdy and practical way to assemble a knife, and to have all three of those characteristics is a rare convergence. The finer threads tend to make a more refined fit and can also snug down a little better with closer tolerances. I will often either attach the nut to the backside of the cap or simply incorporate the threaded sleeve within the caps design.


One of those timeless debates is whether to thread the tang or to attach threaded rod to the existing tang. I have found many considerations (metallurgically naturally) for the method of incorporating the threads. Many people unyieldingly believe that attached threads (welded, brazed or soldered) are inferior in strength to the integral tang being threaded, but with so many things like this it is often a case of preconceived prejudices rather than actual material science fact. For example I had many veteran and experienced bladesmiths resist the idea that welded on threads could be as strong as threading the existing tang, but with the hunch that this was based upon improper refinement of the weld zone I demonstrated to them that following welding with proper cycling to refine the weld zone would make it so that attempts to break the weld would prove impossible, with the failure occurring instead in the initial stock adjacent to the refined and lower carbon weld zone. And, of course, the use of brazing will allow for the same gains in plasticity.


All that being said, I avoid welding, or brazing, and stick to threading the integral tang of the blade simply to appease the notions of the customer. The customer is always right, and despite knowing the strength of the attached threads I would rather have the business of a customer who is confident, and at peace with his beliefs, than prove my point of the attached threads; I guess it is sort of a sell-out, but in the end it is truly six of one and half a dozen of the other.


My method of attaching all-thread uses gas welding to incorporate both a preheat as well as the introduction of more ductile material from the filler rod. If I weld the threads in place I use O/A welding techniques but immediately follow it with hammering of the weld zone to align the threads with the tang, refine the weld zone, and avoid issues with cooling from the liquidus. When the weld zone cools to black I then reheat and quench a couple of times in an oil (just about any oil will do, this is grain refinement not exact heat treating). And on the final heat I only go to dull red (still magnetic). The whole purpose of this odd ritual is to take the grains that were larger than some U.S. states from going to the liquidus and working them down to a finer and tougher state, with the final heat making certain that there is no hardening, but rather an annealing effect. If done properly the tang can be bent back and forth repeatedly with the inevitable fracturing always occurring on the unwelded higher carbon tang side, rather than quickly snapping at an over-cooked, and uncorrected weld zone.
 
Man is this a great thread. That link that C Craft included is perfect for a handle I couldn't figure out. I tapered a tang just a bit to thin for my liking on a big skinning knife. So I ground the edge a bit and sent it to heat treat anyway. I was just gong to complete it with a short handle, I have found that there is always someone with a x-tar large or a xtra small hands that find the handle size just perfect. But now I can bring it back to a consistent 4.25"-4.5" and create a new handle pattern.

Thanks guys
Bigjohn
 
Thanks Kevin, what you are telling me about the welded zone was on my mind. I appreciate the info and especially the part of how to handle that area after welding!

I do like the looks of the threaded integral tang but now I will know not to fear the weld when handled properly! :les:
 
I totally agree with Kevin (as usual) about welding on to the tang. A "properly" (and that's the key word) welded joint is as strong as the surrounding metal - as has been proven time and again in bending type welding tests where the welded joint must be ground smooth with surrounding metal, then bend with no cracks in weld OR area adjoining weld to show the surrounding metal is still good.

Ed: Here are those toggles you linked to - I think I might like this idea - think I'll use it on this dagger, my first ever dagger grind.

Toggle.jpg

With the 4-40 threads the end cap should snug down nicely. I plan to solder a 4-40 screw to inside of endcap so it doesn't show, screw it tight to toggle with handle filled with epoxy it should be plenty strong.

Those toggles are slick - just drill a 1/16" hole, spread toggle and slip on to tang. I did have to tap toggle to get toggle pin thru the 1/ 16" hole, but that makes for a nice snug fit.

Ken H>
 
Ken, that is pretty slick, thanks for posting!! Now I just gotta ask and don't take this wrong but, how dang long is the handle gonna be on that one?? Could just be the angle of the pick but it likes there is room for two hands on that handle!!:what!::biggrin:
 
Yea, it's just the angle - the tang is actually 3" long, with the toggle adding about 5/8", then the long screw is added to that making it look long. In photo it does almost look like a two handed grip. It's not - barely long enough for my hands. I'm thinking a "lady dagger" with focus on thin 'n slim.

Ken H>
 
Jerking your chain Ken! I figured by what I was looking at it had to the angle of the pic!! Don't forget to post pics when it is done!
 
Back
Top