Photo-chemical etching your logo

Johan Nel

Well-Known Member
I have noticed a really large number of logo and logo marking related threads these past few weeks. I have a question as well and do not want to impose on another person's threads.
I have noticed on threads on this forum that to a large extent logos are seems done by means of electo-chemical etching with some stamping, but have not seen any references to chemical etching of logos. So, is it even a done in the USA? Where I am from, the electro etching equipment is not that readily available, so a large number of makers use chemical etching as a means to do their logos or makers marks. Happy to hear any comments on photo chemical etching.
 
Last edited:
I used photo chemical etching for making Printed Circuit Boards, but never considered for logo etching. Tell us more about how it's done - how long does it take to etch and what chemical is used. I did a bit of research and it mentioned Ferric Chloride could be used for SS, but that seems like it would be a slow process.
 
I used photo chemical etching for making Printed Circuit Boards, but never considered for logo etching. Tell us more about how it's done - how long does it take to etch and what chemical is used. I did a bit of research and it mentioned Ferric Chloride could be used for SS, but that seems like it would be a slow process.
What I will do is try and do a bit of a WIP with some photos to illustrate the process.
 
The only real problem I see is the logo/stencil would have to seal to the blade completely. When I do an electro etch the stencil is not 100% sealed on the blade so you get a little bit of the echant bleeding under the stencil. This is where the stencil protects the steel and only removes metal where the stencil is open. After the electro etch is done there is a little blacking around the stenciled area and that is removed with the last abrasive that you finished the blade with. Hope this makes sense?
 
I'm curious about this process as well. I know in theory how circuit boards are printed this way. And I have some ideas about how you would do it with a knife. But more than likely I'm wrong, so tagging along out of interest.
 
The only real problem I see is the logo/stencil would have to seal to the blade completely. When I do an electro etch the stencil is not 100% sealed on the blade so you get a little bit of the echant bleeding under the stencil. This is where the stencil protects the steel and only removes metal where the stencil is open. After the electro etch is done there is a little blacking around the stenciled area and that is removed with the last abrasive that you finished the blade with. Hope this makes sense?
No, it is not necessary. You will see once I start explaining. The stencil is only required for a very short period of time to activate the light sensitive coating.
 
Photo chemical etching uses a photoresist and an etchant to corrode the image into a blade in the exposed areas. The process will now be explained.
Lets first look at the materials that are used for this process.
First, an object to be etched. In this case a ruined blade to illustrate the process.
6. Knife Cleaned.jpg
Alcohol to clean the blade before and after the etching.
2. Alcohol.jpg
A photo negative logo.
5. Logo.jpg
 
...and, Photo Resist.
1. Positiv Resist.jpg
A caustic soda solution to remove the portion of photo resist that had reacted to light exposure; ferric chloride as an etchant and cold blue product to darken the etched logo.
3. Caustics & Etchent.jpg
 
First off, the blade is cleaned with alcohol, to remove any oily substance from the area to be etched. Pretty much as with damascus steel before etching.
The blade is then sprayed with the photo resist to form a uniform, even layer on the blade. This is easier said than done it seems, as I never seem to get it totally even. I do see blotchyness every time I spray it on. It is important that the area is covered with the photoresist, as any exposed area will react with the ferric chloride if it is applied over that area.
Once the photoresist is applied, it is allowed to dry. It can be left for about eight hours, or it can be placed in a pre-heated oven at 70°Celsius (158°F).
It is critical that the blade is not exposed to bright light, as it will cause a reaction with the photo-resist. Normal interior light seems just fine, but very bright lights or sunshine is to be avoided. If the blade is left to dry on its own accord, rather put it in a dark cupboard.
7. Resist sprayed.jpg
The image shows that I am not getting the even layer as is advised, but it is a full cover without any exposed areas.

Now the logo is placed and taped in place.
8. Logo placed.jpg


It is important to note that the logo must be flat against the blade. Any area that is lifted off the blade will allow for light to enter and ruin the process.
 

Attachments

  • 9. Taped.jpg
    9. Taped.jpg
    16.1 KB · Views: 6
Are you using a positive photo resist? In PCB work seems like the negative photo resist is used. I've never used photo resist, I always used Toner Transfer for PCB work.

I'm following this thread - thanks.
 
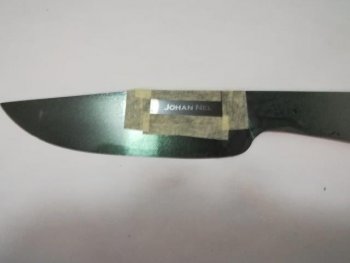
Next, the blade is exposed to bright light, so that the light will cause a reaction to the exposed photo-resist. The dried photo-resist has a greenish hue that turns blue-ish when exposed to sunlight. As I am staying in sunny South Africa where we have sunlight for at least 90% of the year, I need not worry about artificial lighting to facilitate the exposure.:cool:
Apparently a few seconds is sufficient, but if little is good, more must be better:p, so l let it be exposed for a minute or more.

10. Light exposure.jpg

Once back inside, I remove the logo and the next stage can start. This entails the caustic soda solution to be applied over the light exposed area.
Just a note on the preperation of the solution. It is prepared by dituting 7 grams of caustic soda to one litre of water. I bought some at the local grocery store where it is sold as drain cleaner.
Since you use so little of this, mixing a litre of this may be overkill. I have a small electronic scale, so I reduced the caustic soda to 0.7 gram and diluted it in a 100ml of water. The flip side of the coin is that this is so inexpensive and the larger volume is easier and more accurate to weigh, so you can decide what method you want to follow, should you decide to try this out. The solution is to be placed in a dark container, as this also reacts with light and will lose its effectivity, so I placed it in a dark glass bottle with a dripper which I bought at the local pharmacy. The dripper makes for easy application.

The blade is made to lie flat and level, and the caustic soda is dripped over the area where the logo was. The reaction is quite fast. Once the reacted photo resist has been dissolved by the caustic soda, the solution can be removed. I do this by using the dripper to suck it back up, but I then discard that in a paper towel. I also use a paper towel to lightly dab the area to remove any remaining solution. Again, be careful not to scratch the remaining film, as any exposed area will react to the ferric chloride to be applied hereafter.

11. Caustic applied.jpg

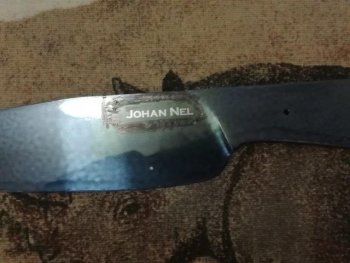
Not the same blade, but this is what the end result of a properly executed process should looks like after the caustic solution is removed. Just a note of interest. The lettering of the example below is quite thick, and this happened because the photo negative logo was not dead flat against the blade while exposed. This resulted a thicker lettering.

12. Caustic cleared.jpg
 
Last edited:
Thank you Johan. I have been wondering how I was going to do this - even tried it a couple times. I looked briefly at your directions and I have a lot of what you listed on hand. When I get time to make knives again I'll be coming back to this thread. Thanks again.
 
Once the caustic solution is removed, the area around the logo needs to be protected from exposure to the firric chloride that is to be used as etchant. TA common method is to use a permanent marker (sharpie in the USA) to form a thick protective layer. The sharpie needs to be fresh. If it is somewhat dry and does not lay down a nice layer od ink, the solvent in the mix will dissolve the posistiv resist already on the blade. This will cause the etchant to mar the logo. A little more on that later on. Other products like nail varnish can be used as well. Once the layers has been placed, let it dry. In the photo below, it is evident that it was layered on thickly and as close to the lettering of the logo as possible.
13.1.jpg

Below is a photo of the blade used for this WIP. As you can see it is not as well layered as the photo above.

Once the layer is dry, the etchant can be applied. Again, I do this using a dripper. The ferric chloride is undiluted and is applied over the lettering of the logo, and within the confines of the surrounding protective layer previously applied.

14. Etchent applied.jpg

There is no hard and fast rule on how long the etchant has to stay on the blade to be effective. To my mind the high carbon steels works quicker than the stainless steels. One needs to do a trail on each steel type in advance to determine what works best. Some users remove the ferric chloride and replace it up to four times. I just leave it on until I am happy with the depth of etching. I do not want to risk marring the protective layer by meddling around with hard object on the surface.
 

Attachments

  • 13. Building a dam.jpg
    13. Building a dam.jpg
    42.4 KB · Views: 8
Last edited:
Sorry, I have been unable to load the last of the photos until now. Lets see how it works out.

Once I am happy with the deemed depth of the etch, I remove the ferrich chloride using the dripper to suck it up again. As it is re-usable, I dump it into the bottle again. I remove the final bit by lightly dubbing the area with a paper towel or ear buds. No force, just light dabs. A little will still remain in the etched logo.
I did not take any photos of the next described process, but next I drip some of the cold blueing (in this case Ballistol/Klever Cold Browning) onto an earbud to a point of saturation and transfer that onto the etched lettering of the logo. It reacts and forms a whitish layer. I assume it is due to the ferric chloride that is present as well. Once it seems to have stabilised, I drip some of the sodium hidroxide solution over the logo to neutralise the ferric chloride. Finally I rinse it under running water. I then use the alchohol on a towel or cloth to wipe all of remaining positif resist and sharpie ink off the blade until clean, then wash the blade with liquid soap and wipe it dry.
Sadly this particular process was not perfect, as you can see from the attached photo. I suspect that I was in too much of a hurry to take the photos and had rushed the process, so the layering of the protective layer of sharpie ink was not done as well as it should have been. I suspect that the solvent in the sharpie may have pierced the posisitiv restist layer. See below:
15..jpg

Below is an example of a trial run on a cheap stainless steel blade which has a cleaner finish.
15.1.jpg
 
My description seems a bit rambled to myself, so I place a PDF description from the KTMS website, a South African knife making & equipment supplier. Sadly the original PDF has been removed from their site to seemingly make place for other more recent articles.
The PDF titled How To Do Photo-Chemical Etching is very consise yet detailed describing the materials needed, as well as the process.
 

Attachments

  • How To Do Photo-Chemical Etching.pdf
    449.1 KB · Views: 19
Thanks for sharing your procedure. I can see where that would work pretty good. I'm pretty happy with my electro-etching, stencils are easy to make and I've got the stuff already. The etcher was easy since I had all the "spare parts" bin (wife calls it "scrap bin") to build.

I downloaded the PDF and it's a clear 2 page description - thanks.
 
My description seems a bit rambled to myself, so I place a PDF description from the KTMS website, a South African knife making & equipment supplier. Sadly the original PDF has been removed from their site to seemingly make place for other more recent articles.
The PDF titled How To Do Photo-Chemical Etching is very consise yet detailed describing the materials needed, as well as the process.
Hello Johan,

Thanks for a great series of posts on the photo-etch process!

I'm a new member here. I was a professional knifemaker many years ago and have come back to it (not professionally, just making knives) after a long absence. I always photo-etched my knives and would like to continue to do so ( I think the result is better than what I've seen from electo-etching).

Is anyone aware of a North American source for the Positiv 20, or similar? I used to buy spray photo-resist from Radio Shack, but they are long gone as a source for the product. I'm willing to order it from South Africa, but it seems there ought to be a closer source?
 
Hi Adam,
If you can source locally in the USA, it would be best, thereafter from Europe.
I see the lacquer that I am using is manufactered by ITW Spraytech in Germany.
Unless you have good contacts in South Africa, I'd advise against trying to source from here. Shipping is utterly unreliable from here to the US
I'll try to post the link of the ITW product.
 
Back
Top