Perfecting bevel line?

Mark Barone

Well-Known Member
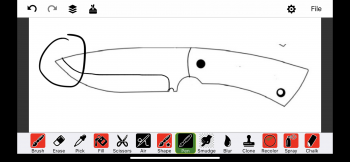
Probably a question that is often asked...As I move the blade against the platen I know the tip of the blade needs a little finessing to get the bevel to stay the same height. Is it just slowing down the stroke at the end so more grinding time happens or do I give it that little “pull back”? It seems my pull back always results in burning the tip. Not sure what I’m doing wrong. I use a jig. C7E30375-3E5F-4276-A689-2DFE448B237F.png
 
Actually there are a couple of thing that need to happen, and those things MIGHT differ, based on how an individual grinds.

For the way I grind....with my elbows locked into my sides, and the heels of my hands tight against my body just above the belt line, and they remain like that throughout a grinding pass. The only thin that moves side to side during a grinding pass is my body.. at the hips and knees. As the blade comes to the curve, I slightly flatten it out, and as I get almost to the tip, I slightly rotate the right side of my body to the rear, and slightly lean back to lift the blade off the belt when the tip reaches approx the center of the belt.

Personally, I would suggest either making a grind line as high as possible, or eliminating it all together, so you reduce the cutting resistance. With a grind line that low, whatever is being cut reaches the top of that bevel and "sticks" because it's like a splitting wedge used in wood sticking. While those type of grind lines might look cool, they are very often a determent to the cutting ability of a blade.
 
I agree with Ed - while those grind lines really look good, they're not the best grind for cutting/slicing. I use a FFG 99% of the time. I've done a very few saber grinds (isn't that what it's called with a grind line like that?), but always have a problem getting the grind line even on both sides and from end to end. FFG for me!

I'll do a FFG to the edge is perhaps .030", then a convex grind to sharpen. I used to bring the FFG down to .010" or less, and it sure makes a NICE slicer but it's not as strong as the convex edge grind. I've read that, and it makes sense with a thinner thickness behind the edge. BUT - I've got several kitchen knives that where taken <.010" before sharpening and they've held up good with no chipping.
 
I agree with the fellas above. A scandi grind is fine for a dedicated wood carving type knife, maybe preferable. But with a wide blade like that and a fair amount of belly, a full flat grind would be much happier, and you won't have that issue once you get a larger flat established.

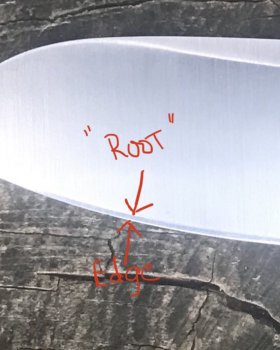
I sharpen a bit different than Ken, but the result sounds about the same. I actually grind to about .010" and then take the edge back until it's the thickness I want. It's hard to say if our convexing is the same "shape," but I shoot for .015"-.018" at the "root" of the secondary bevel for a hunting or bushcraft knife.
 
Thanks. That picture was just an example of the problem. I’m not building that knife. I do have someone that is asking for a bushcraft knife. And that seems to be a lower bevel line. I don’t have a design picked out or drawn yet. Ed... your explanation of how you achieve that makes sense to me even though I use a jig. I can see why people end up free hand. I don’t think I will ever get to that point.
 
I agree with the fellas above. A scandi grind is fine for a dedicated wood carving type knife, maybe preferable. But with a wide blade like that and a fair amount of belly, a full flat grind would be much happier, and you won't have that issue once you get a larger flat established.

I sharpen a bit different than Ken, but the result sounds about the same. I actually grind to about .010" and then take the edge back until it's the thickness I want. It's hard to say if our convexing is the same "shape," but I shoot for .015"-.018" at the "root" of the secondary bevel for a hunting or bushcraft knife.
Can you show what you mean “ root of the secondary bevel”
 
I’ve been calling that a secondary bevel.
Yep, I think that's called a secondary bevel.
I can see why people end up free hand. I don’t think I will ever get to that point
Don't despair, I never thought I'd get to free hand grinding either, but now do most of my grinding free hand. Took me a LONG time using jigs, and the bubble jig some, but it seems I'm finally getting to free hand.
 
Thanks. That picture was just an example of the problem. I’m not building that knife. I do have someone that is asking for a bushcraft knife. And that seems to be a lower bevel line. I don’t have a design picked out or drawn yet. Ed... your explanation of how you achieve that makes sense to me even though I use a jig. I can see why people end up free hand. I don’t think I will ever get to that point.
I know nothing about knife making... literally. But. I think you should maybe try the following.
1) put jig in attic
2) go slow
3) remember that the grind line is a direct result of the amount of pressure you apply with your thumb and index finger.
4) go slow
5) go even slower when you get toward the spine.
Even though everything I’ve said is probably totally wrong, I’d bet my bottom dollar that if you do 1-5 and go slow, you are gonna be super impressed with the first one you attempt. I’ll make another bet... the hardest part will be step 1, but in my opinion, there’s no other way.
Again, I know zero, so the opposite of what I said above is probably your best bet.
I tend to agree with Kevin. Jigs are not for everyone, at least not for me. But that’s not to say that one might be right for you. Try Kevin’s suggestion and see for yourself.
Here is another suggestion- use a tool rest. A knife first not have to be in it’s final shape when grinding. For instance- on a hidden tang knife the grind to Heat treat can be accomplished without cutting the profile of the tang. This gives (for me) more control during grinding either on the tool rest or free hand.
Good luck, you will hit that sweet spot eventually.
 
I've never used a jig but once your grind gets to the edge (nomenclature:oops: edge, bevel, micro bevel, secondary bevel,flat, hollow) isn't that it? seems if you had no taper the grind line would be even. I use a tool rest and push stick occasionally some free hand. If you're looking for control you can get a lot with tool rest/push stick and you can move the stick lower in your case near the tip. A thought I use a 1 inch tool rest so I can angle my kitchen knives when I'm getting near the heel (lower the point) maybe you could lower the back end of the knife as you near the tip again no experience with jigs
Good luck
 
Last edited:
I’ll be the oddball here. This is exactly why I freehand grind. Sooner or later jigs and tool rests just get in the way. Freehand grinding does take a long time to get good at, but once you have the hang of it there’s nothing you can’t do- because there’s nothing in the way.

For tricky grinds I’m a big believer in layout dye. Scribe the lines where you want the bevels to end up and grind to the lines. Bonus points if you hit the top of the bevel and the edge centerline mark at the same time. (That never happens, but it’d be way cooler if it did.)

The absolute key to controlling your grind heights is to establish a “flat” as soon as possible. It’s very easy to bring a grind line up on a flat bevel. It’s darn near impossible on a multi-faceted bevel with high and low spots all over it, especially if ever pass is an attempt to correct the previous one.

We’ve all been there. It really is all about body mechanics and muscle memory, just like Ed explained.

As to the OP’s original question- layout dye and scribed lines will help get the saber grind even on both sides. Watching the gap between your belt and the edge centerline is key. Keeping that thickness the same will keep your bevel height going in the right direction. Having a uniform bevel height from plunglines to tip is all about that thickness plus a little finesse. Leave the tip thicker than you want until the bevels are right, then bring the tip thickness down to where you want it as the last step. There’s no such thing as a single full length pass that magically makes everything even. That’s impossible. I take that back- it is possible with a saber grind. But a true saber grind will leave you with a knife that looks looks great and cuts like crap. Think flea market survival knife. Saber grinds are meant for splitting things. Enough about sabers... If you want any sort of taper, the angles and geometry change as the bevel curves and the blade tapers to the tip. If you keep chasing the tip as you grind the bevels you’ll either burn the tip off or end up with a round nose butter knife.
 
Last edited:
I tend to grind low on the wheel and as I move toward the tip ,tend to raise the point . If you are grinding a curve I move the edge into the wheel to make it work.
The only jig I have used belongs to a friend and I used it to work a big chef knife. Once I got a hollow started ,I could go home and finish it on my 18 inch wheel. Getting older is starting to take a toll on my wrists.
 
I agree that learning free hand is the best option (I just started a few months ago) but there are cases where a jig is useful such as getting flat scandi grinds on those woodworking knives. In cases where a jig might be helpful the way I get the grind line to match at the belly is to very slightly pull the butt end of the knife towards me. The burnt tip means you probably pulled it too much towards you and over thinned.
 
Back
Top