Overheating knife during HT

Pedro G.

Well-Known Member
Sorry for the length of this threat but thank you in advance for taking the time to read it :)

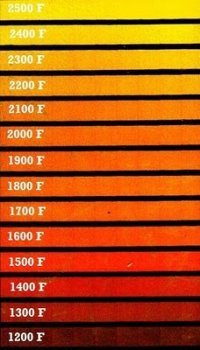
I have a small loose brick furnace that I use to HT. It is a bridge style setup of fire bricks (obviously not good ones because they tend to crack after a couple times of using the forge. I use charcoal and have a pipe attached under that i connect to a hair dryer for air. It heats up to about 2000 F or a bit more if I get it right but it only have about 4"x4" area for the fire to work, I can make it bigger but the air flow would still maybe hit the middle. It's pretty darn makeshift and only cost me 40$ to make. I only have two settings on the hair dryer and that is the extent of the control i have over the heat, aside from the charcoal placement.

Whenever I HT my blades I tend to put them with the spine on a flame or both sides of the blade being hit equally by flames. I'm not sure whether this is good or not but I have never been successful at raising the heat without letting the flames touch, maybe it's because it was 2 4"x4" openings on either side of the forge to let my put me steel through.

Every time I HT I end up burning the blade and they get bubbles. This is a pain in the butt when it comes to re sanding everything especially if I have to hand sand to mirror finish before and after HT. What can I do differently?

If you guys need pictures of the blank and forge I can get them for you.
 
Flame directly on a blade, especially during heat treating is never a good idea. It's impossible to "eyeball" anything, because by the time you see any "color" in the steel, it's already overheated. I'm guessing that what you're referring to when you say "bubbles" looks sorta of like "puddles" or "splotches" after quenching the blade? If that is so, what you've got is element segregation, and the blade is essentially ruined anyway. So, the obvious question would be, why would you want to finish out the blade?
Not trying to be rude of contrary, just pointing that out.
The way to not get the overheating is to either practice more with the setup you have, or build/buy yourself something better for heat treating. Unless you get the heat treat "right", everything else doesn't matter much.
 
What can I do with this setup that I have so I don't ruin my blades? Yes they look like blisters on the steel. Also the steel gets coated in a dark substance which I need to sand off usually. But when I watch professionals their blades just end up a little bit of a yellow color, not much different than what it normally looked like. What can I do to fix this? Should i make a second compartment to trap the heat? What should I do?
 
I think the professionals you have been seeing were doing stainless, either in vacuum or foil envelopes. There is no way to get that result in your setup or with oil or wtaer quench steels. You need to expect some cleanup. I also echo what Ed said.
 
Makes sense, I can deal with clean up. But i'm still not clear on how to not get the blisters on the blade... How do I get the heat on the blade but at the same time not touch the flames.
 
I'm not fully aware of your situation, so the following is a "best advice" scenario....

There's always going to be a level of cleanup after heat treating a blade. The exact amount is going to depend on many factors.

My advice would be to either buy/build a circular style forge, or save up and purchase a heat treat oven. Something that you MIGHT be able to try with your current setup is to get a piece of thin wall pipe, longer then the "heat area" (or better yet, longer than the longest blade you plan to heat treat...but there in lies another issue......with such a short heat source, you're going to have to move the blade back and forth to make it even remotely work). Plug one end with kawool, and then put it into the device you're using to heat the blade. Use the pipe as a kind of "oven"......meaning that you put the blade you are attempting to heat treat inside the pipe....that is inside the heat source. That would keep the flames off the blade, and will act more or less like a radiant heat source....allowing for more control. Where the difficulty is going to occur is the size (4"x4") that you mentioned. That is going to force you to move the blade back and forth in order to ensure it heats EVENLY. The other aspect your going to have to work on is KNOWING what the temp is/needs to be for the given steel you're using. It's going to require time, effort, and likely a few "wrecked" blades to learn/know what you're doing.

In all honesty, I just don't think the device you described in your first post is going to ever work like you'd like it to. It sorta boils down to either building/buying something that works better, or finding a way to make what you have, work the way you want it to. As long as you are getting that "puddled" look on your blades, your overheating the blades, and in the case of the "puddling", causing catastrophic damage.

Learning/Understanding heat treating is without a doubt the most time consuming, difficult portion of being a knifemaker.....the pay-off for taking the time and putting out the effort to learn/understand it is the difference between producing a "quality" blade, or just something that looks like a knife blade.
 
Hmm that definitely makes sense. I guess i might not be able to make a forge how i'd like to. So if I were to make myself a forge would you say a gas forge is better for heat control? I guess that making a heat treat oven might be out of my level for now. And i can't afford to buy any of these things pre made.
 
It sounds like you are getting way too much air to your charcoal forge with that hair drier. You should install a choke plate to your tuyere but I think that it would might burn out the hair drier. Other options are to get a centrifugal blower and attach a choke plate to it (they will hold up) or get something manual. On the last charcoal forge that I built, which still sits in the back of my forge building, I used a large bellows type foot pump that was built to inflate large rafts. It's less than ideal because it's only single action. Another option is to build a box bellows, Japanese style, that is double action, or even a regular double action bellows. You should be able to find patters for both on the web. One more option is to bet a hand cranked centrifugal blower. You can look for them used but they are in rather high demand so you might be looking at something over $100 for one in good working order. There is one person who sells hand cranked centrifugal blower kits. It's a man that goes by OddDuck on Don Fogg's board. You can contact him through his site at www.oddduckfoundry.com. I don't know the exact details but he says he sells them pretty much as cast so I don't know the details of what kind of work/tools are required for finishing. The best bet, however, is to build a gas forge. I tried to stick with charcoal but it was just too much of a hassle tending the fire to get it right.

IMG_0147.jpgIMG_0146.jpg
The first one was cast from Cast-O-Lite rammable refractory. It was build in a square mold with a piece of PCV pipe to form the fire chamber and I had to drill a hole for the black pipe burner tube. The front and back door are of Insboard. It could also be used in heat treating a blade probably up to 12-14" in length. The second was build in a large mailbox to give me the length that I wanted, it's 14" deep. I had to use 3" of ceramic matting insulation to take up the space and still ended up with a largish fire chamber. It's coated with Mizzou refractory cement. It's my heat treating/forge welding forge. It can achieve temperatures above 2000°. Both are powered by blown burners built mostly from parts from a hardware store. I had problems finding a brass needle and ball valves that weren't designed to attach to plastic tubing so I got them from what is now High Temperature Tools and Refractory. Both use the same blower which is designed to inflate bounce houses. There is a gate valve on each of the burners to control the air flow. The connection from the blower is make with a flexable plastic hose and rubber connectors. I had to use two progressively smaller rubber reducers clamped together to step down from the blower opening to the size of the hose. The burner side of the hose is just a rubber sleeve that slips over the plastic hose the the 1 1/2" nipple below the gate valves.

If I had to do the small one again what I would do is find a can of the size I wanted to use and attach legs to it which could be made from bent flat stock, or you could use your imagination. I would then form an inside form from heavy cardboard rolled in a tube. I would cut a hold in the can and the inner form to receive a black pipe nipple large enough to hold the burner tube on my blower. The outer end of this nipple should be drilled and tapped for bolts to hold the burner tube in place. Insert the nipple in place through the can and the inside form and ram the the refractory in between the can and the form. You could use sand inside the inner form if it starts to collapse but you could just make the form a little thicker with more layers of cardboard to start with or you could use a shipping tube. Just remember that it will have to be removed later. Doors can be as simple as refractory bricks reducing or blocking the openings.

After the refractory has enough time to set up well, pull out the inner form, it may have to be done in pieces so remember that when choosing the material for the inner form, and let the refractory shell cure and dry for about another week. Then install the blower and slowly heat the forge to finish drying the refractory. Do this by running the the burner for a few minutes to get the refractory hot and then turning it off to let the water evaporate. Do several cycles of this before bringing the forge up to full temperature or you could blow out the walls from steam formation.

These are just ideas, there are plenty of other designs out there.

Doug

P.S. If you look to the lower right hand side of the picture of my small cast forge you will see my charcoal forge. It's the bucket with the abode in it. The foot pump is against the wall behind the bucket.
 
Last edited:
Those are really good ideas. Actually i'm going to send this knife out to get HTed but while I work on this knife i'm going to try and make a nice forge to be able to practice for next time. I Think it's going to be like the first one, except i'll be using mixed mortar mixed with fire clay with a frame made of home depot fire bricks and i'm going to take that pvc ideah of yours which I really like!

I'm going to try to make it a gas forge rather than charcoal, it seems easier to control the heat. My question is, how to I aim the flame of the torch so it doesn't hit the blade?
 
You will need something to act as a mold release to make it easier to remove the pipe and you will then have to drill the hole for you burner tube. I didn't use a mold release and I recall removing the PCV pipe involved a lot of fussing and cussing. I think that I ended up tapping it out with a rod on the edge of the pipe hit with a hammer. If you use another piece of pipe or doweling to form the hole insert the burner tube through you will have a very hard time cutting the PCV pipe out. You want to bring the burner tube in at a tangent above the midline of the of the fire chamber so that it catches the opposite wall and swirls the flame. This also keeps the burning jet of gasses above your work.

One thing that I didn't mention is that the small forge also shows a repair. Which brings me to another point. Make the sides of the forge 2-3 inches thick go give support to the pipe. Originally the will there was thinner and with burner pipe just cemented in with furnace patch it broke across at the level of the burner hole. When I repaired it I took out the insulating brick that I had on that side, pop riveted a piece of aluminum angle iron for the pipe to rest on and attached the burner tube to it with a bracket. I then build a temporary wood form on the outside of the frame to hold the castable refractory and rammed it into the form around the burner tube. This added about another in to the thickness of the wall on that side and mended the break. I tossed the angle iron in on the top of the forge to support the burner further with a eye bolt and heavy aluminum wire. Actually, casting the burner tube in the way that I did wasn't the best idea. The end of the burner tube does not actually come all the way through the wall of the forge so the refractory around it will give a lot of protection to from the flame. However, if for some reason I should have to replace the burner tube I will have to break it out. It will probably mean having to replace the forge. A larger black pipe nipple big enough for the burner tube to set in that was place up to the outside of the original wall and centered on the hole for the burner tube and then cemented in would have been better. The burner tube would have then been held in place by some set screws a furnace patch packed between the two pipes to keep burning gasses from flowing back between the two pipes.

If I was going to do this with an original build, I would embed the larger black pipe nipple through the outer form but hold it back from the inner form and cast it in place. Remember that you will have to be able to remove the outer form from around the pipe or the form will have to be left as part of the body of the forge, like the tin can. You can use something like a short cylinder of rolled paper to form the hole through the inner form or you can use a masonry bit to drill the hole through the wall for the gasses to enter. You do not want the inner end of the burner tube to actually enter the fire chamber or you will gradually burn it off. That is a problem that I had with the mailbox forge. I started out with a 12" burner tube and, when I finally replaced it, it was down to 7". You can do this but it will mean that you will have to rebuild your burner occasionally, depending on how much you use it. When I replace the burner tube on the mailbox forge the last time I formed the refractory on the inner will around the end of the tube to protect it from the flame.

The burner tube on the mailbox forge is held in place by forming a socket of castable refractory around it inside the ceramic matting wall, which forms up with the refractory lining. The furnace patch on the outside seals the hole where the burning gasses were still able to work it's way around the burner tube. Something that you will want to avoid or you will have combustion within the burner tube, which is not desirable. It will burn up your burner tube, which really should be looked on as the fuel injection tube.

Doug
 
I was just thinking, which can have it's dangers. Instead of using fire brick to form the outside of the the cast wall forge, roll a piece of sheet metal the size that you want and hold it together with a couple of pop rivets or sheet metal screws. Put a removable form inside of it and cast your walls. If you place a circular piece of Insboard on the bottom of the form, this stuff is real easy to cut, then you can cast that in place as the back wall of the forge. Do not bring the refractory all the way up to top rim of the outer form but leave it about an inch below it, the Insboard is 1" thick. Then you can use a second circular piece of Insboard to form the front wall of the forge. All you will need to do is to cut the ports in the Insboard. A fire brick or two can be used to block the rear port if you are not needing to stick the work through, but if you forge is shallow enough, you won't need to worry about it because you will constantly be passing your work through, as is the case with my cast forge. It's only 7" deep. I got my Insboard from High Temperature Tools and Refractory but you could look for local suppliers of high temperature insulating board. I would check with a pottery supply house that sells kilns. They may handle it for repairing or building kilns. It's not the cheapest stuff in the world but all you will need is two 1 foot square pieces. You can make some legs from bent flat stock or build some sort of a frame to set it in.

I have a piece of that material to restrict the front opening of the mailbox forge. It is held in place with a screw through the top of the forge liner and would be easy to remove or replace as I needed. I just shoved the board up against the opening of the forge to make an impression to guide the cutting. It cut very easily with a coping saw and I adjusted the fit with a rasp. It's relatively soft.

I guess the advantage of following another's example is that he can show you where he screwed up and how it can be done better. I'd better stop typing before I start thinking again; as I said, not always the safest thing.

Doug
 
Oops! Too late. You could leave the form sitting on it's end and cut two portals on the top end opposite each other and leave the ends of the forge closed. Forming these with cardboard would be easy as they would not have to stand up the weight of very much refractory. Bring the burner tube into the forge on the bottom. The inner diameter of the forge will only need to be about 4-5". This will give you a vertical forge which gives a little better heat distribution than a horizontal forge. I'll try hard to stop thinking now.

Doug
 
Dammit! Cast round two round blocks of refractory instead of the Insboard for the vertical forge. One for each end of the forge, a couple of inches thick should do, and set them under and on the body of the forge. It will make cleaning and patching the forge easier. You might want to reinforce the blocks with some form of light welded wire but with a diameter of around a foot or so I don't know if it would be all that important structurally. I'll try to stop thinking again. This is getting tiring.

Doug
 
Its possible to judge temp by color , I do it all the time . Japanese smiths have been doing it that way for over a 1000 years . there is no doubt it works . The secret is doing it when its dark (Yakire) or early in the morning . Occasionally
everyone screws one up . I just broke one the other day . I can send you a color chart if you want . They ht and forge thier blades in an open forge right in flame and hot coals . I will say its not something for beginners ! It took me quite a few years to get it right . good luck Bubba


Faint red ..950-1050 F
dark red 1150-1250F
dark cherry 1175-1275 f
Cherry red 1300 1400 f
bright cherry 1475 1575 f
Dark orange 1750 1850 F
orange about the same
yellow 1800 1900 f
yellow white 2000 +
Takes a little getting used to but, after a while it will come naturally
 

Attachments

  • ht color chart.jpg
    ht color chart.jpg
    29 KB · Views: 11
Last edited:
pedro.g newby here i,ve had the same trouble check out harber fright they sell a propaine torch with a hose (get a regulater) for control & safe use that should be a good burner the net has can forge info good luck work safe
 
The problem with going by color is that my blades would be 1700° or more by that chart, when my oven reads 1475°, which I know is about right from cone testing.
 
Doug: Yeah that makes a lot of sense, I took those ideas and I realized that is not as hard to make a forge as I initially thought! Also, thank you very much for taking your time writing such a detailed and long post :)

Bubba: Thank you for that chart, it helps a lot! I thought the colors started at a much lower temperature but now I know :p Last time I tried to HT, I felt as if the change between magnetic and non magnetic on my steel was only off by a couple degrees, it wasn't even gradual, is that normal?

Graveyard: Wow I just realized they had them! I've been looking everywhere. Which one of the torches would I need, they sell 3 or 4. The one with the very large diameter nozzle or the one that looks like a welder head? (I'm completely new to lighting gas flames) :)

Again thank you all for helping me!
 
Back
Top