Need some help with this guard.

Yes he asked me to finish the knife not to use but to remember his good friend. So in a word, Yes.

I can see wanting to take on the project to help your friend out and he asked because he knows you make knives. I can also fully understand the points that the Pair of Johns and others are stating about not finishing the knife because it will not be to the best of their ability I respect that too. I am not saying I would or would not do it for a good friend but if I did I would consider it more of a restoration project which would not bear my name. Now, I also understand that does not stop the recipient from attaching my name to the work (all of it, not just the part I did) so i would have to decide if I was willing to let that happen. Each of us view craftsmanship through our own eye based on our own capabilities and experiences. The Johns are ahead of me in ability, so I may think I am OK with my name being associated with a finished project and they may see things I do not and back out, that is Ok. I will be the first to admit I am much more selective now about what knife work my name is associated with than I was a couple of years ago. The choice is yours, if you decide to help your friend out I know the guys here will give you the best advice they can even if that advice is "Just say No".
 
I was thinking of a slotted guard but the back (for lack of better term) flares are wider than the handle of the blade or where the guard will rest. So I am not sure what to do.

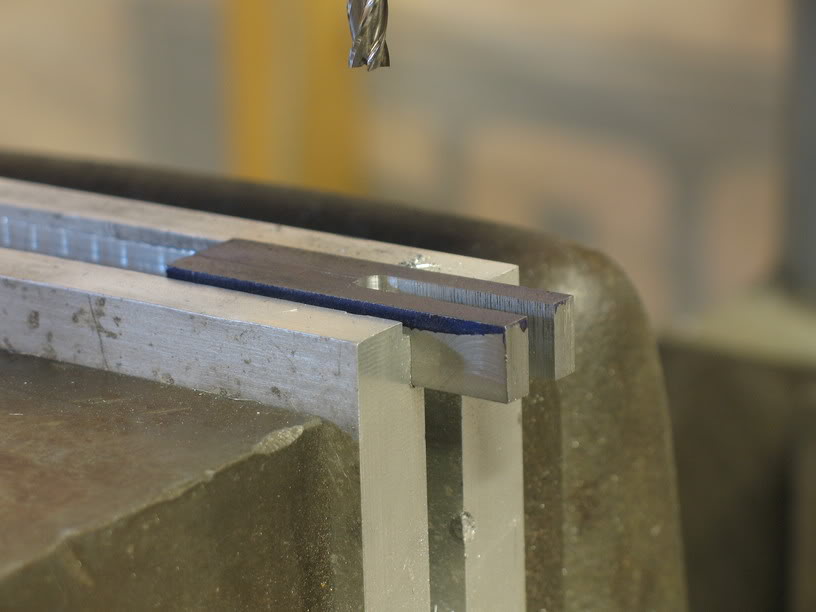
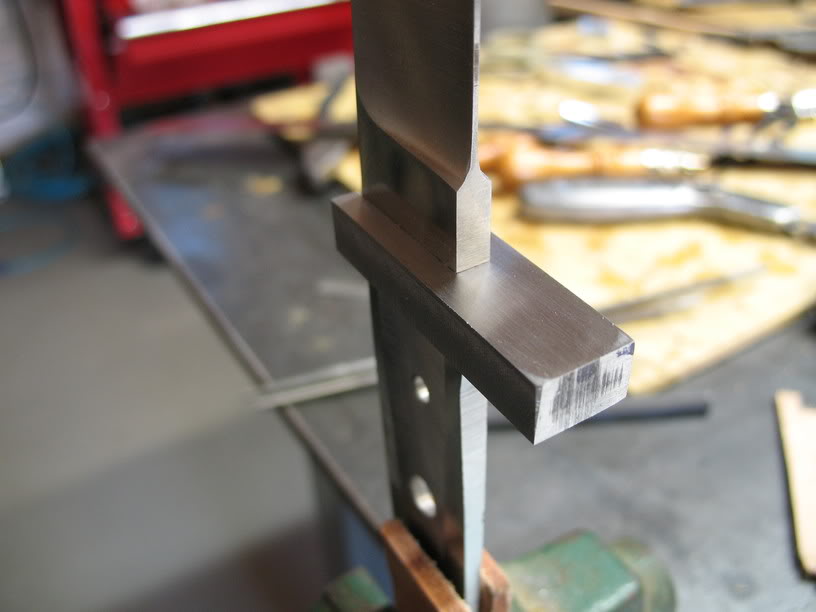
I'm not sure you're thinking of the same kind of slotted guard? Chris is talking about a "Loveless" style slotted guard like you would see on a drop point hunter, for instance. Here are a couple of pics for reference:
29milled.jpg


The guard is milled with the slot open from the spine side of the knife, and inserted from the edge side:
33fit.jpg


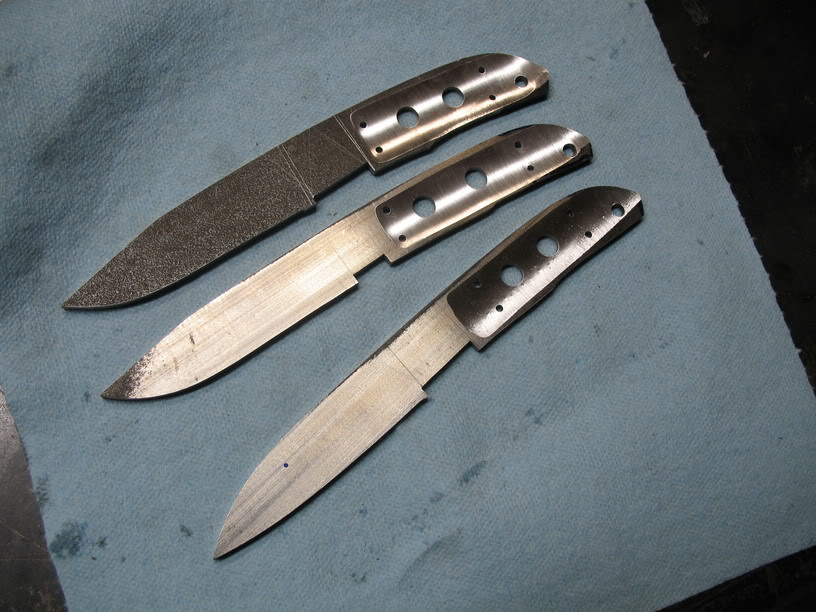
Traditionally, the blade is milled out square as in these three knives:
6groovedfortaper.jpg


If I were to try to fit a guard to your knife, I'd mill a similar notch into the blade with a carbide mill. The holes that are already in the tang will limit you somewhat, but there should be just enough to clean that area up for this style of guard.

Looking at the knife as is, it's almost as if that little "shelf" for the guard is upside down. In fact, you may be better off just removing it completely. You can still slot a guard from the front, but it won't look as weird. I'd maybe even forget about the existing guard holes and just drill a small pin hole in the center.

BTW, these pics aren't mine, but from this tutorial:

(maker David Sharp)
 
I'm not trying to be insensitive or argumentative, but this is a challenging build.....to do it right (which should be EVERYONE'S main goal). If this is beyond your skill set, what's wrong with telling the gentleman that this is above your current ability? And there's no shame in admitting that.
This is true. I may just finish it with my current ability. The man is getting up in age and wants to be able to pass it down so I think I'm finish it just not head in the direction of which it was originally thought up to be.
 
I'm not sure you're thinking of the same kind of slotted guard? Chris is talking about a "Loveless" style slotted guard like you would see on a drop point hunter, for instance. Here are a couple of pics for reference:
29milled.jpg


The guard is milled with the slot open from the spine side of the knife, and inserted from the edge side:
33fit.jpg


Traditionally, the blade is milled out square as in these three knives:
6groovedfortaper.jpg


If I were to try to fit a guard to your knife, I'd mill a similar notch into the blade with a carbide mill. The holes that are already in the tang will limit you somewhat, but there should be just enough to clean that area up for this style of guard.

Looking at the knife as is, it's almost as if that little "shelf" for the guard is upside down. In fact, you may be better off just removing it completely. You can still slot a guard from the front, but it won't look as weird. I'd maybe even forget about the existing guard holes and just drill a small pin hole in the center.

BTW, these pics aren't mine, but from this tutorial:

(maker David Sharp)
Ohhh. Ok yea thanks that does help.
See when I was first shown this I thought of one of those but as I got into it I couldn't figure out how to get it pinned in place.
 
I would do the below or move the split between bolster and scales between the set of 4 holes. I would maybe not use metal for the bolster but contrasting wood or micarta, depending which way you go.
Grind off that little spike or what ever it is for a typical finger notch.

I like that idea, maybe put a finger grove where the spur is.
View attachment 71581
 
I believe it is the connection to the maker.
Out of curiosity what are some of the problems with the blade it's soild, well made, it is already been threw heat treatment.

Again, please don't take this as insensitive, or in any way disparaging to the original maker. But since you asked, I'm going to be honest and to the point about what I see as wrong and needing correction.

The bevels need to be re-ground because the plunges are buggered up and the bottom corners have been rounded. It needs new plunges that come back past the damaged area. Because it has been heat treated already, this will have to be done on a grinder because files won't touch it. The scratch pattern on that blade is very rough. It will have to be cleaned up on a grinder. To hand sand all that out will take hours and hours and hours. That little spur coming off the front of the ricasso needs to go away. It will not fit right with a guard. I'm not sure what the original maker had in mind with that. The spine of the blade is wavy. That needs to be fixed on a grinder, and this will also allow you to fix the tip that has been overworked and rounded off.

Again, all I'm saying is that finishing this current blade will be five times more work than starting over. With a new piece of steel you can trace out the shape and begin working with a clean piece of steel that doesn't have all the holes in the wrong places for what you have in mind.
I completely agree. Apparently his grandson got ahold of it and it was way rougher than that. I'm looking to just finish it enough for him to enjoy. He himself worked on this particular blade(I think that is what happened to the plunge lines.) I'd like to finish this one. I may just finish it as best as I can and give it back to him.
 
This is a great thread. Amazing how much passion a piece of metal can create. Lots of great ideas and input. If you move forward with it, I’m sure all of us would live to see what you do with it. No pressure though. Lol oh looks like the blade is asking for a swedge too, but maybe that wasn’t in the design .
 
Back
Top