Milling machine or surface grinder

well i did it, and i know at least one other maker has, so it's possible that someone else can too. just sayin???

Hello Mike,

Do you have any links you could post to show what you made/did? I would love to get more ideas of what can be accomplished.

Thanks,

John

Sent from my SM-N910P using Tapatalk
 
DSCF7890.jpgDSCF7887.jpgDSCF7891.jpgDSCF7893.jpg
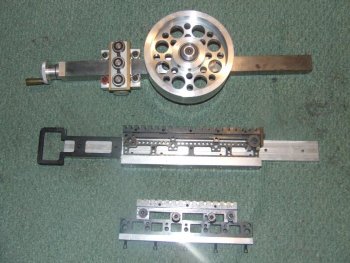
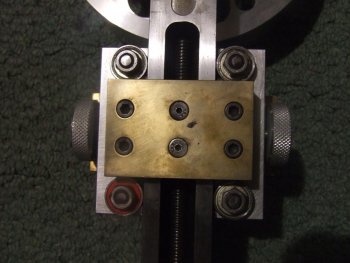
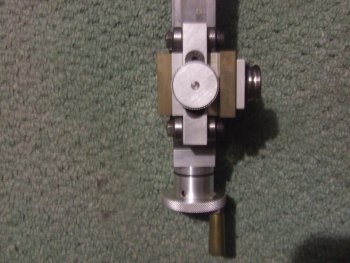
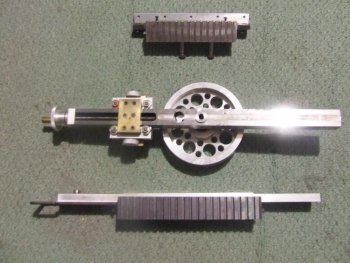
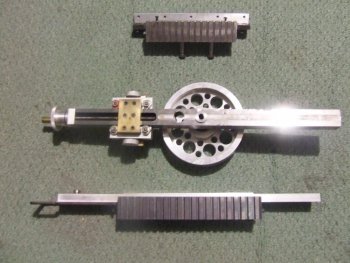
Here's some pics of my toy. I made the wheel myself, you would have to buy one unless you also had a lathe. I'm gonna have my wheel coated in 90 duro rubber eventually. You'll have about $175 in the linear bearing system and about $30 in magnets. There's lots of ways that you could accomplish this, but I went for the most simple and accurate way without blatantly copying TW's. To be honest I think mine is a better design, but I wouldn't have made mine if I hadn't seen Travis' first.
 

Attachments

  • DSCF7890.jpg
    DSCF7890.jpg
    155 KB · Views: 53
Last edited:
View attachment 57166View attachment 57168View attachment 57169View attachment 57170
Here's some pics of my toy. I made the wheel myself, you would have to buy one unless you also had a lathe. I'm gonna have my wheel coated in 90 duro rubber eventually. You'll have about $175 in the linear bearing system and about $30 in magnets. There's lots of ways that you could accomplish this, but I went for the most simple and accurate way without blatantly copying TW's. To be honest I think mine is a better design, but I wouldn't have made mine if I hadn't seen Travis' first.

Thanks Mike , that's awesome!

John

Sent from my SM-N910P using Tapatalk
 
Mike-E, thanks for bumping this. I see that you might have successfully made the adjustment in/out kind of like what I was thinking about in the other thread. Wishing I could see all the innards for how you made it all work with no slop in there :).

Jeremy
 
If I had to have one, I would have a mill. You can do everything a mill can and with a mag chuck and a power feed your 90 percent of a surface grinder. If you can find a combo type machine like a 860 Wells Index your even closer. In my area you can even find older machines with CNC controls for a reasonable amount (I have seen Crusader II machines for as cheap as 2500). The only downside is to keep your machine nice when grinding you should be mindful of where the chips are going, install rubber guards, vacuum, ect.. to keep it off the ways.
 
In any case, I built mine for less than $250. And that included a 4” serrated contact wheel and 1.5” tooling arm!

NOW YOU'RE SPEAKING MY LANGUAGE!!!

I will search out your WIP so I can put together a parts list. I like projects as much as the next guy, but I'm not a wheel-reinventor. I am willing to spend a few bucks on ready made sub-assemblies if I can. What I want is a box of part that I can assemble with as little fabricating from scratch as possible. Time spent building stuff is time I'm not making knives for waiting customers.

So, I'm cheap AND lazy. Guilty! Just kidding, but not kidding a whole lot.
 
Mike-E, thanks for bumping this. I see that you might have successfully made the adjustment in/out kind of like what I was thinking about in the other thread. Wishing I could see all the innards for how you made it all work with no slop in there :).

Jeremy
That's why I posted it back up. I could tell your idea was headed that direction. I had access to a lathe and mill at work and spent my lunches making what I could. I can only stand sports talk so much anyway.
I will disassemble it soon and try to get some pics up.
 
Calvin, I don't want to hijack this thread but I really could use some pointers from a pro on how to make the most of a drill press. I don't have a machining background, so "square" is about the sum total of what I know in setting up my drill press. Anything I could do to reduce runout would be a huge improvement for me. Maybe we can start a new thread if you're willing to share some setup dos and don'ts?


To line up your drill press without an indicator do this:

1. Cut a wire coat hanger so that it has a straight wire about 2" long,a right angle bend around 4 to 6 inches long parallel to the first bend, then another right angle bend about 1" long. (All bends are parallel, so that it lies flat on the table).

2. Cut it there.

3. place the first bend (2") into the drill chuck.

4. Place a sheet of paper flat on the drill press table.

5. Slowly swing the spindle around in a circle by hand and adjust the spindle (with the wire in it) downward until the wire end just barely touches the paper somewhere.

6. Loosen the table clamp a little and swing the spindle containing the wire around by hand. Adjust the table until the wire barely scrapes the paper on all four sides of the table.

7. Clamp the table tight. You may need to shim the table to spindle clamp until it clamps square from front to back.

Easy, huh?

You're quite welcome.

P.S. Hang the wire on the wall. You'll need it again.
 
Last edited:
That's why I posted it back up. I could tell your idea was headed that direction. I had access to a lathe and mill at work and spent my lunches making what I could. I can only stand sports talk so much anyway.
I will disassemble it soon and try to get some pics up.

Thanks, Mike-E I sure appreciate it. Your build looks pretty nice.


Jeremy
 
Thanks, Mike-E I sure appreciate it. Your build looks pretty nice.


Jeremy
Just to make it easier to build you could box in your tooling arm(I recommend brass plate with sides thick enough to drill clearance holes through), and attach a threaded block underneath. The bearing half of the linear slide would be on top.
Then attach a plate to the end of the tooling arm that hangs down for the hand wheel to be against.
Without milling the slot, this could be built in an afternoon. And another afternoon for the mag-chuck and rail mount.
 
To line up your drill press without an indicator do this:

1. Cut a wire coat hanger so that it has a straight wire about 2" long,a right angle bend around 4 to 6 inches long parallel to the first bend, then another right angle bend about 1" long. (All bends are parallel, so that it lies flat on the table).

2. Cut it there.

3. place the first bend (2") into the drill chuck.

4. Place a sheet of paper flat on the drill press table.

5. Slowly swing the spindle around in a circle by hand and adjust the spindle (with the wire in it) downward until the wire end just barely touches the paper somewhere.

6. Loosen the table clamp a little and swing the spindle containing the wire around by hand. Adjust the table until the wire barely scrapes the paper on all four sides of the table.

7. Clamp the table tight. You may need to shim the table to spindle clamp until it clamps square from front to back.

Easy, huh?

You're quite welcome.

P.S. Hang the wire on the wall. You'll need it again.

Don I first read your post on Saturday and I went huh??? This morning with a couple of cups of coffee in me I re-read this post and my lightbulb lite up and I went, Oh I get it!! Thanks Don!
 
Don I first read your post on Saturday and I went huh??? This morning with a couple of cups of coffee in me I re-read this post and my lightbulb lite up and I went, Oh I get it!! Thanks Don!


Yeah, it was kind of hard to describe. Not easy to picture, but easy to make and it does work.

:confused::(:D
 
Back
Top