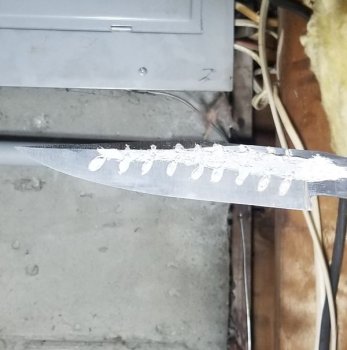
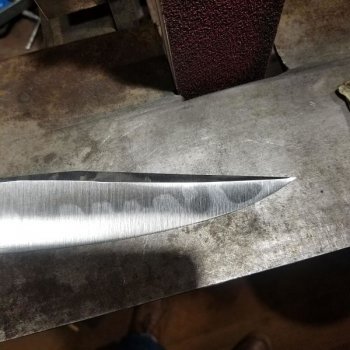
Jason Volkert Kith 2019

Do any places sell small thick pieces of steel for guard work?
Depends... you can make guard out of almost anything. You can make a guard out of mild steel that you can buy at home depot.
What is normally recommend for a easy to polish guard is Nickle silver that you can get from Jantz.com. Every knife supply place sells some kind of guard material. 416 stainless, bronze, brass, copper. USA knifemaker, Texas knifemaker, knife and gun(k&G), Pops, also any of the online metal supply place like metalsupermakets, onlinemetals, industrialmetalmetalsales, and the list is pretty endless. Just google what your looking for.
 
I also wanted to mention that the 3/8" that I like the guard to be is for the style of guard I am making on my drawing. There are many styles of gaurds that I think wont look right 3/8" thick. Everybody has there own style so use what you think looks good.
 
Ok so I got some work done. If you follow me on Instagram check out my High lights or todays stories. I have some Videos. You can see it HERE just click on the bubble that says Bowie WIP
For those of you that don't do Social media:rolleyes: I have some picks for here

So I photo copied the my drawing and drew the Tang in.
Rich (BB code):


JtAVf9c.jpg

Then I cut out the knife glue it to some sheet metal make a template and Scribe it onto some W2 tool steel.
Rich (BB code):
8IJZa51.jpg
Then I cut the profile out On the Bandsaw.
Rich (BB code):
qGj2lFi.jpg
Then I clean up the profile with a 36grit belt and then a 220belt
Rich (BB code):
6LA6enf.jpg
 
Here is a link to my first YouTube video ever. Showing How I Grind with a push stick.
YouTube Link
I use this way of grinding because its way faster and the belts last longer from the High pressure I can use. I did both sides up to 60grit in 30mins.
Almost ready to put some clay on the blade.
 
I tried using a push stick but I didn’t feel like I had enough control of the blade. Might give it another try. I follow you over on Instagram and saw your post there. Have a question for you. You angle the table on your grinder horizontally and rest the knife on the table. I don’t think I’ve ever seen someone grind that way. Seen people grind by tilting the table into the belt. Am I looking at that right and if so how do you determine what the angle needs to be?
 
Last edited:
I only angle the table for the slanted plunge line. I keep it at a right angle to the bevel if you get what I mean. For a straight up plunge line like on a normal knife I guess you could say the the table would be 90degrees to all sides of the platen if you get what I'm sayin. I just tilted the table to what I thought looked right for the slanted plunge line I wanted then found the angle with a angle finder so I could angle it the same for the other side of the knife. @Randy Lucius I hope that made sense if not let me know
 
I tried using a push stick but I didn’t feel like I had enough control of the blade. Might give it another try. I follow you over on Instagram and saw your post there. Have a question for you. You angle the table on your grinder horizontally and rest the knife on the table. I don’t think I’ve ever seen someone grind that way. Seen people grind by tilting the table into the belt. Am I looking at that right and if so how do you determine what the angle needs to be?
Randy , here's a link that might help: dcknives.blogspot.com . Use the search function for "angle calculator" . Hope this helps.
 
I only angle the table for the slanted plunge line. I keep it at a right angle to the bevel if you get what I mean. For a straight up plunge line like on a normal knife I guess you could say the the table would be 90degrees to all sides of the platen if you get what I'm sayin. I just tilted the table to what I thought looked right for the slanted plunge line I wanted then found the angle with a angle finder so I could angle it the same for the other side of the knife. @Randy Lucius I hope that made sense if not let me know
OK. Gotcha now. The tilt of the table is for an angled plunge line. Thanks!!
 
So I clayed up the blade for prep for the Hamon. First I cleaned the blade off with hot water and Dawn. Then I use a Heavy duty degreaser spray. I try to get all the oil from my hands off the blade before I put the clay because every time its not clean enough the clay will explode off the blade as soon as you hit the quench. Everytime that happens to me the Hamon results are garbage. I use satanite for clay and I use then amounts of thickness on the blade like less then .100 thick
Here is a pic with the clay layout

clay lay out_opt.jpg
 
Thanks OP

I reheat treated the blade and the hamon looks good. My phone screen broke and I lost some pics but I have the blade up to a 600grit and cut the shoulders on the ricasso. Should be working on the guard next. I will post some pics and video on the working the gaurd
 
Alright so the the second Hamon attempt was a failure too. I sanded the blade all the way to 600 anf etched it and 1/4" of the edge in 1 spot did not harden. So I ground the edge back again so I could heat treat it again. This time it looks good but I change the design because everytime I had to hardin it again I had the edge already convexed to .005". So instead of making a Bowie/Fighter I'm going to make A Bowie/Camp knife(At least that's what I call a knife over 5" with a single lug gaurd ;) )
So this is the new design
Oo4O2Hq.jpg

After I quench the blade I grind it real quick with a SHARP 120g belt to see if the Hamon came out ok before I put it in the tempering oven
Here a quick shot before it went in the oven
JkKeOYz.jpg
Looks good!
 
I cut the shoulders in on the blade. Here are the tools I use to do it. Some files with safe sides on them, a brass scribe, a brass brush for getting the chips from out the file guide so I can see what I'm doing, and the most important tool a good razor blade.
eC7mrHt.jpg

I use the a brass scribe to scribe the ricasso for where the guard will go.
ZL637ET.jpg


Put the file guide on and start filing. I cut the shoulder on the blade on all 4 sides. I find the way much easier. The trick is all four sides have to be dead even. The way I check that there even is I slide the razor blade across the the file guide to check if I'm even with the guide. If I feel anything with that razor blade that mean I'm not done filing

aisjuII.jpg


Next up is slotting the guard. I use a milling machine for that.
 
Back
Top