How in the world?

KentuckyFisherman

Well-Known Member
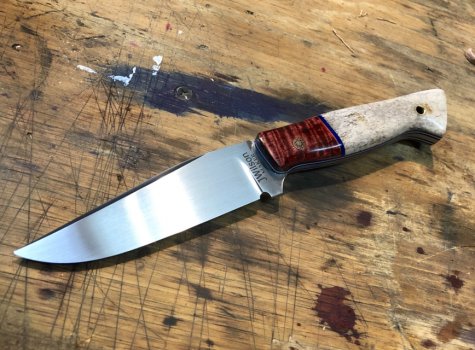
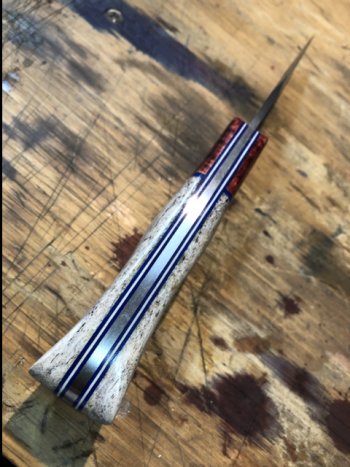
I'm still very much a newbie, only adding scales to purchased blades at this point, and I've just bought the tools to begin making sheaths. So much to learn. I'm hoping someone here has done a step-by-step or a video showing how some of the first-class makers on KDF get such precise, beautiful joinery (right word? wrong word?) in their handles. I don't have a woodworking background and I don't have a clue how to begin getting fitment like is shown in these scales. Sometimes it's a scale that's fit to an angled bolster. Sometimes it's a scale made of two materials and perfectly joined at an angle. I'm not asking for anyone's trade secret technique, and maybe there are several ways to do this, but I'm just fascinated by it and want to learn. Here are some examples, and I hope some of you can point me to a thread or maybe a YouTube video. Thanks in advance. Knives are by Caffrey, Opaul and Morland. I didn't ask their permission, but I'm lifting these up as excellent examples of what I'm trying to describe, so I hope that's OK.

Caffrey.JPGCaffrey2.JPGCaffrey3.JPGOpaul1.JPGOpaul2.JPGMorland 1.JPGMorland 2.JPGMorland 3.JPGMorland 4.JPGMorland 5.JPG
 
My secret, if I have any, is that I use a disc grinder, a good rest, and a 30 degree angle. I simply cut every angle the same using that disc grinder. I never change the angle except to swap out the sand paper. That way all the angles meet up in the final fit up and epoxy session. Has not let me down, yet.

Have a Merry Christmas and feel free to pm me anytime with questions.
 
One tip I can help you with: Imagine creating a solid rectangular block, made up of different materials. You don't make each finished, shaped piece and then put them together. Well, there are multi-piece handles made that way but that's MASTER LEVEL stuff. Let's walk before we run.

Let's imagine a handle with two different woods, and they meet in the middle on a diagonal line. The easiest way to do this is to start out by making two rectangular blocks of wood. Flat and square is your best friend because you need right angles and flat surfaces to get references from. It's much easier if they are made to the same thickness. Now draw a diagonal line across the one that will be the butt end, and make another diagonal line across the one that will be the front end by your guard. This diagonal line should be at the same exact angle on each one so that when you cut the blocks on this line you can take half of each block and slide them together, ending up with a rectangular block made of two different pieces.

If you're like me, the lines you cut won't be perfectly straight. So now you sand and fit, sand and fit until the blocks butt up against each other with no gaps. As Dennis says above, this is where a disc grinder with a work rest is worth its weight in gold. But however you do it, the entire key is to have the blocks butt up together with NO GAPS.

Now you will epoxy the two blocks together and clamp them up so that they cure without sliding apart. If you want to be extra fancy you can put some spacer material between the blocks. That spacer material is where the really pretty line comes from in those butt joints.

Now that you have the multi-wood one-piece block, you can make your handle from it as if it was a single block of wood, because effectively that's what it is now. You can make a hidden tang, or cut this block into scales. In either case, you shape it after the fact.

As you progress you can get more creative by cutting compound angles into your joints like these fine makers above. That's where having good guides and consistent angles pays dividends. The more accurate the work, the less tedious hand fitting you have to do later. But in the world of knife making you will discover that there is a serious amount of dry-fitting, sanding, filing, dry fitting, repeat.... that goes into these things. The finished product may look otherworldly, but I assure you it's 99% elbow grease and patience.
 
John pretty much has it covered. It's less about a specific angle, and more about getting things flat.
For dovetails, it helps to start out with material that's already flat and relatively parallel. Grind your bolsters at a specific angle, then in order to match the lower piece, you just flip the mating piece over and grind the same angle that you ground your bolster at. Turned one way, two 45 degree angles make 90 degrees. Turned the other, they make 180 degress. Get it? Once glued, you can flatten the tang side and then profile the outside like any other piece material.
 
Lots of good advise!
On the knives you posted of mine, I fit each piece individually. It takes a lot of finesse on the granite sanding block. Yep it gets frustrating!
Good luck but you can do it.
 
Aren't the Internet and KDF wonderful resources! As recently as 20-25 years ago the only way to get help from such skilled craftsmen was to visit their shop, call them on the phone, or read a book or magazine article they had written. All this took time and travel. Thanks to KDF, ideas, photos, tips and help are available in the wink of an eye. Thanks, Boss.

And huge thanks to you guys who've responded. The answer was simpler than I imagined, but as Opaul said, "it takes a lot of finesse." In one post or another, I think I've read each of you say that as knifemakers get more skilled they spend more time hand sanding and less time on their machines. I'm still at the stage where I'm fascinated by the speed of a belt/disc sander, but I've gone overboard enough times already that I'm telling myself to SLOW DOWN!

Thanks to those who've responded quickly. I hope others add more tips on this topic.
 
Now that the pros have gone I will reveal how a hack does it (lol). First tip: WORK IN BLOCKS. What I mean is instead of trying to make separate intricate pieces and pray they fit in place make a block and rip it into scales. If I want a handle with a 45 degree angle accent piece in the middle then I cut a 45 across the block, cut the same 45 in my accent piece then I epoxy the block back together with the accent piece in the middle. Once dry, I clean it up and cut it into scales using my table saw. Bang two perfectly matched scales all you have to do is glue them to the tang straight. Glue them one at a time. Why? Because the first one is never wrong. Once the first scale is is secured in place its easy to line the second up properly. This will seem laborious to some makers but if I want the lines to match on both sides its the only way to fly.
 
I'm late to the party again! :) When I produce handles like those above, I literally build a handle block. I cut the various pieces on a compound miter saw, then glue/stack/clamp.... and let cure. Some I will build ahead of time and have stashed in the handle material cabinet....when I get inspired, and then other times I will pause during a knife build, and create the handle block. For me, building a handle block in advance, means I have far fewer chances for misalignments, gaps, etc.

One of my biggest "tricks", if you can call it that.... is using black fiber spacer between not only various pieces of handle, but also between the handle and the guard..... along with black dyed acraglas (or whatever glue a person chooses) serves to hide/seal any MINOR misalignments. ;)
 
Last edited:
I'm fairly new at this too, but hopefully can add some tips. I would experiment with less expensive blades and materials. I have not tried dovetails yet, just side angles between scales pieces.
Yes, it can be very picky finesse work. I ended up gluing these pieces together on a black liner as a base (like Ed suggested) and still ended up breaking it apart when I flexed it too much dry fitting. Really gotta rough up any metal spacers so the epoxy has something to grip. It's tough to get the spacers all flat on the liner, especially the thin pieces. This would have been much better if I had glued before rough shaping the scales, but I was using recycled birdseye that I was just able to eke my pieces out of. With square blocks the clamping would be a lot easier. Also, some sort of box shaped or parallel walled glueing jig would be helpful as the angled parts want to slide around when you put pressure on the ends to hold it together.
10 Maple and marble.jpg IMG_7490.JPG

The other tough part is making sure the two sides are exactly opposite each other when you look down at the spine of the handle. Making one solid block with thicker material and splitting it into scales would make that easier. This one is close, and most people won't notice, but I see it and it bugs me.
No12Fillet3XCU.jpg

This one was glued up in one block and split into separate scales. As Chris R. said above, much easier to do I think as well.
No4 12-28-18  2.JPG
 
Last edited:
Something needs to be said about these multi-piece handles. You will use much more material than with a single piece handle. Cutting, fitting, grinding, sanding, etc. just eats up material. Just plan accordingly. Use bigger pieces to make smaller pieces. Plan for having waste.
 
I'll quickly admit that I am also new to the multipart handle. After a number of failed attempts I finally figured out a way of making the scales before putting them on the tang. I think the trick is to make the scales before they go on the tang.
I'll throw out a series of photos of what I do for anyone to comment on - I sure don't have all the answers.

Made a glue up jig out of plastic that won't stick to epoxy, nylon I think. 3" wide
1609026768292.png
Cut the angles on my mill, using the same angle set for all the joining faces. Not everyone has a mill so cutting the angles on a disk or belt grinder will work too.
1609026905357.png
Match up the mating faces
1609027026735.png
In this case glue up the pieces with firm pressure, but not too much to force the beveled pieces out of position and at the same time use clamps across the face of the pieces to give downward pressure
1609027077094.png
Then just cut the slab in two and mate up the bevels across the tang so they are parallel.
1609027292845.png
Here's another variation using the same process
1609027747515.png
The combinations & variations are endless.
 
I'll quickly admit that I am also new to the multipart handle. After a number of failed attempts I finally figured out a way of making the scales before putting them on the tang. I think the trick is to make the scales before they go on the tang.
I'll throw out a series of photos of what I do for anyone to comment on - I sure don't have all the answers.

Made a glue up jig out of plastic that won't stick to epoxy, nylon I think. 3" wide
View attachment 76431
Cut the angles on my mill, using the same angle set for all the joining faces. Not everyone has a mill so cutting the angles on a disk or belt grinder will work too.
View attachment 76432
Match up the mating faces
View attachment 76433
In this case glue up the pieces with firm pressure, but not too much to force the beveled pieces out of position and at the same time use clamps across the face of the pieces to give downward pressure
View attachment 76434
Then just cut the slab in two and mate up the bevels across the tang so they are parallel.
View attachment 76436
Here's another variation using the same process
View attachment 76437
The combinations & variations are endless.
That red and white one is awesome.
 
Something that I do when I’m making the scales before final glue up in the case of angled connections that like to slide if clamped together is I make that connection with super thin CA glue. I put parchment paper down on my surface plate and take my two 45deg cut pieces from my disc grinder and put them down flat and pushed into each other then I can just wick the CA glue into the joint. A minute later they’re attached plenty strong to drill holes and get them ready for actual glue up to the liners and tangs with g flex at which point the epoxy will be holding the pieces together. It does have to be a nice joint when done with the CA glue as it won’t fill any gaps. This sped up my two piece scales process, I got to this process after asking how to clamp them with epoxy on another forum.
 
Once you get the technique down, you can use all sorts of materials. On this knife I used Elk antler and Curly Maple. Like Ed, I like to use liner material in the joints and on the back of the pieces because I think it makes for strong joint support. That liner material also makes a very pretty spacer line in my opinion.
 

Attachments

  • 4 inch hunter Elk and Curly Maple.jpg
    4 inch hunter Elk and Curly Maple.jpg
    725.1 KB · Views: 24
  • elk hunter spine.jpg
    elk hunter spine.jpg
    381.6 KB · Views: 24
Once you get the technique down, you can use all sorts of materials. On this knife I used Elk antler and Curly Maple. Like Ed, I like to use liner material in the joints and on the back of the pieces because I think it makes for strong joint support. That liner material also makes a very pretty spacer line in my opinion.
That, sir, is one very fine knife - terrific craftsmanship. And, The background is very cool too.
 
Something that has not been mentioned in this thread, and that I feel is uber important. When building multi-piece handles... it's in your best interests to stop and think about the materials your combining, particularly mixing natural and synthetics, or mixing those natural materials that "move" a very different rates/amounts. Why? I not only have witnessed it, but have had it happen to knives I've built..... cracks, checks, and/or separations of the materials that I put together in the same handle. In fact, the very first knife of mine, pictured in the initial post, came back to me because the burl portion, even though stabilized, had expanded after some time at it's new home. By the time I got it back in my shop, the burl was just barely higher then the blackwood. I took it down to even, refinished, and got it back to the client before it could acclimate to Montana's dry environment (before it could shrink). The last time I checked, it was good with the client, so hopefully we got that one solved, but it taught me again, what I already knew.... stabilized natural materials will still expand and contract... but not as much as non-stabilized.

Long story short.... Do Not just throw together two or more materials because they look good. Take the time to think about if combining those materials may cause you issues later down the line. Just some food for thought.
 
Do Not just throw together two or more materials because they look good. Take the time to think about if combining those materials may cause you issues later down the line.
So, I'm going to build on your comment with a self critique of the knife I posted above, the one with laminated micata scales and red/white herringbone. That knife actually started as a simple two part scale construction. But, when I saw the herringbone design on a knife my KITH recipient had made, I decided to challenge myself and try that.
Well, when finished I'm not too thrilled with mixing the micarta's gentle laminate lines with the sharp edges of the herringbone. And, it strikes me that the two different shades of red don't really work together either. For sure, I learned a ton by making this knife. But, had I taken time to think about the esthetics of the handle material I could have made better color selections. Probably a solid primary scale color that compliments the red/white herringbone would have been better.
An example of having my compass set on a specific task and not thinking about the final product.

While I agree with everything you said about choosing materials that go together aesthetically, I personally believe you are being too critical of your knife because to me it's drop dead gorgeous. But that's a very true thing that you said. Sometimes we do get tunnel vision on one perspective while ignoring others.

I learned a hard lesson regarding materials: "pretty" isn't always enough to justify a material. I am totally in love with horn material. But I'll never use it again. I made a couple of pocketknives with Kudu horn scales. They came out absolutely beautiful. But the horn material is crazy. It wants to move A LOT with temperature and humidity changes. I epoxied those scales down hard and darn if one of them didn't still manage to peel up at the bolster.
 
Back
Top