Gun-Kote sources?

billyO

Well-Known Member
Hello all. I hope everyone is staying healthy and happy.
The recent threads on Gun-Kote made me think this would be an ideal addition to my damascus chess pieces I'm making. The problem is, I can't seem to find any at Brownell's.com, and the stuff from KG Industries doesn't come in an aresol version
 
I spray it through a cheap harbor freight air brush. I got the idea from Ed Caffery. I tried it in a Preval Can which is the same as an aerosol can and it was too hard to control. I buy it from KG.
 
Buy from KG (or anywhere you can find a good deal, in liquid form, AND in a small bottle....far more economical. The reason you want a small quantity, because when applied correctly it goes a LONG WAY, and it doesn't have a great shelf life. I recommend using a cheap harbor freight air brush.... https://www.harborfreight.com/quick-change-airbrush-kit-93506.html

Not only is an aresol can too difficult to control, it also applies FAR too much. The "secret" to applying/using clear Gun-Kote, is a super LIGHT coat. If you can see it on a blade/item when you apply/spray it on, or if it looks "wet" when applied, you've used far too much. If left that way, it comes out looking like a gloss plastic coating. Thank might not be a bad thing for some applications, but it looks terrible on a knife blade.

With the airbrush I listed above, I turn the nozzle on the paint cup all the way off, and then in very tiny increments, turn it on, until I can barely see a mist being sprayed. The blade has already been cleaned well, and with the airbrush about a foot from the blade, press the "trigger" with the spray NOT on the blade, and then a slow sweep across the blade, I do this on both sides, top, and bottom. If the right amount is applied, there is not need for drying time....it will already be dry. I have aluminum channel with slots cut into it....in my toaster oven, the tang goes in a slot with the blade edge down.

I did some research since Chris had issues with a blade turning straw color. Clear is suppose to be baked on at 300F for 1 hour AFTER the part reaches temp.....I just bake for at least 1 1/2 hours. If you're using colored Gun-Kote, 325F is the recommended temp.

Here are examples of a blade that I over sprayed and baked just to illustrate what it looks like when too much is applied/baked on....

IMG-5415.jpg


IMG-5416.jpg


I think it looks cheap and horrible!

Here's the same blade, sanded completely back down, re-etched, and then the correct amount of clear Gun-kote applied....

IMG-5700.jpg


In the right light, you can catch a little sheen from the Gun-Kote.... but nothing like the first pics.

Here's one I just did a couple days ago....waiting on some spacer material to come in.....so I can complete the knife.....

IMG-5701.jpg


The good thing with Gun-Kote, is that if you apply too much, you can take it off with acetone before it's baked, and try again. Once you bake it on, the only way to change it/re-coat it is to sand it down to bare, and start again. For me, the whole idea of using clear Gun-Kote, is to provide the protection/minimize required maintenance..... without it bein obvious that it's there. ;)
 
Last edited:
Thanks, guys. Looks like I need to buy more tools and learn how to use an airbrush....
 
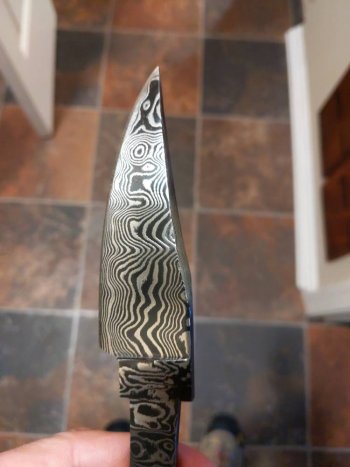
I did with some help. My first billet. I don't have a forge press or power hammer. I visited a fellow knifemaker who helped me make this first billet. I brought it home and made this with the first bit of it.

I was getting frustrated with the coffee etch to begin with, because it doesn't seem very durable. However, the gunkote layer seems to have fixed that issue altogether.

My wife told me that since it's my first Damascus knife, I have to keep this one. Well, okay!
 
I have always thought the same about a coffee etch. I often have thought about rinsing, blowing dry and immediately gun koting. Then I thought “if the oxides come off so easily from the etch then would the gun kote release easily”. I am not sure.
 
This will be a test for me on that. Another reason why I am going to keep this one and use it as much as possible to see what happens.
 
This will be a test for me on that. Another reason why I am going to keep this one and use it as much as possible to see what happens.
Please let me know how it does I am curious. I like the looks on the coffee etch but getting it to stay has eluded me thus far.
 
You guys are making a fork in the road, so I thought I'd just run with it! :) IF you want to keep that maximum contrast on damascus blades, the most durable/lasting method is.....

***First, the finer and tighter the pattern on a damascus blade....the better the following works....

1. Etch the blade fairly deep.... to the point that you can feel the topography with your fingertip.

2. Neutralize and Clean the blade thoroughly.

3. Using an airbrush, and GLOSS BLACK Gun-Kote, apply it to the entire blade.

4. Bake the coating on

5. Once the baking is finished, and the blade is cooled, use a HARD sanding stick, and 800+ paper, GENTLY hand sand the blade, What you are seeking to do, is remove the gloss black Gun-Kote from the HIGH areas of the blade's topography..... and LEAVE THE GLOSS BLACK Gun-Kote in the low areas of topography.

6. Once you have achieved removing the gloss black from the high areas of the topography, clean the blade well, THEN go through the procedures you would for coating the blade with clear Gun-Kote.

*** Super high contrast, extreme durability, and it makes for near zero maintenance for a damascus blade, which in my experience is a high thing for knife buyers. ;)***

Here's an example.... this one is just the gloss black, and hasn't been recoated with clear yet.

IMG-5713.jpg
 
You guys are making a fork in the road, so I thought I'd just run with it! :) IF you want to keep that maximum contrast on damascus blades, the most durable/lasting method is.....

***First, the finer and tighter the pattern on a damascus blade....the better the following works....

1. Etch the blade fairly deep.... to the point that you can feel the topography with your fingertip.

2. Neutralize and Clean the blade thoroughly.

3. Using an airbrush, and GLOSS BLACK Gun-Kote, apply it to the entire blade.

4. Bake the coating on

5. Once the baking is finished, and the blade is cooled, use a HARD sanding stick, and 800+ paper, GENTLY hand sand the blade, What you are seeking to do, is remove the gloss black Gun-Kote from the HIGH areas of the blade's topography..... and LEAVE THE GLOSS BLACK Gun-Kote in the low areas of topography.

6. Once you have achieved removing the gloss black from the high areas of the topography, clean the blade well, THEN go through the procedures you would for coating the blade with clear Gun-Kote.

*** Super high contrast, extreme durability, and it makes for near zero maintenance for a damascus blade, which in my experience is a high thing for knife buyers. ;)***

Here's an example.... this one is just the gloss black, and hasn't been recoated with clear yet.

IMG-5713.jpg

I always wondered how you got such contrast on your damascus. I just figured I was bad at etching. I appreciate that run down Ed that is GOLD.
 
Ed are you using the satin clear? Does the baking process change the temper at all?

The curing temps for Gun Kote are in the 300-325 range depending on what color you use so as long as your temper point is not 275 or lower should not be any issues.
 
Back
Top