Forge question

Why 3" of ceramic fiber??
Well, the idea of 3" of insulation was to reduce the ID of forge to around 6", but thinking a bit I suspect 2 layers of 1" insulation will actually wind up being pretty close to 6", maybe 7" and that's just fine.
same 15lb billet
I can't image that much mass in a forge. Remember, I've only the the "Baking Soda" (Arm & hammer) type of power hammer so won't be working with anything that large. My arms 'n shoulders won't take that much stress.

To some extent I'm thinking of the thicker insulation (now thinking 2") to protect the thin metal shell of the forge body from burn-out. Should I put a thin layer of refractory cement slurry that is thinned to down to latex paint type consistency brushed over the first layer of fiber as if just "painting" it to hold the fibers tight before placing the second layer in? OR, best to place both layers in dry before starting the "painting" of the refractory cement slurry over the inside to seal all the fibers really good?

OK, I'll plan to leave the firebricks out and use just the ceramic fiber and refractory cement for lining. Perhaps later I'll coat with ITC-100 if I decided I need it. Trying to save a bit of money (just ordered a new ham radio), so far I've only ordered the Ceramic fibers, had all the rest of stuff on hand.

Thanks again for all the help keeping me on the right track.

Ken H>
 
OK folks, I've done some cutting on the propane tank and welded up the burner. You can see the back end is cut full diameter of tank, while front end is cut a bit smaller. Main question I have is the burner position. It comes in at the 9 o'clock position and points straight across so the flame will be hitting opposite wall at center point. I'm thinking that will provide good heat but keep the direct flame off billet on bottom. Would it be better angled slightly upward? OR, is level ok?

That is a short piece of pipe welded to shell, with 1-1/4" pipe for burner tube. I felt 1-1/4" would be large enough, but if it's not I can swap it out for a 1-1/2" pipe. The blower tube is 2" pipe with gas injection close to blower inlet. I have the needle valve connected to the blower tube via a short nipple. Comments please, especially should that burner pipe be point upward slightly so the flame would be hitting above center line of forge body. At this point I can position the burner tube upward a bit if better.

Comments and guidance before I get any further along. I will be mounting rails on front and rear to hold firebricks to close off open ends.

Forge-Shell.jpg
 
Is that the ceramic matting on the outside of the forge?? It should be on the inside of the forge coated with a refractory. The way you have it set up the flame will eventually eat through the shell of the forge. I can't really see much of the plumbing to comment on that.

Doug
 
I think it's just an empty "shell"..... I did a double take when I read your post....and at a glance, it does look like there is ceramic fiber on the outside! :) But I think it's just an optical illusion.
 
OK, I've looked at that photo again twice and can't see what you're talking about "Ceramic fiber on outside", just see an old steel worktable. Then, looked 3rd time and see the shell is painted white - that's the color of a propane tank, then think, is that what they're talking about?

Ed, do you think the burner going direct in is ok, or should I angle it upward a tad?

BTW, that old steel worktable is one I brought from the farm that Dad had in the shop since I was a small kid - it's an old molasses tray for making sorghum molasses. If you look at bottom side the trays are still mostly there.
 
It's hard to tell, but I think you might want to tilt the tail end of the burner down...and the part going into the forge up. I usually wait to attach the burner until the refractory/insulation is in.....then I "eyeball" the angle needed to make the flame follow the inside radius. A "trick" to placing the burner....tack weld a piece of angle iron to the shell and attach the burner to the angle iron with a heavy duty hose clamp....that way you can "tweak" the burner position, and once you have it, finish welding the angle iron to the shell. ;)
 
I had not thought of putting insulation in forge body, then welding the nipple to hold burner in, but that makes a LOT of sense. Since I've got the nipple already welded in place, What if I can bend the nipple enough so the flame is entering at the 9 O'clock spot but angled upward enough so it's sorta "tangent" to the shell? That would put the flame hitting around the 12 to 1 O'clock position, but not a direct hit, but sorta flowing around the inside. Comment?

Ed, when you mention welding the angle iron to forge to hold burner in position, while putting insulation inside forge - that puts the burner tube in position while you're putting the insulation around the tube? In the past the one forge I made I had the nipple welded in place, then put insulation inside forge body covering over the burner hole, then cutting the hole thru insulation.

Wait, I know what I'll do - it will be easy to remove the legs and reweld them on so it will put the nipple at the 10-11 O'clock position and bend so it will be tangent rather than direct across. It will still be mid point, but I think that will be ok.

Thank you again for all your help.
 
I would recommend putting the burner holder/burner NO HIGHER then the 9 o'clock position....and then angle it from there.... the further around the interior curvature you make the flame travel, the more evenly the heat spreads inside the forge.

I do what you mentioned.... put the insulation in, then cut the burner hole..... the trick is to have the end of the burner JUST EVEN with the interior of the insulation. That way the end of the burner won't erode away so quickly..... it also help if you cut the end of the burner tube to match the interior curve of the insulation...... sometimes it's the little things that make a big difference. ;)
 
Ken, if I might be so bold to suggest. Ed, helped me with the angle of the burners on this forge! Pointing upward somewhere between the 2-3postion. Think vortex. The flame creates a swirling effect in a counter clockwise motion looking on mine from the front. If you look closely at the first pic below you can see two patches welded to the outside of the pipe which makes up the exterior of the forge. That is where I had them positioned downward and after speaking with Ed, I changed them!!I

The area on the bottom of this one is fire brick. So as to be replaceable and the floor where the metal sits is also where the temperature is read from.

One thing I have learned is a forge is always an ongoing process. I have modified this one several time for things I did not like!! As a disclaimer this forge has never been fired! I was moving the cart it sits on one day and since the forge is so heavy. I had never really thought about the forge moving! Till one day while in a hurry I ran the cart over a 2x2 that had fallen up under it! The forge tilted and once it got started I could not catch it. It fell and busted up all the inside! So this one sits on the same cart after rebuilding and yes it is fastened down now!! :rolleyes:

This was about the time my wife was having so many problems and before the cancer diagnosis! The knife making took a back seat at that point. So this particular forge has never been fired! But it did work initially!!

It is a 10" pipe with two layers of wool inside and coated with sanite! So that leaves about a 6" inside chamber. It has a door/cap front and back so I can use it with longer material if needed! They also are insulated with 2" of wool!

The front has a sliding door in the cap so I can close it down to help with heat loss! Both can be raised and lowered to accommodate the need for material or work on the interior of the forge itself! ! I hope some of this is helpful since you have always been helpful to me!

Ed, was posting as I was typing!!
I do what you mentioned.... put the insulation in, then cut the burner hole..... the trick is to have the end of the burner JUST EVEN with the interior of the insulation. That way the end of the burner won't erode away so quickly..... it also help if you cut the end of the burner tube to match the interior curve of the insulation...... sometimes it's the little things that make a big difference. ;)

Ed had told me this as well and that is exactly how the inside of this one is set up! The end of the burner tube is curved to come out flush to the inside of the insulation!!
 
Cliff - it's GOOD to see you posting :) and what you've said about Ed's knowledge and Ed's sharing is 100% true. I REALLY do appreciate Ed's help.

Cliff, that is one good looking forge - shame you've not had a chance to fire it yet, but I do know the reason. Are those venturi or blown burners? Looking closer I think those are venturi?

Ed, leaving the burner at 9 O'clock is exactly what I'll do. MUCH easier than moving the legs and will do the same thing. I did some cutting and changing to this:
Blower-2.jpg

I think that's what you're looking for? The center of burner is actually 2" forward of mid point so I'll put a very slight angle so flame is toward rear just a tad, not much because the rear of forge isn't all that far away since burner comes in only 2" forward of mid point.

Now, let me go do some welding. After cutting that nipple out my welding is going to look even more ragged than before. I paid my way thru college burning welding rods. These days it's been so many years since I welded full time and I only burn a lb or 2 of rods/yr so don't really get my welding back up to snuff.
 
Last edited:
Welding is one of those things like riding a bicycle, you don't forget but the older you get the less comfortable the ride is!! :p

Those are a modified Ron Reil burner! This latest version will be blown! Here is a better shot from the rear.
These will definitely bring me some grief but in testing it worked. Now how it will work once it is fired up,...…….. that may be another story!!! Only time will tell!! Embarrassed Emoticon.png
 
Now that is some piping! Is that a blower I see connected to the Reil Venturi burners? I guess that makes them blown burners? Did remove the jets on gas inlets? OR, are you using the blowers with jets?
 
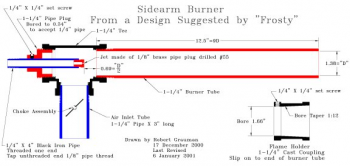
Correct on what you are seeing. The jets are in but have been modified! It works like the Mongo burner! https://ronreil.abana.org/Sidearm.jpg

1574460192924.png
In the drawing above it shows a choke assembly in the air inlet. I decided to go with the gate valves instead!
The gate valves act as an additional control of air flow besides the choke plate on the blower itself!

Like I said this whole set-up has not been tested as of yet. I have been told it won't work but I have also spoken to a man who is using a very similar set-up! And he has been using it for some time!! So time will tell!! :rolleyes: Like I said I found out a forge is a work in progress. You try something and you don't like it or it preforms great! If not well it is back to the drawing board!! It's like the old movie Blazing Saddles,......…work work work!!!Back to work.png
 
Last edited:
Cliff, you said the jets have been modified, how do you mean? Drilled out larger? What was the original size and what did you drill them out to for use with blower? Should the burners still work as a venturi burner if blower goes off with the mod'd jets?

I have a venturi burner of that same design I built and sometimes run with a small blower. The burner still works pretty good without blower, but with blower the forge gets even hotter. my setup isn't near so impressive as your forge setup is. I know you're looking forward to the time when you can fire it up.
 
Nothing real dramatic about the modification. I would have to go back and look-up the actual orifice size! The jet has been shoved deeper into the burner itself. They say it will handle the force of the air better and blend easier.

The guy that uses this set-up has a special gas set-up. He runs off of natural gas and has own high pressure control! He runs multiple burners in his forge. I would have to go back and look it up but, he has either 5 or 6 burners. He told me has it set-up where he can shut of any one of them he wants/needs to. He also told me he usually only burns three at a time, most of the time!!
 
Back
Top