Forge and knife shaped object (non hardenable)

Absinthe

Well-Known Member
Sharing post from instagram

I am not sure how to share things well here but the link above should get my text and all 7 photos. I can go copy and paste the text but can't share photos from my phone(the forum always complains they are too big), I have to do that from my desktop computer. :( If there is a better way to do this please let me know.

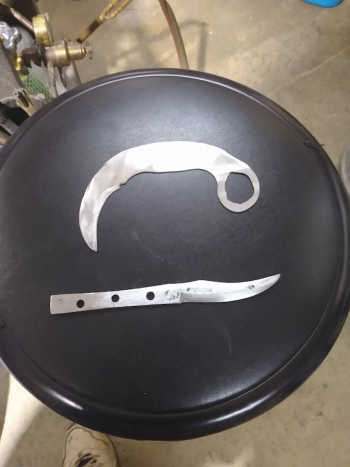
So tonight I made a one brick forge. I didn't have any blade steel around but I still wanted to test it out. This was a left over piece of cold rolled steel, I assume 1018 or similar. So I know it won't be able to be hardened. But that was not my goal.

I was able to get the metal hot enough to glow red and move it with a hammer on my vise and my chunk of rr-rail. I also learned that I still need a bunch of work on my tongs. :)

I never considered what it would take to bevel a recurve blade. The belt grinder was just too much to get used to so I moved to a hand file in the vise to try and straighten out (or curve as it were) the bevel.

I am not sure that I won't learn all the same lessons as I would using blade steel since I have to do the same things, except for HT and temper. I think I will finish it anyway. It fits my small hands nicely so I am not going to go crazy with a hidden tang. And when I hold it my thumb just naturally goes to the back of the blade, so it is begging for some jimping.

Not sure what it will be good for when it is done, perhaps a letter opener or simply a paper weight.

Anyone want to offer techniques for beveling on a recurve. I have been getting reasonable results with a small flat file, but I think it will require perhaps a half round. But the real question is how to bevel it on the belt grinder...

#onebrickforge #recurve #knifemaking #knifemaker #bladesmith #maker #diy

I couldn't get the link to load...

The Tapatalk app is great for uploading photos to forums.

Just scroll to the bottom of the page when you're typing a reply or starting a thread and hit the button that looks like sheet of paper with a plus sign in it.
Sent from my Champion Forge using Tapatalk
 
Looks like that.
757e474876ad9f0e360771dc699f28f4.jpg


Sent from my Champion Forge using Tapatalk
 
You said that it got the stock red. Depending on what type of steel or stainless or whatever I'm forging, I like a medium to bright yellow. The corner of that stock is how got I like to get the steel when I'm rough forging. The piece in the picture is about 1/2"x 3" (maybe bigger?) from a truck leaf spring. Once the stock is roughed in and I don't need to move a lot of material, just refining the shape and removing hammer marks, I bring the part up to maybe a orange-yellow.

Of course, you can work the steel a lot colder than that, but the hotter it gets, the easier it is to work with. Any hotter than light yellow and you're entering the danger zone. Parts start burning up/melting.
c80493825f8533654cfa491bd974af89.jpg
d9be3660dee3ee3a0334e13db154c0bb.jpg
bafc2b0cd06c54b54597273d6160815b.jpg


Sent from my Champion Forge using Tapatalk
 
Yes, hopefully I won't be doing much of this. I am not sure I was quite getting to 1500° but possibly if I left it in long enough it might have gone that far. There was definitely a hotspot in the forge so whatever I did, it probably wasn't the right torch angle or velocity. With the propane I used the regular cheap torch on it. With the mapp I used the turbo torch which has a convenient rotational aspect and seems to have good velosity. I never saw the whole inside of the brick glowing equally so I assume I wasn't getting a good consistent heating.

Everything was freehand and by eye so I have no expectation of perfection :) That said, I feel pretty well centered, but my bevel seemed to be evading me on the grinder. But when I put it in the vise and used the file I could see it. I may try switching to a half round or something like that. Perhaps this is a small wheel application or something like that.

"Hey let's try to make a blade to test out the one brick forge", "And, of course, let's to a 4" with a recurve...." Because, masochism.....
 
With that type of forge you do have a "hot spot" right below the torch. You get the whole billet hot by moving it in 'n out to put different parts of billet below the torch. As good as that "knife shaped object" looks you're doing good. You might as well start planning to spend $200 to $300 and build a nice blown forge:)

Fill out your profile to location - you just might find somebody close to you that can really help. BTW, what grinder do you have? Seems like there was some talk about a grinder, but I don't remember.
 
I think the bevel is coming a bit better, but the more I try with the 2" grinder, the more I am wiping out the short curve of the recurve. The overhead light in the shot is so harsh, you can't see the bevel as it looks in real life. The karambit was in the drawer for the past 5 years maybe? I got some inspiration from Leo Todeschini's blades that he did for Tom Hardy's character on Taboo. This was just an attempt to see if I could hack out the rough shape with an angle grinder from an old circular saw blade. I am not thrilled with the ergo on it, especially the index hole. I had so much issue with that, I couldn't even consider doing the two hold knuckle duster style that he came up with. Anyway, if I try that shape again, in some real steel, I think I will spend more time in my drawing packages, and perhaps some time with cardboard to get the shaping right.

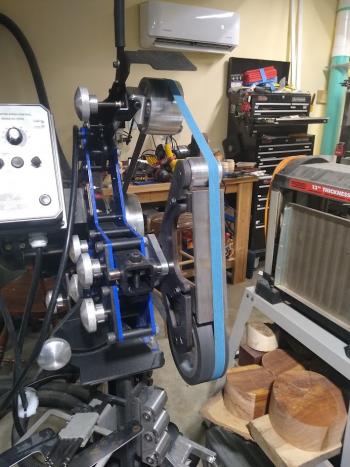
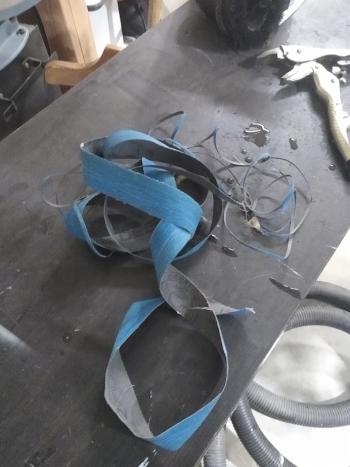
Anyway, I got a little excitement from the new belt grinder, as I learned how to turn a 2x72 into a 3/4 x 72 by cartching a cutting corner right into the belt. It was quite exciting as it shredded off a big slice of the belt, then tried to beat me silly with it before letting it fly freely across the room. On a good note, the blade itself was gone from my hands so quickly that I had to go looking for it. No one was hurt, and nothing was damaged except for a 120 2x72 belt that is now about 3/4". And I have some 120 for the lathe. :)

All that aside, I am considering straightening up the front side of the tang just a touch more, and doing a 1/2 hidden through tang.(is this even the correct term) The idea being that I want the spine and tang visible on the palm side of the handle, as well as the butt (pommel end?) but not on the finger side. I figure this way I can provide some more ergo to the fingers, but still have that nice stripe of steel on the handle of the knife. But still thinking about it.

I have posted this knife process elsewhere. I prefaced the posts that I "know the knife can't be hardened because it was made from 1018." I hadn't thought anything of it, other than as an exercise in shaping and grinding. But one fellow on FaceBook replied with this:

Wrap the 1018 blade in stainless foil. Add some charcoal and barium carbonate to the packet. Make sure it is air tight. Put in forge and let it heat while you are working on other things. After about 8 hours cooking in the forge, the blade will be high carbon steel most of the way to the center. Treat it like 1095 with a soft core. It will get very hard and you will have to temper. I've made several hand plane irons this way and all turned out very well.
I'd never heard of such a thing, but figured I would ask if anyone ever heard of doing such before?

1655725042246.png1655725061603.png1655725073290.png
 
That's a nice looking grinder you've got. What brand is it?

On the wrapping in SS foil I'll let other more knowledgeable folks than me comment, but that sounds more like case hardening which is only a few thousands deep.
 
That's definitely case hardening. The piece should be completely covered with the carbon source.

Most modern files are made that way, Bradley, which is why they aren't any good for knives with that mild steel core.
 
Clickspring on YouTube has a pretty nice video on "old-school" case hardening.

He also has one on making files by hand.

Sent from my Champion Forge using Tapatalk
 
That's a nice looking grinder you've got. What brand is it?

On the wrapping in SS foil I'll let other more knowledgeable folks than me comment, but that sounds more like case hardening which is only a few thousands deep.
That is the AmeriBrade (Mastery Package).

I never intended for this knife to be hardened, just wanted something to practice basic grinding/shaping techniques on. But, some people see every challenge as something to be solved :) Like I said, it might be an interesting process to try, but I probably won't.
 
That's definitely case hardening. The piece should be completely covered with the carbon source.

Most modern files are made that way, Bradley, which is why they aren't any good for knives with that mild steel core.
Thanks, I was not aware of that. But with the prices of good steel, I am not all that interested in files as a source t this point in time.
 
Clickspring on YouTube has a pretty nice video on "old-school" case hardening.

He also has one on making files by hand.

Sent from my Champion Forge using Tapatalk
Absolutely fascinating. Most interesting was the part where he made the chisels for the file teeth. He said that even though they were case hardened the time or whatever made them so they were hardened through all the way, so he would not have to be concerned for the sharpening
 
His comments about being hardened all the way through are misleading . The actual case hardening only extends a .010 to maybe .040 in thickness depending on carbon source and soak time. After that the steel might have carbon in it buts its diffinately softer. Using his method, It takes days to get the carbon equally diffused throughout the bar. Ive seen black powder shooters go throw away flints thinking they were bad and not sparking. Turned out they had worn through the case hardening on the Frizzen
 
The video makes a good case for deep hardening of mild steel. BUT - I agree with vlegski above about the depth. Most places I've read talk about case hardening being only .002" to .003" deep. I've drilled Rolling Block receivers from 1880s that were case hardened and for sure they were in the range of not more than .010" as mentioned above. Case hardening these days is more for the surface color.
 
I should say the depths mention are for small scale case hardening like his file video. Industrial depths will vary depending on wear specs. In those case ur talking from a few thousand to millimeters. Surface hardness might be a 60 RC, but after transition zone the core might only be a 20RC.
 
Back
Top