kevin - the professor
Well-Known Member
Hello Everyone,
I hope Bubba-san doesn't mind me posting this. He and I are working together on a bar of steel that he smelted himself. I think this technically makes it orishigane.
Since I mostly have made daos, and he is comfortable with Japanese stuff, we decided to make a blade that was Japanese but simillar to the dao. He will do the fittings, and if he chooses to document that part, then he can explain. He is the master of the fittings, not me.
I saw a naginata at the Royal Armoury at Leeds (in UK) this summer. It was a gift from the Tokugawa family to the British Royals. I was stunned, I stared at it for about 20 minutes while my wife just walked around without me (I did that several times, you gotta go to this museum. Nothing but weapons, the vast majority are edged and from almost everywhere and everywhen...).
So, I came home to make my interpretation. You will see the evolution of this one pretty well, at least to where I am now.
I forged thick because a pole arm is meant to take a lot of shock, so the base of blade up to beginning of false edge is thick with very little bevel on the back.
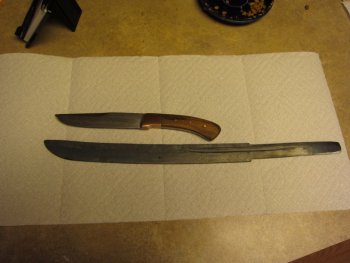
After forging, I heat treated the blade. I did not see much of a trace of hamon. Here it is clayed for heat treatment.
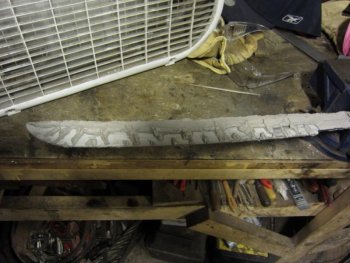
Since I saw no hamon, I hardened it again. Both times were a 3 or 4 count (I get excited and count fast) in hot water and then into Parks at room temp. (this second one is really a picture of the same clay just before it dried, it didn't take a pic the second time becasue I was focused on working to get things right and not loose this beautiful steel)
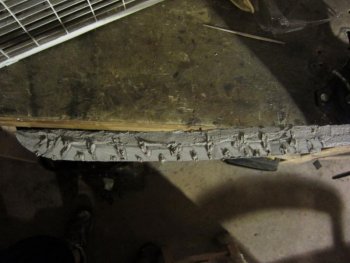
Then, rough grinding and some draw filing.
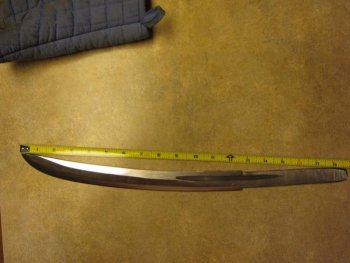
Here, I noticed that I did not like the lines because I let the angle grinder slip (it ground into my guide stock a little bit) when grinding that really deep fuller (called a "hi" I think). So, I adjusted the lines to get the proportions of the bevels right. It cost me the swelling at the first portion of the blade where the back and spine suddenly spread farther apart (Japanese call it fumbari I think). Still, it looks better and is starting to look like a real blade.
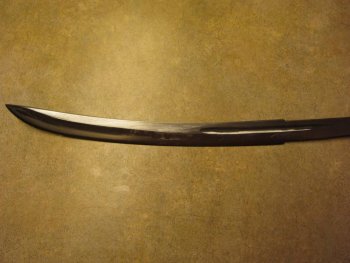
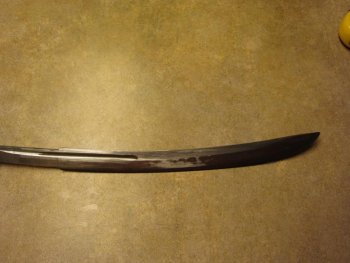
Finally, for now, I filed the plunge cuts for the blind false-edge. This thing, like most of these I have seen, has a blind false-edge, which means that the blade is thick at the spine over the fuller, then there is a graceful scoop taken out which helps to define the ridgeline, and then there is a flaring just before the point. Strong, light, and rigid.
I can also feel the hardened steel, the line of transition is just at and below the ridgeline.
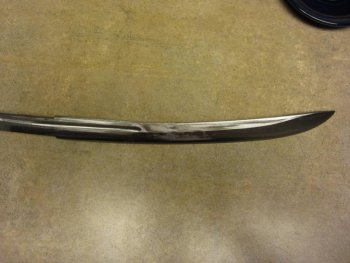
Let me know what you think so far. It will look a great deal better when I use stones and abrasives on it. It does definitely have a pattern in it from being, "self-smelted."
I am grateful to Bubba-san for giving me this chance (James). It will be really nice to see a blade I make in Japanese mounts.
comments welcomed. Take care,
Kevin
I hope Bubba-san doesn't mind me posting this. He and I are working together on a bar of steel that he smelted himself. I think this technically makes it orishigane.
Since I mostly have made daos, and he is comfortable with Japanese stuff, we decided to make a blade that was Japanese but simillar to the dao. He will do the fittings, and if he chooses to document that part, then he can explain. He is the master of the fittings, not me.
I saw a naginata at the Royal Armoury at Leeds (in UK) this summer. It was a gift from the Tokugawa family to the British Royals. I was stunned, I stared at it for about 20 minutes while my wife just walked around without me (I did that several times, you gotta go to this museum. Nothing but weapons, the vast majority are edged and from almost everywhere and everywhen...).
So, I came home to make my interpretation. You will see the evolution of this one pretty well, at least to where I am now.
I forged thick because a pole arm is meant to take a lot of shock, so the base of blade up to beginning of false edge is thick with very little bevel on the back.

After forging, I heat treated the blade. I did not see much of a trace of hamon. Here it is clayed for heat treatment.

Since I saw no hamon, I hardened it again. Both times were a 3 or 4 count (I get excited and count fast) in hot water and then into Parks at room temp. (this second one is really a picture of the same clay just before it dried, it didn't take a pic the second time becasue I was focused on working to get things right and not loose this beautiful steel)

Then, rough grinding and some draw filing.

Here, I noticed that I did not like the lines because I let the angle grinder slip (it ground into my guide stock a little bit) when grinding that really deep fuller (called a "hi" I think). So, I adjusted the lines to get the proportions of the bevels right. It cost me the swelling at the first portion of the blade where the back and spine suddenly spread farther apart (Japanese call it fumbari I think). Still, it looks better and is starting to look like a real blade.


Finally, for now, I filed the plunge cuts for the blind false-edge. This thing, like most of these I have seen, has a blind false-edge, which means that the blade is thick at the spine over the fuller, then there is a graceful scoop taken out which helps to define the ridgeline, and then there is a flaring just before the point. Strong, light, and rigid.
I can also feel the hardened steel, the line of transition is just at and below the ridgeline.

Let me know what you think so far. It will look a great deal better when I use stones and abrasives on it. It does definitely have a pattern in it from being, "self-smelted."
I am grateful to Bubba-san for giving me this chance (James). It will be really nice to see a blade I make in Japanese mounts.
comments welcomed. Take care,
Kevin
Last edited:
