Building a pattern in laminated steel

wmhammond

Well-Known Member
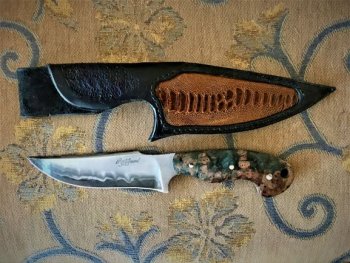
I have just completed my first laminated steel knife. I bought the 12" X 2" X 3/16" billet from Aldo and it has a 52100 core and an unknown SS outter surface. I am a stock remover not a forger so in order to develop a pattern in the underlying steel I heated the billet to forging temp, laid a round 1/4" screwdriver shaft on the blade and hammered on it concentrating on th bottom (blade) edge of the blade. Did the same thing on both sides. A pictire of the blade and the sheath I made to go with it is below and I think it turned out OK but I think I was hoping for more action in the "Hamon". Can anyone provide some suggestions about how to get more action on the blade during the heating and hammering process?
 

Attachments

  • IMG_E0223 (2).JPG
    IMG_E0223 (2).JPG
    86.4 KB · Views: 71
Yes it does to me as well...love the look. The sheath rocks - that's a good looking cover. I'm guessing you used the screwdriver as a .. hammering guide?
 
That is the PERFECT amount of "action" for me in the line between core and cladding. Not really a "hamon". Is that a SS cladding? I think it looks really good. I've never had to use a hammer to forge some "action" into my line for San Mai. The core always moves more than I'd like when I'm making San Mai. I use a hammer, not a press to weld the cladding to core so the core and cladding are never "even" as they would be if using a big press.

You did good. Oh, that sheath really rocks!
 
Maybe a cross or diagonal peen hammer or a ball peen. That blade and sheath look great.
 
Last edited:
Yes it does to me as well...love the look. The sheath rocks - that's a good looking cover. I'm guessing you used the screwdriver as a .. hammering guide?
I laid the screwdriver shaft flat on the heated billet prior to grinding and struck the blade with a hammer creating a series of elongated "dents" that deformed the underlying steel and created the "tooth" pattern.
 
Yeah, I read your first post several times and my inexperience wouldn't allow me to visualize the technique. Hadn't heard of doing that before. Very cool and Interesting "hammond hamon" look.
 
The key to putting more "action" into the area you are asking about..... first that size billet is really too thin to get much more "action" than you have. To achieve more "action" with the method you mentioned, or similar methods, is to start out with a billet that is about twice the thickness you wish to end with. Then put in the "waves" by whatever method you choose. The key then is to anneal, and grind. It's very similar to working "pressed in patterns" that have been discussed here......usually you can figure on about 2/3 waste to properly achieve what you're after. Where you have to be VERY cautious, is in the heating and hammering on this type of material..... because the expansion/contraction properties of the included materials is so vastly different, they will come apart very easily with improper heat or technique. There's a HUGE amount of effort and waste in making and manipulating these types of billets.....which is a major factor in the lofty prices of the resulting knives.
 
Hey Ed, thanks for the comment. From what you say I guess I got very lucky then. I bought the billet from Aldo, $100 + and I do not forge. It was a rookie attemptto put some action in the billet layers because it looked to me very moch like all the layers were very flat. Sound like I should be happy with what I was able to get. Thanks

Wallace
 
Back
Top