Advice for folder

C Craft

Well-Known Member
I am looking for a little advice on the thickness of material for folders, as well as a few other questions concerning folders. I realize there is a folder forum but as I am new to this as I have made only one friction folder to date.
I am planning on making these first folder attempts from 1084. I know that may not be the steel of choice for most folks making folders but these will be my first folders. I prefer to work in a steel that I know and have the ability to HT~

Aldo has 1084 in .125-1/8, .156-5/32, .187-3/16, and
.250-1/4.

I want to build a couple of friction folders, so for them I am thinking, .156-5/32.

I also want to try my hand at a couple of EDC, lockback folders and I am thinking, .125-1/8 for those.

Anyone got any suggestions and why you would/wouldn't use a particular thickness, for folders??

Also what do you recommend as the best steel for spring material?? Will the 1084 work for spring and the pivoting lockback/rocker bar???
 
Last edited:
Aldo's steel will be several thousandths oversized. I think 1/8" is like .140" from Aldo. I'd go with that for any folders.

They'll definitely have better slicing efficiency the thinner they are. I think many makers tend to 'kill' folders by making them out of overly thick steel and other materials. A folder really doesn't need to be thick, heavy and clunky.
 
I had to learn how to rethink things when I got into folders. It took me a little while, but I found that life is MUCH easier when you determine the blade thickness based on the hardware you use. For example, most all the hardware I use comes from TiConnector.com (Tracy sells them too). Let's start wtih standoffs...... there are only a limited number of widths available. For most of my flippers, I chose to go with .190" standoffs. That means my finished blade thickness needs to be .170" IF I am using either .010" bronze washers....OR if I use bearings and bore the bearing pockets to .050" (that leaves approx. .012" of bearing "sticking up". (I figure about .002" break-in for bearings). The other thing to consider, if you are using them, is screw sizes. A one time I used 1-72 through 4-40s in my folders, but a few years ago I standardized everything to 2-56 screws....that way I only have to buy tooling for one screw size, versus buying drills, reamers, taps, etc. for three or more different screw sizes.

What all that means is simply that my blade thickness is usually based on the hardware.

Personally, these days I only build liner/frame lock folders. For a couple of years I did lock-back folders, and found that they simply did not sell nearly as well as liner/frame locks, and were much more labor/time intensive to produce..... which means that the money I could get for a lock-back wasn't worth the time and effort I put into them.

OK, all that being said, unless you're doing things in a semi-production, or production methodology, thickness is really going to based on what YOU want. I don't know if you own a surface grinder, but if your going to be serious about making folders, I feel its a "must have". The first dozen of so folders I ever made were without a surface grinder....and I literally spent DAYS trying to get everything "flat" on a granite plate......and the parts still were not where they should have been.

Whatever you decide to do, just keep this simple formula in mind..... Blade thickness + washer thickness (or amount of exposed bearing)= Backspacer/stand-off thickness. When dealing with lock-backs, I always made my lock bars .002" thinner then the sum of previous "fomula".

As a side note..... I always like to see folks getting into folder.....for the simple reason that with folders, our mindset must change. Generally when dealing with "straight" knives, we often think in fractions of an inch. Folders will teach you to think in thousandths of an inch, and as a result ALL of your knives will realize a very real improvement.
 
Last edited:
Ask and you shall receive. You know we got a bunch of good folks around. First of all at this time I am not going into production. Just want to push the envelope in a different direction!! Thanks for all the info guys. Ed I know what you are saying is very true. I found that out on the one and only friction folder to date that I have attempted! Thousands make a difference!

OK now on to the other questions.

What do you think of 1084 for blades. I know it is not your go to for most folder makers but I am just getting my feet wet and I am comfortable with the HT and temper on the 1084. I think for the friction type folder it will work well!! I am just not so sure about a folder or a slip joint.

Is 1084 good for spring material or do I need a different steel for spring material???
 
I've made a lot of my "Progression" folders with 1084. Those are liner locks. 1084 is also very usable for springs. In my experience, its a bit tricky to get the correct temper..... much depends on the exact shape of the part. The biggest complaint I've seen with carbon steel for lock-back springs in the rust issue, and the fact that its buried deep within the knife.... which means its very difficult to get at for cleaning. Overall, I would think it would fine for learning.
 
Thanks Ed, I appreciate the info. I knew rust was going to be somewhat of an issue but, while I am learning I will just have to deal with it! I am sure the more I get into this I will be back to pick some more brains. Two thumbs up to all those on this forum, knowledge is meant to be shared, in my humble opinion!!!
 
I'll throw in my two cents from a newby perspective. I've built about a dozen slipjoints now. I've switched to stainless, but my first few were with O1 and it worked really well. Looking at heat treat info for 1084, there should be no reason you can't use it for springs too. I can heartily recommend O1, as it is easy to work with, easy to spring temper, comes in a nice variety of thicknesses, and is cheap. I didn't have a kiln at the time I was using O1, so I would use a 2-brick forge and then temper it based on color change with a propane torch. I learned how to do that from Chris Crawford's video on building slipjoints. I will echo Ed's comments on rust. My experience is that slippies eventually find their way through the washing machine at some point. I have also found 3-in-1 oil seems to work pretty well at keeping the rust at bay.

In regards to Ed's comments - the flatness and tolerance thing is critical - even with slipjoints. Just a thousandth of an inch can really show up in the final product and drive you nuts! I'm at the stage where I'm looking for a surface grinder. Pretty much half my time building a slipjoint is spent hand-sanding on the granite surface plate.

I'll share with you some other things I learned/learning on slipjoints (I've not built other folders).

- Try to keep hardware standardized. I use 3/32" pins for my pivots and springs (I think this is pretty standard for traditional slipjoints). For scales I will use 3/32" or 1/16". Even with "simple" slipjoints, you can get pretty crazy with screws, etc., but standardizing keeps things easier in the beginning and cuts down on the amount of bits,reamers, etc that you need as Ed mentioned above.

- I didn't have a lot of peening experience when I started. After cracking the first two pairs of scales and ugly looking pins showing through the bolsters, I stopped and researched methods for making those pins disappear and techniques for proper peening and then I practiced on scraps.

- I heartily recommend micarta as scale material for your first knife for reasons mentioned above - and the cost is nice. I have a fondness for bone and wood, but spent a lot of money destroying my first few scales.

-Rise and fall indicator. I haven't figured out how to build a one-off slipjoint without one. You can easily build your own or Tracy has one for sale that's really nice.

When I attempted my first slipjoint, I failed at it several times (read ~8 times)! I really had to think about each step, why I was doing it and what I expected my result to be. Even then, I would end up with a knife that wasn't salvageable. It wasn't until I bought Don Robinson's book that I was able to get past some of the hurdles that I kept struggling with. Don's book really lays out how to make a slipjoint (his way) and I can't recommend it enough. I wish I had purchased it when I first started as I really struggled with that first knife. But then again, that's how most of us learn...
 
Usually this is kind of like digging in the dead letter file to post on an old thread but I said I would be back to ask more questions. So I have been doing a lot of reading as well as watching some tutorials and some new questions have came to mind!!!

1. Do you use a pivot bearing on your folders?? It runs in my head that one maker told me he uses washers! Any details in the area of pivots would be appreciated.

2. Is it feasible to build folders without all the equipment, IE, lathes,[FONT=verdana, geneva, lucida, lucida grande, arial, helvetica, sans-serif] milling machine, etc., etc.?? [/FONT]

[FONT=verdana, geneva, lucida, lucida grande, arial, helvetica, sans-serif]At present I am not going to be going into production, I just want to build a few to see if I like it! I have drill press and a KMG clone, band-saw but beyond that pretty much nothing! I presently use a hand reamer when necessary. [/FONT]

[FONT=verdana, geneva, lucida, lucida grande, arial, helvetica, sans-serif]My two biggest concerns at present are the pivot area and the fitting of the blade to the spring area! Any advice on these areas for the beginner would be greatly appreciated!![/FONT]
 
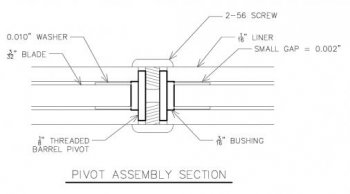
1. Pivot assemblies are as simple or complex as you want to make them. I think most of us folder makers have a couple of assemblies that are tried and true. I make small liner locks almost exclusively and the pic below shows a cross section of my pivot assemblies.

attachment.php


The are basically made up of a bushing, a barrel pivot with screws, and two washers. The blade pivots around the bushing which is lapped to be just barely longer than the width of the blade + the two washers so that the blade doesn't bind against the liners. The barrel pivot screws are tightened down, clamping the liners against the bushing. This way, I can torque the screws down tight without binding the blade.

Now, after showing and explaining the above, your pivots may be completely different depending on what type of folder you choose to build. Some slip joint makers mill out a relief in the liners and don't use washers (some do use washers) and peen a pivot pin through the liners and bolsters. Some use a bushing, others don't. Many lock backs are built much the same as slip joints. Larger liner locks, frame locks and flippers usually use ball bearing assemblies. The choices can be staggering. I suggest you do your research on the type of knife you plan to build.

2. I don't have any specialty equipment I my small shop to build my folders. Would I love to have a mill or a surface grinder, you bettcha! But, I don't have the space for those machines and I certainly can't justify the price for my little hobby. I've found that you can do some very precise work with simple tools that any knife maker would have in his shop.

My advice is do some research and jump on in and build a knife. We will all still be here when other questions arise. I hope this helps.
 

Attachments

  • Pivot Assembly.jpg
    Pivot Assembly.jpg
    14.7 KB · Views: 132
Thanks Brandant, I appreciate the drawing! Are you milling out for the washer in the drawing?? If so how or better yet what do you use to do that milling job for the washer!

I have got some ideas kicking around in my head. I would love to watch someone making one! I have taken a few apart in my younger years but at the point in time I was not thinking along the lines of building my own from scratch! :what!:
 
No, I don't do any milling. The washers ride on the flat surfaces of the liners and the blade. If you interested in seeing a few of my builds, I have four or five full builds on my blog. The web address is below in my signature. Let me know if I can be of any more help to you.
 
If you haven't already, check out Steve Culver's tutorials... http://www.culverart.com/Tutorials.htm
His slipjoint tutorials were monumental in making my first slippy a success just a few weeks ago.

The rise and fall indicator lets you know if the walk of the backspring is even in all positions. Open, closed and half stop if you use it. It certainly can make things easier but I built mine without one. Using your liner template, drill the pivot and rear backspring holes in a wood block, establish the backspring height at open and then grind fit the rest of the tang to match. Don't forget you want 2 points of contact between the walk and the tang at each position.

Good luck!
Chris
 
OK I actually have looked at Steve Culver's tutorials and after reading this section I not sure if I understand what has to be done at this point!

Here is a quote from the tutorial page 1,
http://www.culverart.com/Culver-Building%20a%20Slip%20Joint%20Folder-Part1.pdf

Quote:
Using the “Ruple Dial” to set the tang and spring. This device was designed by Bill Ruple. It helps to quickly get the tang to spring fit-up and geometry close without having to assemble the knife repeatedly. The micrometer sets on top of the spring and measures the lift that the tang imparts on the spring. The tang is ground to set the rise of the spring in all three positions of the blade;open, half-stop and closed. The blade kick is also adjusted to fit the tip of the blade into the handle. This will only get the fit-up close; the final adjustments will have to be made after the knife is assembled and the spring is loaded. When the spring is loaded, it flexes, and the position of the blade will be different.

I can't capture the picture from the tutorial so will try and explain what I am talking about, without the pics!

Quote from the excert:
The micrometer sets on top of the spring and measures the lift that the tang imparts on the spring. The tang is ground to set the rise of the spring in all three positions of the blade;open, half-stop and closed.

So what they are saying is the the notch/tang, or the actual round of the blade in the half stop postion, and the closed position, is being ground to make the measurement equal in all 3 positions! I guess this is done to give the knife fluid movement as the blade is opened and closed!!

Is that correct??

To accomplish this process, I am going to assume that you measure all 3 positions and take which ever is the least and grind out till the other 2, equal the one that measured the least! Is that a correct assumption??

Why couldn't you make a jig that would put the spring under the same load it would be under in the knife and, then measure and set them so all 3 points are equal??
 
Last edited:
Well since there has been no response I figure this thread has slipped into the dead letter box! Either that or everyone thought my question was too dumb to answer!!

Quote from post above:

Quote from the excert:
The micrometer sets on top of the spring and measures the lift that the tang imparts on the spring. The tang is ground to set the rise of the spring in all three positions of the blade;open, half-stop and closed.

So what they are saying is the the notch/tang, or the actual round of the blade in the half stop postion, and the closed position, is being ground to make the measurement equal in all 3 positions!

I guess this is done to give the knife fluid movement as the blade is opened and closed!!

Seeing as how I have never built a folder/slippe or even watched one being built I didn't think the question about the measuring of the "lift that the tang imparts on the spring" a dumb question.

After all I do not know what position you would start in, " open, half-stop and closed" when it comes to taking that
measurement!

Can anyone enlighten me about this process and whether the rise and fall setup is used when building other folders???
 
It's been a little slow on here lately. I've been following along, but I've never made a slippy before either, so I can't help. I think I met Steve at the KC show, if he's the guy I'm thinking of, he encouraged me to contact him anytime I needed help. Seemed like a super nice guy, like to talk, etc.
 
Yep I know Anthony! I kind of feel like the comedian beating on the mic, "is this thing on"! I am one of those people who not only wants to know how to do it , but why it is done that way!!!
 
I'm starting my first slip as well using Chris's video. I'll just go the scribe line method he discusses and skip the daily meter device this time. His video is awesome.
 
And when I talk about Chris's video, I'm referring to his 4.5 hour DVD series I bought off of his web site. If you don't have it, buy it, its been invaluable to me and I didn't even start yet.
 
Back
Top