1st San Mai Billet

KenH

Well-Known Member
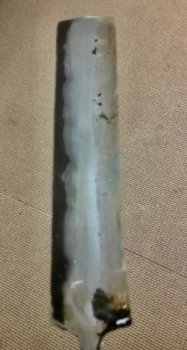
OK, here' my first attempt at a San Mai billet. It's got a .093" thick 15N20 (high carbon) with a .100" layer of mild steel on outside. Clamped in vise, stick welded all way around, put in forge got hot (bright orange) and started pecking away. The trick seems to be light steady taps, not hard whams. The black is the 15N20 core that's been etched, with the whitish part the mild steel outside. Best I can tell there are no delaminations visible. I'll most likely cut this up looking for delams inside rather than make a blade from it. I didn't take photos of making the billet because I didn't expect it to turn out this good.
1st San Mai Blade Profile-s.jpg

This is the top edge - the core seems to be fairly well centered and no delams visible on top.
1st San Mai Blade Edge-s.jpg
 
Thanks for the nice words folks - This first billet was just too easy, so I know all of them won't be that easy. It took about an hour from the time I lit forge to start heating up. Then clamped fresh ground metal in vise and stick welded all around to seal. Welded rod to billet and forge was to temp. It was around an hour later I'd finished welding billet and grinding, then an etch to see. There was some delam around the edges, but once I ground back 1/4 to 1/2" it was clean.

I KNOW the next one isn't going that smooth.
 
That is awesome Ken. San mai is on my shortlist. Not to hijack here but could you tell me what PSI you ran you forge on? If its venturi I mean a blown forge obviously would be different.
 
Thanks for the nice words Chris - I've got both a blown burner and a venturi burner. I also put a blower on the inlet of the venturi and picked up more heat. The pure venturi runs from 10 psi to 15 psi, and trying to remember what I drilled the orifice at - seems like it is around .032"(?) When I put the blower on the venturi air inlet I still run around 10 psi range. The blown forge I have a .062" orifice and run around 5 (or less) psi. This is a small one burner homemade forge using a 20 lb propane bottle for the case. I think I'd like to try 2 smaller burners in the forge to spread out the heat a tad more. With a single burner the billet has to be moved around a good bit for even heating from end to end. My blower is actually too small for a true blown forge, but does seem to work ok on the venturi burner. I have no idea of the cfm as this is a spare squirrel cage blower I had left over from building tube amps for ham radio. The tag on blower case says 120vac, 0.65 amps. The motor is spec'd at .5 amps, which is close to what I checked and blower pulls 0.4 amps blowing on table. I finally found a CFM rating for the blower, looks like it's spec'd at >85 CFM which I'm sure is free air rating. Better than I expected.

I profiled a blade today and didn't find any delams other than at the end where I had to trim a tad off. I was expecting delams around the edges and ends. So far, I've not found any delams other than around edges.

Ken H>
 
Last edited:
Thanks Ken. I have a two verturi burner forge so I will start the process at 15 psi and see if it works from there. I think it goes to 30 and I normally forge most things at 5 psi or less.
 
Do you have a way to check the temperature of your forge? I've got a TC I use to check temp. I drilled a 1/4" hole thru side into interior and use this probe: https://www.amazon.com/dp/B00XJ0VUBG/ which is rated for 2372°F. While I wouldn't expect it to last very long if used all the time, it's good for getting an idea of temps inside. With probe tip even (maybe sticking into forge 1/4") with insulation the forge is running around 2200 to 2300°F. If I push the probe tip toward the center where the billet is the temp is over 2400°F. Oh, that probe will work for any type K thermocouple meter, DVM or what have you. I use a PID controller I use on my tempering oven as an indicator only.

A trick I've read, but not yet tried is to use a coat hanger wire to touch the billet - if it sticks, it's at welding temp. I think we're talking about "sticky" when touched rather than sticking as in welded.
 
I have read that too about the coat hanger. I will just have to feel it out as far as how long it takes to get to welding heat. Just filled my 60 pound tank up so I guess its a good time to try.
 
Yep, ran a solid bead around the billet to seal the inside. I ran welder on the hot side with a light bead, one just to seal without worrying about penetration for strength. I did a clean 120 grit grind on each side of each side of metal. Just before clamping in vise I cleaned all fresh ground surfaces with alcohol. This allowed me to forge without any flux.
 
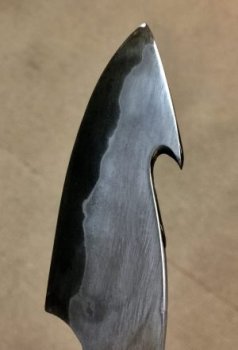
OK, I got the profiled blade shaped, ground, and etched. With all the grinding I did no delams showed up so I'm pretty happy with my first San Mai attempt. Now to HT, finish grinds and put handle on knife. My 2nd attempt on a gut hook, my first was in the first year of making knives and didn't really like putting them in. Still don't, but wanted to try again.

1st San Mai GutHook Blade Profile-s.jpg
 
Back
Top