Ht'ing W-2 and Keeping the hamon off the EDGE!!!

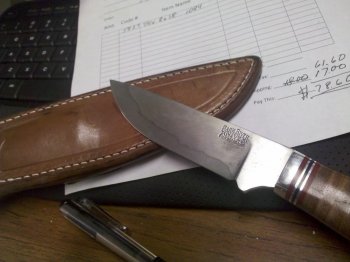
Update from re-HT and using DT-48 quench oil....take a look at what I got!


Hey Guys,
With everyone's input and a lot of tenacity, meaning an abnormal amount of hand sanding, polishing, some cussing, whining and a little moaning AND cracking open a 5 gallon bucket of Maxim's DT-48, I was able to get a much better hamon, that is well off the edge, with some interesting activity that is really nice.

A couple of things I did differently,
1. When I applied the clay, I didn't do my normal 1/3rd's, it was more like 1/4th's, I basically kept the clay much higher, closer to the spine, and then added my little details by using a little more water mixed with clay than normal and drug the extra lines down toward the edge at an angle, or rather a curve...hard to explain, next time I think I will do a straight line at an angle to see what happens.

2. My target temp this time was 1450, I did a 5 minute soak time, I'm thinking from what I've learned from Don Hanson's many posts, is the a 7 to 8 minute soak time would be better and may help in keeping the hamon higher up on the blade.

3. And probably one of the most important changes, I quenched it in Maxim's
DT-48. I believe I got the best results from using it than I have with anything I've used to date. It came out harder than any blade I have quenched and no warping on a fairly thin blade (knock on wood!).

Now it's time to see some PICS!!


100_2939.jpg100_2942.jpg100_2942-1.JPG


I did my best to make them a good size to be able to see the details, it may be pretty big, sorry the pics aren't the best but it's late!
Let me know what y'all think, both pro's and con's! If these pics aren't good enough, let me know and I'll set up my light tent tomorrow night and get some better shots!

Thanks for EVERYTHING!!! I couldn't have done it without everyone's help! Rex
 
Thats cool Rex , no big deal. No doubt you should work with steel you are most used to . The reason it may not be following the clay is , it may be melting . Some refractory clay will do that . Try letting the clay dry over night . I saw your hamon on blade looks pretty good . Hamons are funny little devils , no matter how many times you do one, they always turn out a little different. Anxious to see your blade all polished up . Your Hamon is called Hitatsura Meaning ,, "tempered all over" ..http://home.earthlink.net/~steinrl/terms/terms.htm... Bubba


couple pics of hamons from blades of past work . steel is 1095, W-2 and tamahagane
 
Last edited:
Thanks Bubba,
I either let my clay dry completely or I will set it close to the forge and let the heat from the forge dry it a little faster. The clay didn't fall off, even after the quench, I believe the problem was HTing too hot, Don Hanson says to never go over 1475, I was pretty close too that on my first 2 attempts, this last one I was at 1450 but I don't think I let it soak long enough. I will do the same thing next time but I'm going to let it soak longer, maybe 8 to 10 minutes, depending on the size of the blade. I'm pretty happy with this one so far, I haven't completely finished this blade, I took it to 400 grit, then etched to see what it would look like, I'll probably start over again at about 180grit and take it to around 900 to 1000, and re-etch. Appreciate the comments and the pics are fantastic! Rex
 
Lookin' good there Rex. Can't wait to see it once its completely polished out.

Thanks Darrin!
I worked on it last night, I took it to a 1000 grit and re-etched it, WOW!!!! It is freakin awesome, I'll post some pics tonight, it is the best hamon I've gotten to date. I've learned several things about W-2 with this last knife, and I have another one forged out and ready to grind that will benefit from all the stuff I've learned from this one.

One thing that I hope someone might know how to address is that one side has the hamon moving up and down with nothing inside the softened top side, the other side, (the one I did last night) has all kinds of darker and lighter...for the lack of a better description, I'd say spots or blotches inside the waves going down, in the top (soft) side. It's not a problem, I'd just prefer both sides resemble easch other. If anyone knows what causes that, I'd love to know how to prevent it from happening or better how to make it happen on both sides, it is probably the nature of a hamon, or something in the steel that makes it happen that way.

Thanks again for the comments, I apprecate you taking the time, Rex
 
Last edited:
Thanks Darrin!
I worked on it last night, I took it to a 1000 grit and re-etched it, WOW!!!! It is freakin awesome, I'll post some pics tonight, it is the best hamon I've gotten to date. I've learned several things about W-2 with this last knife, and I have another one forged out and ready to grind that will benefit from all the stuff I've learned from this one.

One thing that I hope someone might know how to address is that one side has the hamon moving up and down with nothing inside the hardened top side, the other side, (the one I did last night) has all kinds of darker and lighter...for the lack of a better description, I'd say spots or blotches inside the waves going down, in the top (soft) side. It's not a problem, I'd just prefer both sides resemble easch other. If anyone knows what causes that, I'd love to know how to prevent it from happening or better how to make it happen on both sides, it is probably the nature of a hamon, or something in the steel that makes it happen that way.

Thanks again for the comments, I apprecate you taking the time, Rex

Update on this W-2 blade, I did get the hamon work finished up last night, I was lucky to have my son the "Pup" assisiting me, so of course everything took twice as long as it would if he wasn't, still, I wouldn't miss a chance to have him in the shop with me. I also took pics last night, AND loaded them on my computer, but I didn't get in from the shop till late so I knocked out right after a shower, so I will either post them tonight or tomorrow morning. My step-son has a football game tonight, so I'll be tied up with that until about 10:30, maybe I can get some time in the shop after?....Doubt it, next I have to finish the guard, and handle, once that's done I'll test it some more before I decide if it is sellable.

Does anyone else get all freaked out about selling a knife that possibly could fail? Not that I think it will, the ones I sale and have sold were dead on with everything, it's just that I make so few that I'm that proud of, where everything is just right, am I being too picky? Or, is that the right way to think? I'm going to have to start making and selling more blades instead of experimenting and learning new stuff. Since the construction of our house has started, I will have to start making knives great enough to sell, on a regular basis! Or I won't be able to afford to keep making them....man that sucks! But a new house is worth it, I think..., if I knew I would have had to agree to stop making knives, I don't think I would have agreed to it, it'll just put a cramp in my knifemaking budget for a while, so I'm going to stock up on all the materials and supply's I need now, maybe I'll have enough to get me through the construction.

Anyway, I'll get the pics up tonight if I can, looking forward to hearing what you all think, I seriously want ot know that the hamon, or rather the softer area isn't too low, it has a lot of movement to this hamon, I've tested it with a file and it skates easily, I've chopped a 2x4 with it, but not with a fine edge, more of a pre-edge. you know before you take it to the stone. Thanks Guys....(sorry about the rant there), Rex
 
Rex,

Here is the "NO CLAY" hamon that I made with the W-2. It was a full quench in ATF. The blade was ground to about .210 before we started grinding the bevels. The Hamon came up about .320 on the edge and back about .650 off the tip. "NO CLAY"
 

Attachments

  • IMG_20111021_174510(1).jpg
    IMG_20111021_174510(1).jpg
    89.6 KB · Views: 32
Last edited:
Rex , I don't think you have anything to worry about ! from what I have seen of your work . We all have failures occassionally. although I messed up 4 swords in a row , until I finally got one right . I was ready to stop doing water quenched blades . Ill bet your blade turns out to be a beauty .And Aldo you are pretty good !! looks like one of stewarts blades .....
 
Actually it's the only Bark River Bravo-1 ever made with W-2 and a stacked leather handle. Please don't ask BR dealers for it. It is definitely a 1 ott.
 
Ok Dawgs,
I said I would post pics tonight, so here they are. As you can see one side has an amazing hamon line, and while the other side isn't dazzling, it is seriously nice. It maybe the Marine in me that demands uniformity, or my anal ways. Should I just let it go and not worry about it, or is there something I did wrong?
Or possibly, something I didn't do right. If it's normal for W-2, I can deal with that, if it's something I can control, I'd love to know what it is. Thanks Dawgs!!!

BTW, I added both sides for comparison.


100_2944.jpg

100_2942-1.JPG
 
Rex,

Here is the "NO CLAY" hamon that I made with the W-2. It was a full quench in ATF. The blade was ground to about .210 before we started grinding the bevels. The Hamon came up about .320 on the edge and back about .650 off the tip. "NO CLAY"


Aldo ,
That looks nice but not as nice as W-2 is known for, also the big question I have is, is it repeatable? Can I depend on that method to 1.) get me a hamon and 2.) give me a differential HT? Answer these questions for me, otherwise I'll stick with my clay!! No disrespect intended, but with the amount of work that goes into getting a hamon I would prefer there at least be a decent chance of getting something to show up. I know there are no guarantees with
Hamons, but at least I know I have a chance using clay.

I'm assuming your point is that this W-2 is so shallow hardening that it doesn't take a lot to get a hamon on it, is
that what you're trying to get across to me? You know I'm dents...right? I know, I know, it's supposed to be dense, but that's a personal side joke on me!

Thanks Bud for chiming in, do let me know what you think about the pics I posted earlier, please!!! Rex
 
Rex , I don't think you have anything to worry about ! from what I have seen of your work . We all have failures occassionally. although I messed up 4 swords in a row , until I finally got one right . I was ready to stop doing water quenched blades . Ill bet your blade turns out to be a beauty .And Aldo you are pretty good !! looks like one of stewarts blades .....

Thanks Bubba!
I do appreciate your vote of confidence, I know there will be failures from time to time, I don't expect to get it right every time I step up to the anvil, I do expect that I WILL step up to the anvil, with the expectations of doing something great!!! It may be that I have wanted to make knives for so long that my expectations of what I can do and my skill level aren't together, which is fine, one will have to get to the other eventually! Hopefully my skill will reach my expectations!! Thanks again, Bro! Rex
 
Both sides look great to me Rex. They aren't mirror images but they are both nice in their own way. I'm sure you'll get the look you're going for after a few more blades.
 
Just wanted to let you know what you are working with. As far as Hamons go I guess it's pretty basic, but I never really expected it to begin with:what!:
 
Rex , I believe you hit it pretty good . although one side is a little different , as long as blade didnt warp or twist it should be a great blade. Getting the clay on both sides evenly is one of the hardest part of differential HT Using clay. I hardly ever get them to look alike , and I have been doing Japanese hamon for over 30 years. Your hamon it Hitatsura they never look the same ......
 
Just wanted to let you know what you are working with. As far as Hamons go I guess it's pretty basic, but I never really expected it to begin with:what!:
Aldo,
So how did you polish it out? I mean if you weren't after a Hamon, how did you know it was there? I'm thinking during hand sanding you saw a shadow of one and decided to etch it, maybe? Also how do you bring out the hamon after etching? I have the way I was taught, which does work pretty well, but I'm always open to learn new techniques!! Thanks Bro', Rex
 
Rex , I believe you hit it pretty good . although one side is a little different , as long as blade didnt warp or twist it should be a great blade. Getting the clay on both sides evenly is one of the hardest part of differential HT Using clay. I hardly ever get them to look alike , and I have been doing Japanese hamon for over 30 years. Your hamon it Hitatsura they never look the same ......

Eeeerrrrr OK,
So what makes it a Hitatsura? I'm going off what I've read and what I've learned talking with other blade smiths, and the main thing they were looking for was called (I think) Suri lines, I was told to get the extra activity, to drag the clay down real thin toward the edge or however I wanted to do it, but to keep the clay thin and going thinner to the end of the line, does that make any sense? I did learn on this one that I needed more lines and to keep them super thin, the hamon does follow the clay, just NOT where you put it!
Thanks Bud, Rex
BTW, do keep in mind that this is the third time I HT'd this blade, I had no twisting or warping, and the 3rd time I quenched in Maxim DT-48, it came out screaming hard, I think this is going to be some great oil. I have high
hopes anyway!
 
Last edited:
Rex, I don't think I'd have the patience for this. lol

John,
you never know what you are capable of until you test yourself! First, I would have to say that you MUST have a love for Hamons, once you've gotten one to really POP! You will go for another one!!!...and another and another and...

Really the craziness comes in when you get a little light hamon and decided to start over hand sanding again and end up going through all the grits and re-etching ... numerous times!!!!

But do keep in mind, that for bigger blades like I do, the differential HT is the most important thing I'm looking for.

If you ever want to give it a try, just let me know, I'd love to work with you on something bigger than one that'll fit in your pocket! Just let me know!! It's not as hard as you may think, it's just a little finer finish than satin, I've gotten it down pretty good, it sometimes does take several sanding etching sequences to get it to really look good!
Come on, YOUCANDOIT!
 
Back
Top