52100 & w2 heat treat

As I get ready to post this I see that Rob has already nailed it in one sentence better than my typical page and a half verbosity.

Rex, words cannot express my horror and the awful "slug in the gut" feeling I got from reading your post. I was devastated, shocked and utterly confused until I carefully re-read my post and saw my totally inept wording.


Kevin,
I can honestly say that I understand how you feel, because I feel that same "slug in the gut'', now! This was nothing more than a simple miss understanding, and like you said, if any of us knew you, we would know that you aren't that way, just like I said if you knew me, you'd know that I generally say what I mean and mean what I say, that my word is very important to me. Not meaning I wouldn't spare someone's feelings if needed, it's not necessary to be hurtful to people ESPECIALLY THE FEW GREAT PEOPLE IN THE WORLD THAT WILL HELP OTHERS!!!!! Kev, it was only a misunderstanding, nothing more, I understand now what you meant, and I didn't write my email in anger or anything other than probably bewilderment, this is NOT the time to leave us, this is the time to make your mark even bigger in this craft, to build your LEGACY, cause believe me when I say, that there won't be many knives made without a little bit of KEVIN CASHEN in everyone of them!!!!!!! That is the impact you've made, and continue to make, helping each and everyone of us as we all need a little more guidance.

It feels like this is my fault, and I don't really have the words to say other than I appologize, to Kev and if you you leave I'll be appologizing to every Knife Dog memeber for the rest of eternity....sick as I feel I may have to leave the group too.....
 
Hate to hear that you've decided not to post here anymore Kevin. I will be following you on the ABS forum (or wherever you go). Some may scoff at what I'm about to say but you are my go to guy for H/T questions. I want you to know publicly that I appreciate all the questions you've answered in the past and also for the ones you hopefully answer in the future. And if you ever finish that book I want the first copy, autographed of course. Best regards.

Darrin
 
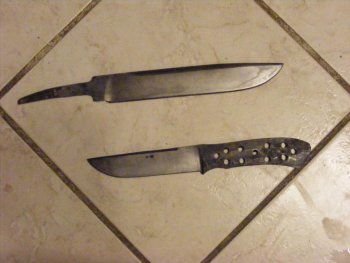
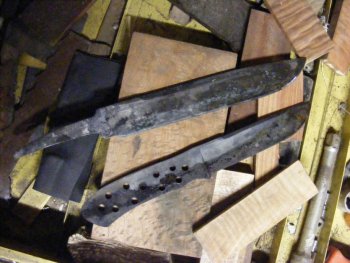
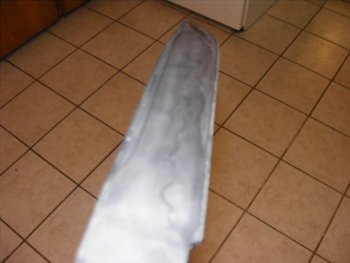
okay, i didnt have the luxury of chosing between 1425 and 1475, (i only have a propane forge) but i hardedend my two blades ( 52100 hunter w2 fighter) w2 in 150 degree water, 52100 in 130 degree peanut oil. and heres how they came out so what do you think?how do you get the hamon to come out?


kevin dont leave!
 

Attachments

  • Jun28,2011 015.jpg
    Jun28,2011 015.jpg
    95.2 KB · Views: 15
  • Jun28,2011 001.jpg
    Jun28,2011 001.jpg
    94.2 KB · Views: 14
  • Jun28,2011 006.jpg
    Jun28,2011 006.jpg
    76.4 KB · Views: 14
Last edited:
okay, i didnt have the luxury of chosing between 1425 and 1475, (i only have a propane forge) but i hardedend my two blades ( 52100 hunter w2 fighter) w2 in 150 degree water, 52100 in 130 degree peanut oil. and heres how they came out so what do you think?how do you get the hamon to come out?


kevin dont leave!

Badger,
I have a question just so I can be clear, from the pic it kinda looks like you clayed the edge of the small blade, in the second pic, that is the way mine look when I take the clay off the spine, is that the case or could it be from a different quench oil, maybe? Or what you're using for clay, possibly?

The way I polish mine out is first I hand sand them down as high as I can go without skipping a grit, I use a piece of Mouse Pad, the rubber kind to back my paper and a piece of that (useless) G11 many folks bought a couple of years ago, (G11 will make a nice handle but it's ahuge MESS!). Once I've gotten it sanded, then I do my etch, there are many ways to etch, this is the way I was taught and it works for me, dipping the entire blade will work as well, first I clean it with either alcohol or windex(the cheap kind) then I just take a good paper towel, dip it in my diluted etching solution, and wipe it on the blade, making it sure that it stays on the blade and does not dry, I give it about a 90 second etch, then neutralize it will windex, next step I take red rouge, you can scrape some off with a knife or I found that a zester works great, it's kinda like a tiny grater used on citrus to take the skin off in tiny pieces used in cooking, to get the rouge very fine, if you scrape it off with a knife there will be bigger harder chunks in it that have to be taken out, I apply a wet coat of WD-40, then the rouge, then go to polishing, I'll do my best to keep as much rouge on the blade as long as possible polishing in small circles. You want the WD-40 and the rouge to make a loose paste that can spread easily, keep polisihing as long as you have plenty of the red on the blade, once you've used it all, you should start seeing a line, if it isn't popping like you want you can re-do the sanding starting (and etching as many times as you think is necessary) at about 120 or so, to about 400 (for using knives) higher depends on what kind of finish you want, the higher you go the more the Hamon will show, I think it was Ed Caffrey that said he takes his knives to about 2000 grit and finishes them with a 400 grit, it's a more usable finish. Once you have it like you want, you can take some Flitz or other polishing compound (I like Mother's Aluminum and Mag wheel polish) to brighten up the hard edge to make it shine brighter than the dull grey softer side for more contrast. At this point if you polish the softer side you will be removing more of the grey oxide, you want to take a little off, but not a lot, try rubbing it down with a dry paper towel first, get as much as you can off that way, so your customer won't get it on their hands, some will come off, the more polishing you do to the soft side the brighter it will get reducing the contrast, hope this helps, if you want more info, let me know, I'll give you everything I've got, Rex
 
I may be wrong, but I don't think you'll get a hamon on 52100.

Darrin you are correct 52100 won't give a hamon, but it'll still have a differential HT! Which is more important than a Hamon in my mind, I clay coat every blade I do so I can get that toughness and to make certain areas of the tang area not be fully hardened, kind of a safety thing in my mind, does that make sense? Rex
 
I'm not challanging you, I'm just asking for clarification. When you say that clay coating provided differential hardening with52100, how did you test to confirm this? Were you able to achieve, or at least come close, to a 90 degree bend with breakage only in the martensitic edge? Thanks.

Doug
 
I'm not challanging you, I'm just asking for clarification. When you say that clay coating provided differential hardening with52100, how did you test to confirm this? Were you able to achieve, or at least come close, to a 90 degree bend with breakage only in the martensitic edge? Thanks.

Doug


Doug,
Admitedly, I am repeating what I was told, I have absolutley ZERO experience with 52100, so I guess I shouldn't have spouted off, I'll stick to the steels I know and use, 1084, 1095 and am learning W-2! No need to worry about challenging me, it's the questions that make us all smarter.

Back to the point, if I remember correctly, isn't that the same steel that Ed Fowler has done so much research with? And doesn't he do a differential HT? I would guess he does a soft back draw, which is probably your point. Sorry to spread incorrect info, seems like I'm batting .1000 this week, in the negative, I think I'm going to go back to lurking, and be quiet for a while... unless I know I know, that I know, what I'm talking about, Thanks for straightening me out, Rex
 
No problem, I was just trying to separate statements like "according to the data sheets, this is the expected result"-which is what many of us have to resort to, from measured results. I myself have to admit that I assume that austempering 52100 at 430-450 degrees in oil for three hours gives about 25-30% tempered martensite with about 70-75% bainite because that's what the ITT diagrams say should happen. I just can't afford to send a test blade out for analysis if I knew of a lab that would do the work.

Doug
 
Badger,
I have a question just so I can be clear, from the pic it kinda looks like you clayed the edge of the small blade, in the second pic, that is the way mine look when I take the clay off the spine, is that the case or could it be from a different quench oil, maybe? Or what you're using for clay, possibly?

The way I polish mine out is first I hand sand them down as high as I can go without skipping a grit, I use a piece of Mouse Pad, the rubber kind to back my paper and a piece of that (useless) G11 many folks bought a couple of years ago, (G11 will make a nice handle but it's ahuge MESS!). Once I've gotten it sanded, then I do my etch, there are many ways to etch, this is the way I was taught and it works for me, dipping the entire blade will work as well, first I clean it with either alcohol or windex(the cheap kind) then I just take a good paper towel, dip it in my diluted etching solution, and wipe it on the blade, making it sure that it stays on the blade and does not dry, I give it about a 90 second etch, then neutralize it will windex, next step I take red rouge, you can scrape some off with a knife or I found that a zester works great, it's kinda like a tiny grater used on citrus to take the skin off in tiny pieces used in cooking, to get the rouge very fine, if you scrape it off with a knife there will be bigger harder chunks in it that have to be taken out, I apply a wet coat of WD-40, then the rouge, then go to polishing, I'll do my best to keep as much rouge on the blade as long as possible polishing in small circles. You want the WD-40 and the rouge to make a loose paste that can spread easily, keep polisihing as long as you have plenty of the red on the blade, once you've used it all, you should start seeing a line, if it isn't popping like you want you can re-do the sanding starting (and etching as many times as you think is necessary) at about 120 or so, to about 400 (for using knives) higher depends on what kind of finish you want, the higher you go the more the Hamon will show, I think it was Ed Caffrey that said he takes his knives to about 2000 grit and finishes them with a 400 grit, it's a more usable finish. Once you have it like you want, you can take some Flitz or other polishing compound (I like Mother's Aluminum and Mag wheel polish) to brighten up the hard edge to make it shine brighter than the dull grey softer side for more contrast. At this point if you polish the softer side you will be removing more of the grey oxide, you want to take a little off, but not a lot, try rubbing it down with a dry paper towel first, get as much as you can off that way, so your customer won't get it on their hands, some will come off, the more polishing you do to the soft side the brighter it will get reducing the contrast, hope this helps, if you want more info, let me know, I'll give you everything I've got, Rex


i just clay coated the fighter. the little blade was just edge quenched. thanks for the input every one!
 
Doug,
Since I was invited to check out "Hype Free Blades(.com)" I should have known better than to make a statement of that sort, I was thinking it would be like all high carbon. But there is no,"like all high carbon", with all the alloying being added to steels these days.

Was I correct on getting a differential HT using the soft back draw method?

And why temper in oil, is it similar to HTing in salts, or in this case tempering in salts? To get more coverage on the blade resulting in an even heat completely around it, if this is the case wouldn't it need to be suspended in the oil? Being that if it touched anything it would be reactive, resulting in a heat sink or possibly increasing the temp, just me thining out loud, I've not heard of tempering in oil, and for me 52100 is probably too advanced for me to get great results.

I bought about 9 bars of Aldo's W-2, I think I have the right recipe to HT it, I have some more hand sanding to do to the blade I started Sunday, and I will start getting the clay on it.
Here is a question that has bugged me for a while now, that I seem to keep forgetting to ask anyone, after the quench if the clay doesn't come off, are you supposed to take it all off and clean the blade before it goes to temper? Or leave the clay on? My thinking was take it off, as it would soften the spine a little more (possibly), while it was softening the edge. It's one of those questions that comes to mind whenever I'm in the middle of HT'ing a blade, and I'm at that point where I can't stop and go ask.

I hope to have this one ready for HT by Saturday, so I can get started on another. This one is a trade or really a gift for an engineering friend that did my Perk test (were building a house soon), he said he'd like a knife and I got an idea of what he'd want, and made it, problem with this one is that he doesn't want any forging marks on it, and with the new Tire Hammer it was unavoidable, the forging marks turned out looking pretty good, as far as they can, I'm not crazy about them but at the same time the look is growing on me. I figured, finish it and if he didn't like it, I will use it for testing and keep it for myself, it's not terribly thin, as most of mine aren't, I usually make mine pretty beefy. Thanks Doug, I do appreciate the non challenging "challenge", it's that type of info that shouldn't be spread without some way to back it up, Rex
 
i just clay coated the fighter. the little blade was just edge quenched. thanks for the input every one!

Thanks Badger,
That explains what I was seeing, did my polishing instructions help any, also do you do it a different way? If your way is different I'd like to hear how you do it, I know my way is labor intensive and I'm looking for anything that can help me make mine better with less work! Thanks Bud, Rex
 
I take it you are asking if clay coating is an effective method of differential heat treating? To be honest, I don't know because I've never clay coated 52100. As a matter of fact the only blades that I've clay coated are some 9260 blades that are still awaiting secondary grinding. With the 9260 I originally didn't think that clay coating wouldn't work until I say someone post a picture where he produced a hamon on some blades made from it. I went bact to the ITT diagrams and realized that the ferrite start line was at about 0.9 seconds at the nose even though the pearlite start line was just over 2 seconds. However, with 52100 there is no ferrite start line, just the pearllite start line and it's over 2 seconds at the nose. I don't know if this will retard cooling enough with clay coating to get the actual cooling curve over the pearlite/upper bainite start line, let alone the finish line. The theoretical possibilities are that 1) the clay coating will retard the cooling enough to allow the actual cooling curve to cross the pearlite/upper bainite finish line for a soft back, 2) the cooling curve will cross the pearlite/upper bainite start line but not the finish line allowing the remaining austinite to cross the Ms line, or 3) the actual cooling curve will miss the pearlite/upper bainite start line the and the austinitetic steel under the clay coating will still be converted to martensite.

The next time that I forge some blades from 52100 I intend to clay coat the spine of a sacrificial blade and see how it breaks.

Doug
 
The next time that I forge some blades from 52100 I intend to clay coat the spine of a sacrificial blade and see how it breaks.

Doug

Doug,
Errrrr....., huh? Ok I'm kidding , sorta. What I was refering to was being able to get a differential HT with a soft back draw, I think Ed Fowler was a proponent of doing this to 52100, I'm not really a big fan of his knives but his research does seem sound, with his metalurgist at his side. And repeatable results that do what he claims.

9260, ok that is a new one for me, I've probably heard of it before, but being still what I call a newb, I've purposely limited myself to high carbon-low alloy steels, except the W-2 is a new venture, with the wild Hamons that Don Hanson gets it makes a guy really want to try to get something like it or at the very least get close! For me the differential HT is more important, if it was all about the "line" I'd be wasting my time, on a lot of blades, it just doesn't work everytime for me. Generally a mistake on my part, I have learned not to buff a blade you want a hamon on! I don't always know why they don't happen, for the most part I can pinpoint my mistake but sometimes I'm left rubbing with no reward! At least the finish is still nice, and it should still have a differential HT, unless I'm totally missing something. Most of my failures will have a very faint line, but no matter how much I try to make it pop, it just doesn't happen like I want it to, those are the ones I put through my usual paces, edge flex, paper cut, chopping seasoned oak, and if I'm feeling extra confident I have a log of Mock Orange that will dull and AXE, chainsaw, or any ginsu, if it cuts that without edge roll or chipping, it gets my name put on it! Don't get me wrong, cutting that stuff is right up there with chopping concrete or steel. Mock Orange is what Southerns call Osage Orange, seriously HARD WOOD, the piece I have a buddy from work gave me, it was used as a fence post on his families cattle ranch and was planted by his Grandfather when his dad was a little boy, so it was in the ground around 50 years or more! Tough stuff! I only use my bigger(est) blades on it, they really have to have a meaty edge or it could destroy the blade of a smaller knife. I have cut some blocks for handles out of it, and they are gorgeous! Thanks for all the technical data, Rex
 
Sorry, I misunderstood. I thought that you were talking about differntial hardening with clay coating or edge quenching. You're talking about differential tempering with a soft draw. Try putting the edge and point of the blade in wet sand to act as a heat sink and then apply heat to the spine. The spine will still be martensitic but softer. The only way to remove the martensite from the spine would be to austinize it and allow it to slow cool. I don't think there is a way to do that without overtempering the edge and point. Maybe if you use something like a butane pen torch you could if that localized the heat enough to austinize the spine without overtempering the edge. Appling less heat to the point end of the blade than you do to the tang end you could leave the point of the blade just a little harder for penitration, if that is even an issue.

Doug
 
well mccllelan im only an 400 grit paper right now but i think it will work in the end. oh hey how do you guy check hardness? and what do you do for cutting test? these hamons are realy starting to give me head aches... :)
 
Last edited:
One thing don't confuse hamons with differential hardening. Yes, you do differential hardening to make a hamon but the differential hardening can still be there even if the blade doesn't desplay a hamon. I drive the rough sharpened blade through soft iron wire to test the edge. Others cut through brass rod. Deflection with a brass rod is tricky and can be misleading. Cutting something hard will tell you every time if you have a hardness issue with the edge. It will chip out, too hard, or roll over, too soft, or be just right. You can look on it as the Goldylocks test.

You can try chopping 2X4" which will test the strength of the edge and edge retention. Slicing fiberous rope will test edge retention. Cutting free standing water bottles will test for sharpness and edge geometry.

Doug
 
well mccllelan im only an 400 grit paper right now but i think it will work in the end. oh hey how do you guy check hardness? and what do you do for cutting test? these hamons are realy starting to give me head aches... :)

Badger,
If your head is starting to hurt you're rubbing with the wrong part of your body! Kidding aside, it's usually my elbows or back depending how I'm standing, but pain is a part of knife making depending on how old you are!

I have spent upwards of 30 hours+ handsanding trying to get a hamon to POP! Sometimes it works sometimes it doesn't, once you've finished polishing after your first etch, you may need to repeat starting at around 180 grit back to 400, then re-etch, and re-polish, also sanding to a much higher grit will make it a lot nicer, somewhere around a 1000 grit, that sometimes does wonders, Hamons are finickier than CATS! And yes they will drive you CRAZY, In the words of one of my favorite makers, Don Hanson, when I was asking for help, after a similar statement, he said, " Fun, aint it!"

If you were closer I would be happy to have you over to my shop and I could show you exactley how I do it, just like I was shown, it took that kind of one on one for the light to come on in my head! Have you looked at Stephen Fowler's tutorial? It's almost the same way I do mine, and he gets great hamons! I think he advises at least three cycles of sanding, etching and polishing. The higher grit will help, but you have to relize that some times it's not going to happen, you should be able to see some sort of line around 400 without etching if it is a really good one, etching will bring it out more.

For cutting test, remember it depends on the type of knife as well, with some choppers and hunters I start off with news paper, if it can cut that with out making it bunch up, edge gemetry should be pretty close, for toughness (with choppers) I have some seasoned oak, I take several chops on it, after a few cuts I'll inspect the edge for any deformity, if there is none, it should be in good shape, but I keep chopping making sure I hit every part of the edge, my seasoned oak is about 5 years old, so it's pretty hard, for my bigger choppers with thicker edges I have some Mock Orange, I use sometimes when I'm feeling confident, or suspect that it didn't harden correctly, that stuff will destroy an un-hardened or thin edge, not for everyone, its like chopping steel! I have heard of folks chopping 10 penny nails, brass rods etc. Then I do some stabbing into the oak and twist the blade out fast and slow, to watch to see how much the blade is going to twist some or none, I want it to give some without deformity, it should spring back. Most of these tests are for larger knives, a smaller Hunter, will cut the newspaper much better than a convex ground chopper, while of course the chopper will chop wood better than the hunter, don't expect too much from knives not suited for the purpose, I was trying to get both when I first started and it was and still is beynd my skill level, some makers can make tough small knives with thin blades, because they have tried everything under the sun, and tested every possible steel to find the right steel and the right HT, with the perfect edge geometry for what they were looking for, it's an elusive prize that almost made me want to quit. Until I realized that I need to crawl before I tried to run, then I got to making knives that were just knives, and still do just that, Excalibur is a myth, not that I will ever stop trying to get to that quality! If there i sanyway I can help just let me know, I'll show you as much as I can, Rex
 
Good thread you guys have going here.

I thought I'd point out a couple things for general info purposes-

Ed fowler gets his differential on 52100 by edge quenching. The spine of the blade does not get quenched so it forms pearlite and the result is what most would call a "Temper Line. In addition he uses a torch for hardening which allows the heating of ONLY the bottom half of the blade to austinising temp. IE- the spine wouldn't harden anyway even if fully quenched because it's not up to critical temp.

These methods will give you a temper line on pretty much all oil hardeneing steels like 52100, 5160, 10XX series, O1, and W series come to mind

To go further than a temper line (either wavvy or straight) and get a hamon with "activity" caused by mixed strucures below and above the Temper line the steel needs to be of the shallow hardening variety and the quech has to be fast enough to "freeze" these mixed structures. - 10XX W series

Go to the other extreme of air hardening steels and you wont get a temper line at all because no matter how fast your quench is the blade will harden underneath the clay and form martinsite because of the time available to reach the martinsite start temp.

Inbetween these extremes lie steels like 5160, O1, and 52100 (I suspect) where you may or may not get a differental with clay. If the clay insulates enough to keep the spine from getting under the nose (martinsite start temp.) during the quench I suspenct you would get a fairly crisp temper line with martinsite on the bottom and pearlite on the top and very little area of activity. If this is what your after it's much simpler to just edge quench for the same result and would be why we dont see folks clay coating deeper hardening steels.

Hamon, at least the temper line, will be visible at 80 grit if you hold your blade near a light or in the sun and "roll it around" to bounce the light off of it. After quenching I at least grind one side of the blade free of de-carb and check this way to see what I got. If I like it I'll temper. If not then I'll clean it up, clay it up and harden it again.

This is my opinion ONLY here- To me 220 grit paper puts significantly deep scratches in the blade. I try to start with 320grit handsanding until I'm at 320 and clean. I may use a little more 320 and time to get a scratch out but feel it GREATLY reduces the chance of getting to 800 and having to go back down. Again thats just what works for me ;)

Just thought I'd mention this also -Using cheap sandpaper is a HUGE handicap !!!! I've tried a bunch of kinds and I'm finally ready to load up on Rynowet Redline. If you haven't tried it yet give it a shot.


I'm getting a fairly good grasp on heat treating but still learning also, so please feel free to correct me if I'm wrong about any of this fellas and we'll learn together.

Take care guys, Josh
 
I got some 52100 from Aldo, I heat treated the blades at 1500 with 10 minute soak and quenched in Parks 50 heated to 100 degrees. Parks 50 is fast for 52100 so I didn't heat it as hot. I then gave the blade a quick 2hr temper at 400 degrees and left it alone. After the oven had cooled I put the blade back in brought it back up to 1500 with another 10 minute soak and repeated the quench. Then after the blade cooled to room temp I did two 2 hour temper cycles at 400. It took a razor edge and passed some cutting test with flying colors. I have read that 52100 makes a better blade when forged than stock removal, so I double quenched.

On W2 I did almost the exact same procedure with the exception of putting clay on the spine between the first and second quench. Hand sanded to 1500 grit, etched and polished with Flitz for a nice polished hamon. This was my first time using W2, it worked for me but I am sure others with more experience can tell you more. One other thing make sure to give the sanitite plenty of time to dry completely.
 
Back
Top