Trying To Dial In The San Mai

DanF

Well-Known Member
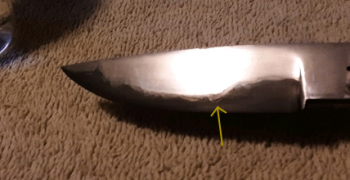
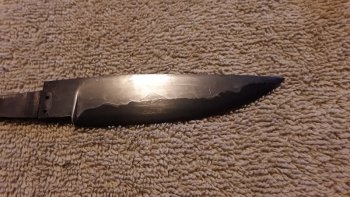
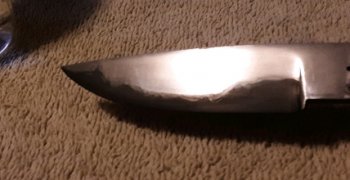
After many different recipes and etchant soak protocols, this is my best attempt. I still have a lot of work to do at the transition line where the two steels meet, but I think I'm getting there.
20190201_150358_crop_428x220.jpg
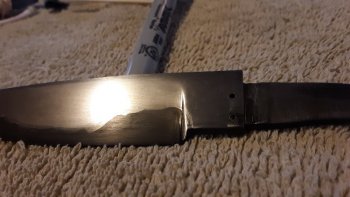
This is what I'm going for, but it still has a long way to go as every component will need much shaping and refining still.
20190201_150854_crop_508x114.jpg
1084 sandwiched between 15n20. I think I will reverse them next time.
 
Last edited:
Nice! Looks like there is some minor delam between the layers.

You grinding all the sides nice and clean and fluxing before it gets hot enough to form any scale?
 
No delam anywhere, that is fingernail polish left over from the protective coat applied to the outer layer. Like I mentioned, needs more cleanup, waiting for fingernail polish remover to get here tonight, denatured alcohol makes for a lot more work and I'm out of acetone.
 
Oh okay. Sorry. Looked like there was a little gap there. Hard to tell.


That is what I was looking at
sanmai1.png
 
I really like it. I have been trying to dial in the San-Mai too but I have not thought of using acid resist on the outer layers. The first one I tried was Mild steel and 1095 and for some reason the 1095 etched just like the mild steel did. I am wondering if it is the batch i got because I made two Nakiris for a customer and they wanted a hamon. When I etched the 1095 it did not etch like I am used to. even though the steel is hard it is not etching dark like I am used to so I am not sure what is going on. The second San-Mai I tried was mild steel and 1084 but I have yet to etch it as I am still grinding. The etch I did to see if the core was centered seemed to etch much darker than the mild steel so we will see tomorrow. Crap, I am hooked on San-Mai now too.
 
@Chris R, I think the nickel in the 15n20 gives a better show coupled with the 10xx. I base that on results I had with simple, low layer levels of pattern steel (not enough layers to call it damascus).
 
Last edited:
You grinding all the sides nice and clean and fluxing before it gets hot enough to form any scale?

Flux free weld, I like it better than flux, less mess, don't have to worry about eating up the forge's soft bricks.
 
I see. Yeah can't help you there much. Never tried it without flux. My welding forge I use for damascus is solid 3" thick castable all the way around so flux doesn't do much to it. Oddly enough, my first 15-20 knives were all san mai neck knives. I was just blacksmithing but got inspired by murray carter's stuff and so most of my first knives were in a similar style to his. They were all 1095 core with A36 on the outside. I got hooked and basically switched completely to knives.
 
Cleaned up a the transition area a bit, the area previously mentioned was a bit of fingernail polish that had raised slightly from trying to remove it with denatured alcohol. Still needs more cleaning 20190202_100042-800x450.jpg

Opposite side with finger nail polish still in place.
20190202_095824-800x450.jpg

2X5 min etch with FeCl, clean well with windex and dawn original.
800 grit sand only the outside layer (the etchant shows the line), once the outside layer is where you want it, coat with cheap, clear fingernail polish. Let dry at least an hour then into coffee etchant. I left in coffee 2 hours.
 
Dan - I like the looks of that San Mai! To save a bit of money on my practice billets I used some scrap mild steel sheet I had on hand so the only thing I had to pay for was the 15N20 or 1095 core. I've used both and it seems like the 1095 etched darker than did the 15N20. I've got more work to do with my San Mai to get core better centered after grinding so the line between core and outer layer will be more even on both sides of finished blade.

Won't that FFG you've got make the transition line between core and outer layer be higher up the blade then if you used a bevel only perhaps half way up the blade?

Good work! I'm learning as ya'll post results - thanks to you Dan and Chris both. I also dry weld by welding all the way around billet to seal.
 
Ken, if I'm not mistaken 1095 and 1084 "should" etch darker than 15n20, given the same etch treatment (at least that is what I have heard/read).
You can also "layer" in visual effects (lighter and darker lines), at the transition line for more visual appeal. With stainless, you control the visual effect in different ways (carbon migration, differing dies on a press, etc.).
This blade is a combination of flat and convex grind to control the height of the transition line (hard to see in the pic).
It is a learning experience I am enjoying.
 
Yeah, it's the nickel in 15n20 that helps keep it resist the etch.

That's looking pretty slick! For some reason I never etched my San Mai blades. Though I used to put a thin piece of pure nickel on either side of the core. The nickel would look slightly gold tinted after it was hand sanded. Gave a cool effect woth the gold line running down the edge. Still wish I would have etched some of them, haha.
 
How thick was the nickel strip you used? I've got some thin .008" thick nickel ordered to try. Do you think that will be thick enough to do show up?
 
Hey Ken, I have a big roll of Nickel 200 that is 0.020". I just cut strips out of it with tin snips. That said, IIRC at the time, I was using 1/4" thick core and 1/4" thick sides. Then just smushed all that down. So that 8 thou might work depending on what you start with. This nickle always seemed to act a little weird to me. Always looked like it wasn't welded on the edge. So I'd smush it down a bit then go back and grind around the edges.

Did some deep digging to try to find a picture of one of the knives from back then. Finally found one... just so you know what I was talking about. It wasn't as gold-colored as brass but had a subtle gold tint to it. Hard to see the gold tint in the picture but you could tell in person.

This one was dated June of 2013 :D
2013NeckKnifezr.jpg
 
Last edited:
Hey Ken, I have a big roll of Nickel 200 that is 0.020". I just cut strips out of it with tin snips. That said, IIRC at the time, I was using 1/4" thick core and 1/4" thick sides. Then just smushed all that down. So that 8 thou might work depending on what you start with. This nickle always seemed to act a little weird to me. Always looked like it wasn't welded on the edge. So I'd smush it down a bit then go back and grind around the edges.

Did some deep digging to try to find a picture of one of the knives from back then. Finally found one... just so you know what I was talking about. It wasn't as gold-colored as brass but had a subtle gold tint to it. Hard to see the gold tint in the picture but you could tell in person.

This one was dated June of 2013 :D
View attachment 67414
Yep, thats cool.
 
.020" nickel strip sure does look good in that photo - even without etching it makes the forged edge really show up. Your core is exactly what I'm striving for with that type of strip of core showing on both sides.

Since I'll be using something on the order of .060 to .090" for core and perhaps 3/16" for outer layer my .008" nickel might work pretty good. I've got two strips of 416 SS measures .110" each and a .095" strip of 15N20 for the core. These are 1" wide and hope to draw them out so they're around 1/8" finished thickness after grinding. I hope to try this either tomorrow or next day.

Ken H>
 
Back
Top